

These Pumpkin Pie Cookies are my fall take on one of the best holiday desserts. They have buttery cookie cups with creamy pumpkin pie filling and plenty of warm pumpkin spice flavor.

My Pumpkin Pie Cookies recipe starts by mixing a soft buttery cookie dough with brown sugar and vanilla. The dough is then shaped into little cups before they are filled with smooth pumpkin filling and baked until the edges are lightly browned. If you are building a complete holiday menu then try our Roast Turkey before serving these cookies for dessert.
The other key to these Pumpkin Pie Cookies is the creamy pumpkin center. Not only does it have real pumpkin but it also has brown sugar and pumpkin pie spice and vanilla. Every component of these Pumpkin Pie Cookies is flavorful on its own which means the whole thing is ridiculously good.
Ingredients
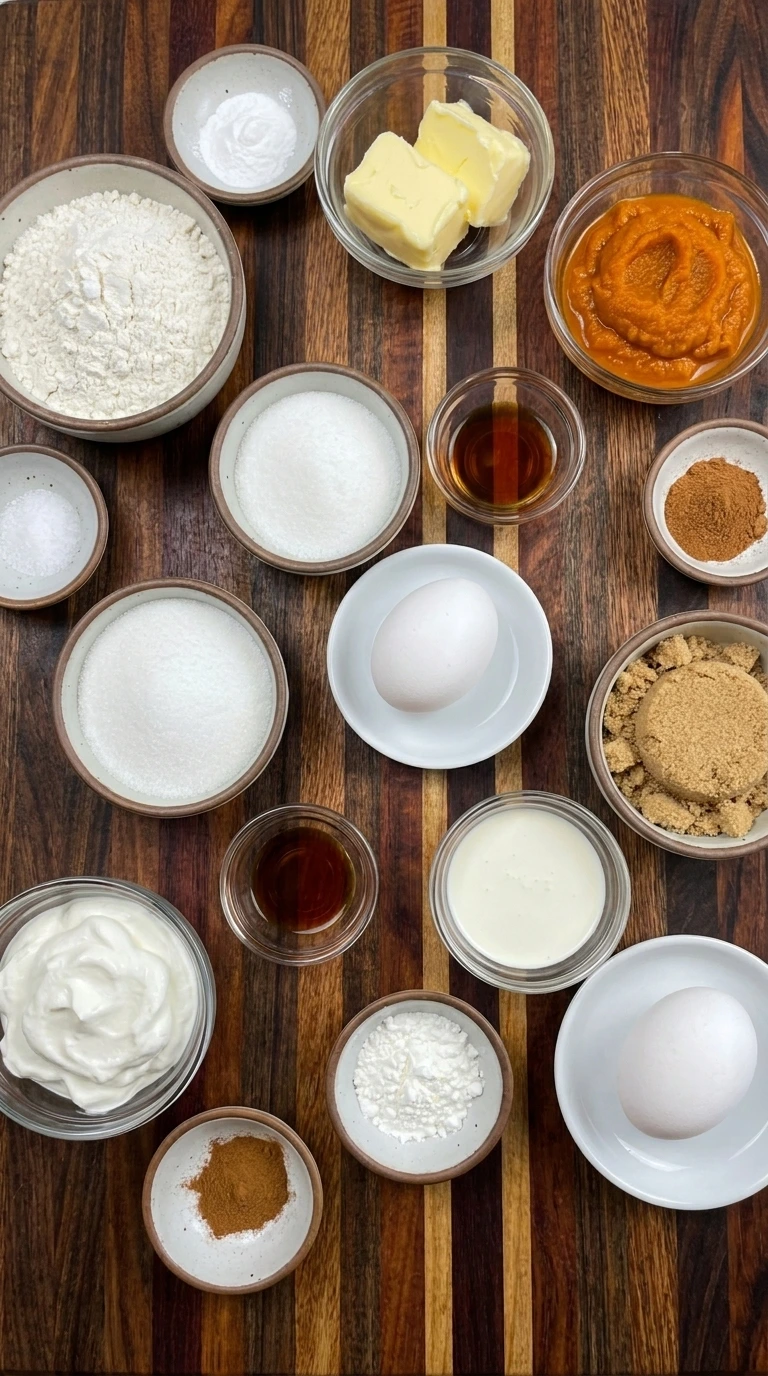
Here is what I use for this recipe :
- All-purpose flour: Provides the main structure for the buttery cookie cups and keeps them sturdy enough to hold the pumpkin filling.
- Baking powder: Adds a gentle lift so the cookie base stays tender instead of becoming overly dense.
- Fine salt: Balances the sweetness and strengthens the buttery vanilla flavor in the cookie dough.
- Unsalted butter: Creates richness and a soft crumb while helping the cookie edges develop light golden browning.
- Granulated sugar: Sweetens the cookie dough and encourages lightly crisp golden edges during baking.
- Large egg: Binds the cookie dough together and adds moisture so the shaped cups hold their structure.
- Vanilla extract: Adds warm aromatic flavor to the cookie dough and complements the pumpkin spice filling.
- Pumpkin puree: Forms the creamy center and provides the classic pumpkin flavor and soft custard-like texture.
- Light brown sugar: Sweetens the pumpkin filling while adding mild caramel notes that deepen the fall flavor.
- Large egg: Sets the pumpkin filling as it bakes so the center becomes soft and creamy without remaining runny.
- Heavy cream: Adds richness to the pumpkin mixture and helps create a smooth pie-like center.
- Cornstarch: Thickens the pumpkin filling and helps it stay neatly inside each cookie cup after cooling.
- Pumpkin pie spice: Provides cinnamon-forward warmth and classic autumn spice throughout the pumpkin filling.
- Vanilla extract: Rounds out the pumpkin filling with a sweet aromatic note that softens the stronger spices.
- Prepared whipped cream: Adds a light creamy finish that echoes the traditional whipped topping served with pumpkin pie.
- Ground cinnamon: Adds a final warm spice accent and a natural dusting of color over the finished cookies.
Tools I Use :
- Large mixing bowl: Provides enough room to combine the butter and sugar with the remaining cookie dough ingredients without crowding.
- Medium mixing bowl: Holds the pumpkin filling ingredients while they are blended into a smooth and evenly spiced mixture.
- 12-cup muffin tin: Supports the cookie dough as it bakes into defined cup shapes that securely hold the pumpkin filling.
- Measuring cups and spoons: Ensure accurate proportions for the dough and pumpkin filling so both components bake with the intended texture.
- Cooling rack: Allows air to circulate around the baked cookies so the shells cool without becoming overly soft underneath.
Instructions
Step 1: Mix the buttery cookie dough
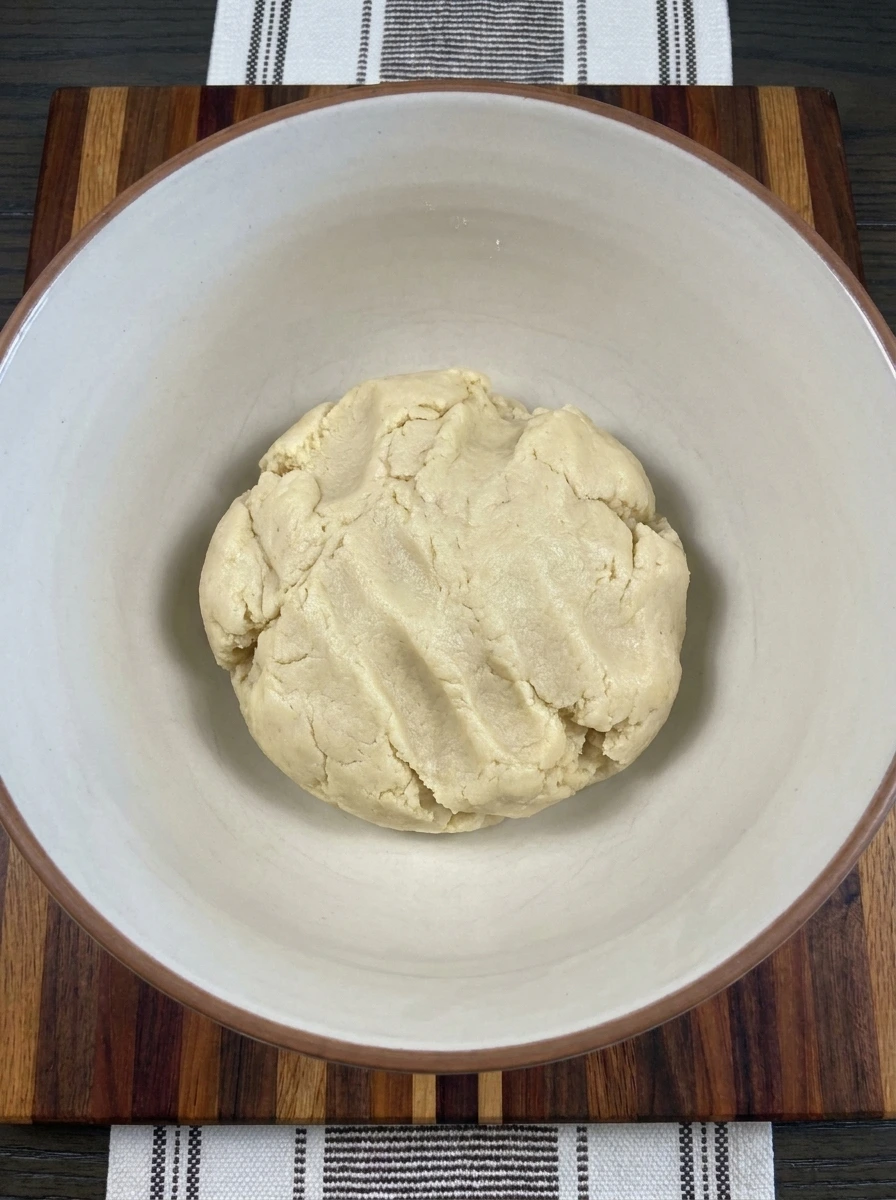
Combine the softened butter with granulated sugar until the mixture changes into a pale creamy base. Add one egg and vanilla before folding in the flour with baking powder and salt until a soft dough forms. The finished dough should look thick and slightly uneven rather than perfectly smooth. Small ridges and soft folds should remain visible throughout the mixture.
Tip: Stop mixing as soon as the flour disappears because overworking the dough can make the baked cookie cups firmer than desired.
Step 2: Shape twelve cookie cups
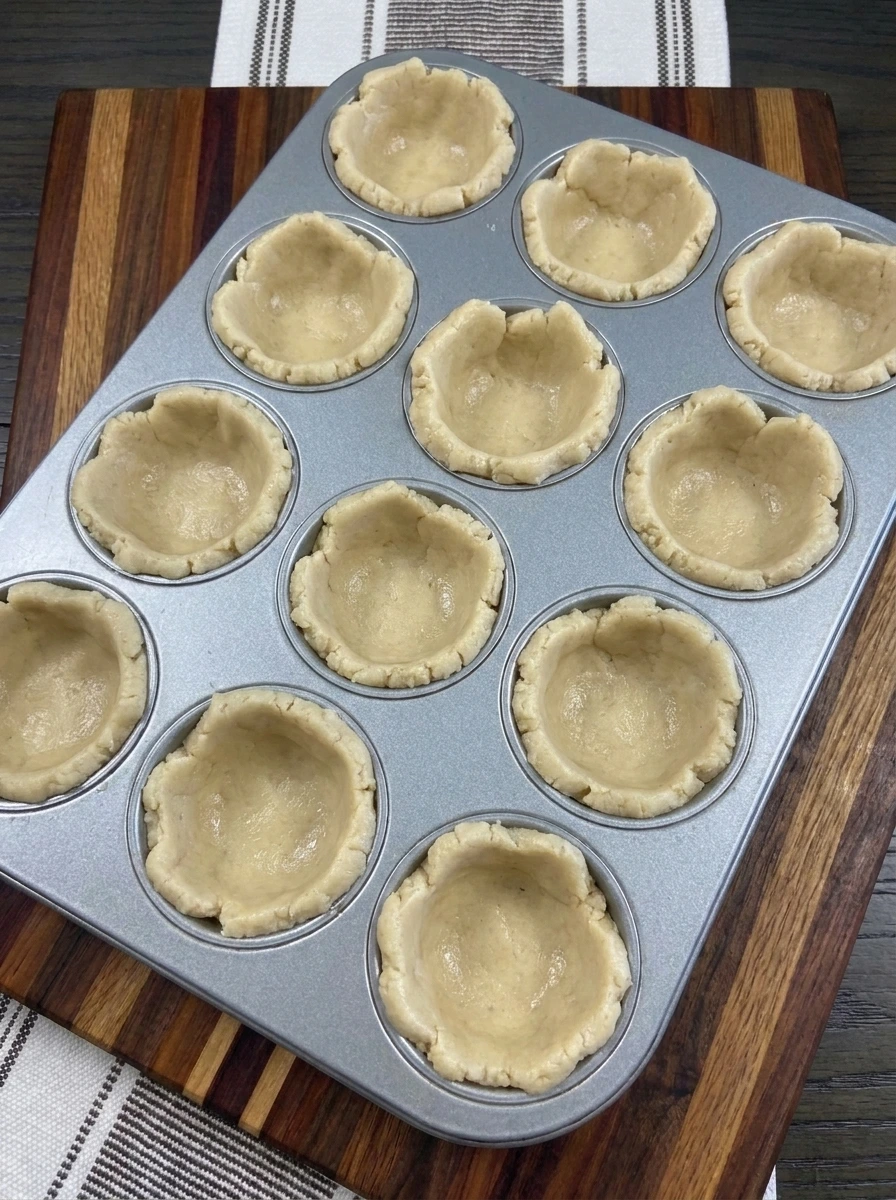
Divide the cookie dough into twelve portions and press each portion into a muffin cavity so the dough rises slightly around the sides. Leave the edges naturally uneven so every cookie cup has a homemade shape. The dough now changes from one soft mass into twelve individual shells. Each center should have a visible hollow while the rims remain slightly thicker and irregular.
Tip: Keep the cookie cup bottoms slightly thicker than the sides so they support the pumpkin filling without becoming fragile.
Step 3: Mix the pumpkin pie filling

Combine the pumpkin puree with brown sugar and one egg and heavy cream and cornstarch and pumpkin pie spice and vanilla. Mix until the separate ingredients become one thick orange filling with a creamy consistency. The pumpkin mixture should look smooth overall while still showing subtle natural streaks and tiny spice flecks. It should be thick enough to settle slowly rather than spreading like a thin liquid.
Tip: Mix only until the filling looks evenly blended because excessive mixing can introduce extra air and cause uneven puffing.
Step 4: Fill the cookie cups

Divide the pumpkin mixture among all twelve shaped cookie cups until each hollow center is nearly full. Let the filling settle naturally so some surfaces sit slightly higher than others. The pale shells now surround distinct orange centers and create the first clear pumpkin pie appearance. Keep a visible border of cookie dough around every portion so the filling does not completely cover the dough.
Tip: Leave a little space below each cookie rim because the pumpkin filling expands slightly while baking and settles again as it cools.
Step 5: Bake until lightly golden

Bake the twelve filled cookie cups until the dough changes from pale beige to lightly golden around the uneven edges. The pumpkin centers should become visibly set while retaining a soft surface with gentle dips and slight color variation. The cookies should look homemade with some rims browning more deeply than others. The filling may puff slightly before settling into soft pie-like centers as the cookies cool.
Tip: Remove the cookies when the centers are set with a slight softness because continued heat from the pan finishes the filling as they cool.
Step 6: Top and serve one cookie

Transfer one cooled Pumpkin Pie Cookie to a white plate and cut it into two uneven halves so the soft pumpkin center and baked cookie shell are visible. Add a small swirl of whipped cream over the portion and finish with a light cinnamon dusting. The final serving should show a lightly browned crumb around the outside and a creamy orange center inside. Keep the whipped cream naturally swirled and slightly irregular so the cookie looks homemade rather than commercially styled.
Tip: Cool the cookies fully before topping them so the whipped cream holds its shape and the pumpkin center slices cleanly.
Pro Tips
- Use pure pumpkin puree instead of pumpkin pie filling so you can control the sweetness and spice level of the centers.
- Press the dough slightly thicker across the bottom of every cup so the finished cookies stay sturdy after they are removed.
- Avoid overfilling the dough cups because the pumpkin mixture expands gently during baking before settling as it cools.
- Let the cookies cool completely before adding whipped cream so the topping stays fluffy and does not melt into the filling.
Storage Instructions
Store cooled Pumpkin Pie Cookies in an airtight container in the refrigerator because the pumpkin centers contain egg and cream. They will stay fresh for about four days when kept chilled. For the best texture add the whipped cream only when you are ready to serve the cookies. This keeps the topping fluffy while preventing extra moisture from softening the cookie edges. To freeze the cookies place the cooled portions in a freezer safe container with parchment between the layers. Freeze them without whipped cream for up to two months and thaw them overnight in the refrigerator before serving.
Frequently Asked Questions
Yes. Bake them one day ahead and refrigerate them without whipped cream before adding the topping shortly before serving.
Yes. Use thick homemade puree and drain excess moisture first so the pumpkin centers set properly during baking.
The cookie rims should be lightly golden while the pumpkin centers should look set with only a gentle softness.
Yes. Freeze the cooled cookies without whipped cream in an airtight container and thaw them overnight before serving.
See You in the Kitchen
These Pumpkin Pie Cookies are a great way to satisfy your pumpkin pie cravings without making a full pie.
I typically serve them after a cozy meal like Tomato Tortellini Soup or Creamy Chicken Tortellini Soup so every part of the meal feels ready for fall.
Even my kids love this one!
Print
Pumpkin Pie Cookies
- Total Time: 43 minutes
- Yield: 12 servings
Description
These Pumpkin Pie Cookies are an easy and quick fall dessert with a simple buttery cookie base and a soft pumpkin pie center plus a swirl of whipped cream. They are one of the best holiday baking ideas for a party or potluck or brunch and they also fit meal prep when you want a cozy treat ready ahead. With real pumpkin and warm spices they bring a healthy inspired twist to classic pie flavor in a fun handheld cookie made for Thanksgiving baking days.
Ingredients
- 1 1/2 cups All-purpose flour
- 1/2 teaspoon Baking powder
- 1/4 teaspoon Fine salt
- 1/2 cup Unsalted butter
- 1/2 cup Granulated sugar
- 1 Large egg
- 1 teaspoon Vanilla extract
- 1 cup Pumpkin puree
- 1/3 cup Light brown sugar
- 1 Large egg
- 1/4 cup Heavy cream
- 1 tablespoon Cornstarch
- 1 teaspoon Pumpkin pie spice
- 1 teaspoon Vanilla extract
- 3/4 cup Prepared whipped cream
- 1/4 teaspoon Ground cinnamon
Instructions
- Combine the softened butter with granulated sugar until the mixture changes into a pale creamy base. Add one egg and vanilla before folding in the flour with baking powder and salt until a soft dough forms.
The finished dough should look thick and slightly uneven rather than perfectly smooth. Small ridges and soft folds should remain visible throughout the mixture.
- Divide the cookie dough into twelve portions and press each portion into a muffin cavity so the dough rises slightly around the sides. Leave the edges naturally uneven so every cookie cup has a homemade shape.
The dough now changes from one soft mass into twelve individual shells. Each center should have a visible hollow while the rims remain slightly thicker and irregular.
- Combine the pumpkin puree with brown sugar and one egg and heavy cream and cornstarch and pumpkin pie spice and vanilla. Mix until the separate ingredients become one thick orange filling with a creamy consistency.
The pumpkin mixture should look smooth overall while still showing subtle natural streaks and tiny spice flecks. It should be thick enough to settle slowly rather than spreading like a thin liquid.
- Divide the pumpkin mixture among all twelve shaped cookie cups until each hollow center is nearly full. Let the filling settle naturally so some surfaces sit slightly higher than others.
The pale shells now surround distinct orange centers and create the first clear pumpkin pie appearance. Keep a visible border of cookie dough around every portion so the filling does not completely cover the dough.
- Bake the twelve filled cookie cups until the dough changes from pale beige to lightly golden around the uneven edges. The pumpkin centers should become visibly set while retaining a soft surface with gentle dips and slight color variation.
The cookies should look homemade with some rims browning more deeply than others. The filling may puff slightly before settling into soft pie-like centers as the cookies cool.
- Transfer one cooled Pumpkin Pie Cookie to a white plate and cut it into two uneven halves so the soft pumpkin center and baked cookie shell are visible. Add a small swirl of whipped cream over the portion and finish with a light cinnamon dusting.
The final serving should show a lightly browned crumb around the outside and a creamy orange center inside. Keep the whipped cream naturally swirled and slightly irregular so the cookie looks homemade rather than commercially styled.
Notes
Pro Tips:
- Use pure pumpkin puree instead of pumpkin pie filling so you can control the sweetness and spice level of the centers.
- Press the dough slightly thicker across the bottom of every cup so the finished cookies stay sturdy after they are removed.
- Avoid overfilling the dough cups because the pumpkin mixture expands gently during baking before settling as it cools.
- Let the cookies cool completely before adding whipped cream so the topping stays fluffy and does not melt into the filling.
Storage: Store cooled Pumpkin Pie Cookies in an airtight container in the refrigerator because the pumpkin centers contain egg and cream. They will stay fresh for about four days when kept chilled.
For the best texture add the whipped cream only when you are ready to serve the cookies. This keeps the topping fluffy while preventing extra moisture from softening the cookie edges.
To freeze the cookies place the cooled portions in a freezer safe container with parchment between the layers. Freeze them without whipped cream for up to two months and thaw them overnight in the refrigerator before serving.
- Prep Time: 25 minutes
- Cook Time: 18 minutes
- Category: Dessert
- Cuisine: American