

Learn how to make a salt dough recipe at home for an easy and fun Christmas craft idea. Whether you are making homemade ornaments for a big holiday celebration or creating keepsakes with your family on a cozy winter afternoon this recipe makes it so easy.
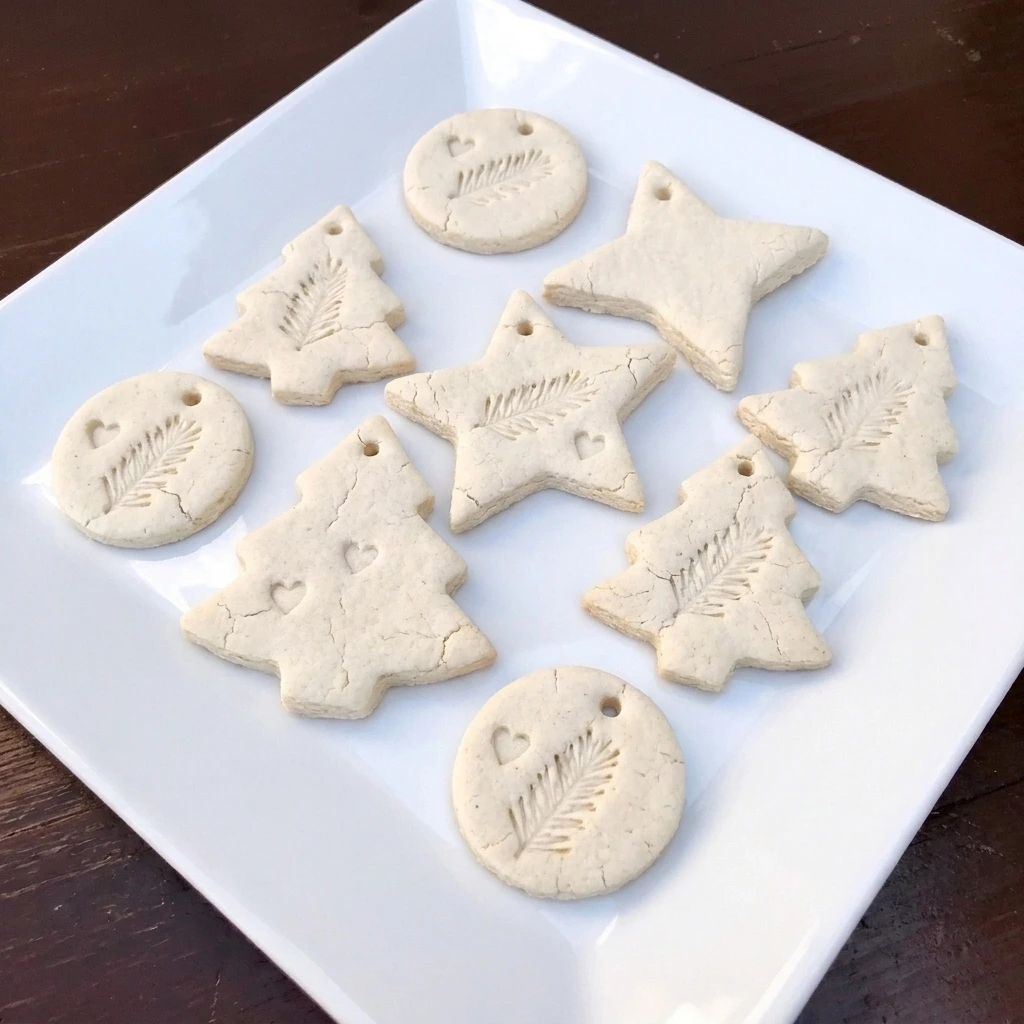
Being a mom of 3 I have become an expert at finding simple activities that keep little hands busy during the holidays. With this easy salt dough recipe my Christmas crafting just got easier. With only minutes of prep work you will have the dough ready for rolling and shaping in no time. The results are smooth and sturdy ornaments that are perfect for decorating and giving as thoughtful homemade gifts.
I especially love planning a little holiday baking and crafting afternoon because the kids get so excited about making something themselves. While our ornaments are drying we can enjoy a homemade treat like Gingerbread Pizza for an extra festive family activity. The best part is that this simple dough uses ingredients you probably already have in your kitchen and creates memories that last much longer than the holiday season.
Ingredients
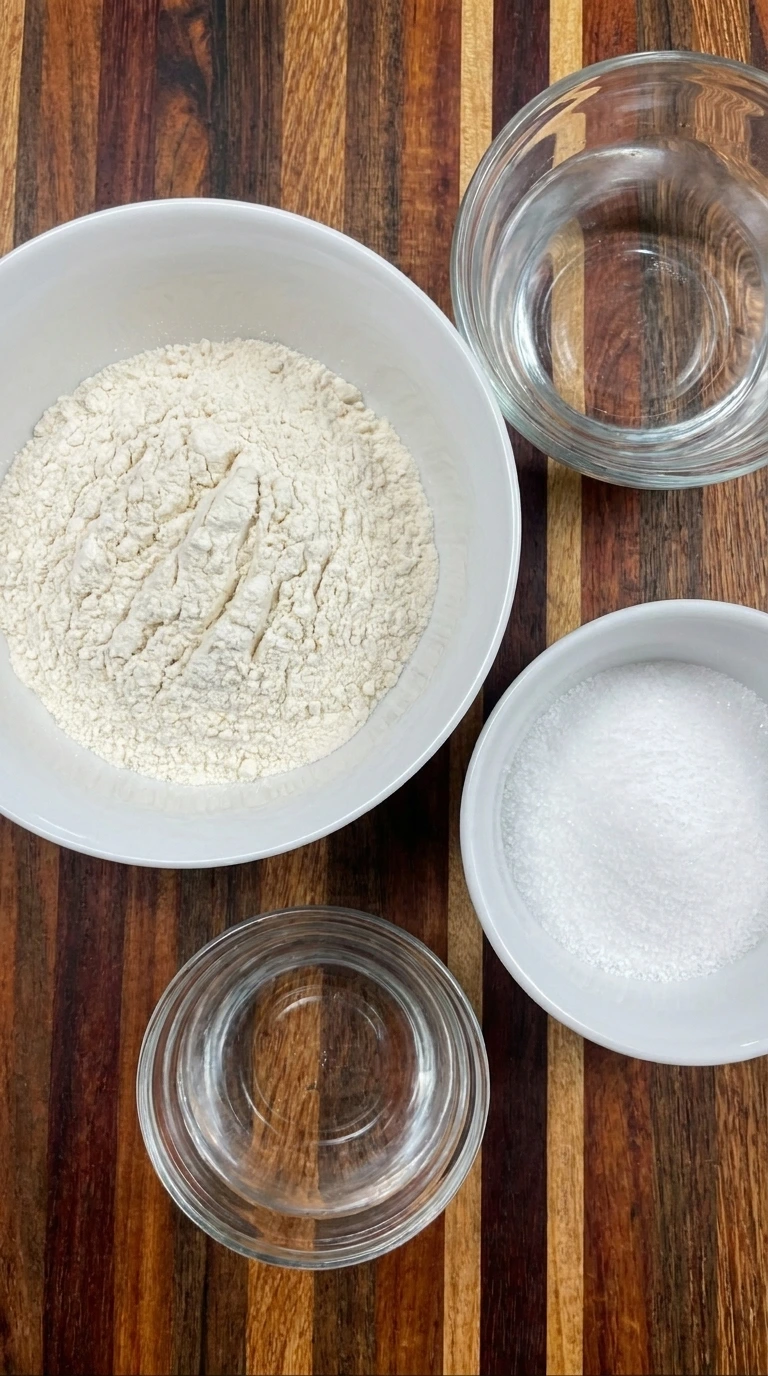
Here is what I use for this recipe :
- All-purpose flour: Provides the main structure of the dough and combines with the salt and water to form a smooth mixture that can be rolled and shaped into Christmas ornaments.
- Fine table salt: Helps create the firm texture needed for durable decorative ornaments and supports the drying process while keeping the finished shapes sturdy.
- Warm water: Hydrates the flour and salt while allowing the ingredients to come together into a flexible dough that can be kneaded and rolled without excessive cracking.
Tools I Use :
- Large mixing bowl: Holds the flour and salt during mixing and provides enough space for adding water and bringing the dough together.
- Measuring cups: Measure the flour and salt and water to maintain the correct dough consistency.
- Mixing spoon: Combines the dry ingredients and incorporates water until a rough dough forms.
- Rolling pin: Flattens the dough into a sheet of reasonably consistent thickness for cutting ornaments.
- Wooden cutting board: Provides a sturdy work area for rolling and cutting the soft dough.
- Christmas cookie cutters: Cut the flattened dough into decorative stars and trees and circles or other festive shapes.
- Drinking straw: Creates small hanging holes in the soft ornaments before they are dried.
- Baking sheet: Supports the shaped ornaments while they slowly dry inside the oven.
- Parchment paper: Lines the baking sheet to help prevent the soft ornaments from sticking during drying.
- Oven: Provides gentle heat that removes moisture from the ornaments and makes them firm enough to decorate and display.
- White display plate: Holds one finished ornament for a detailed decorative presentation after the ornament has completely cooled.
Instructions
Step 1: Combine the flour and salt
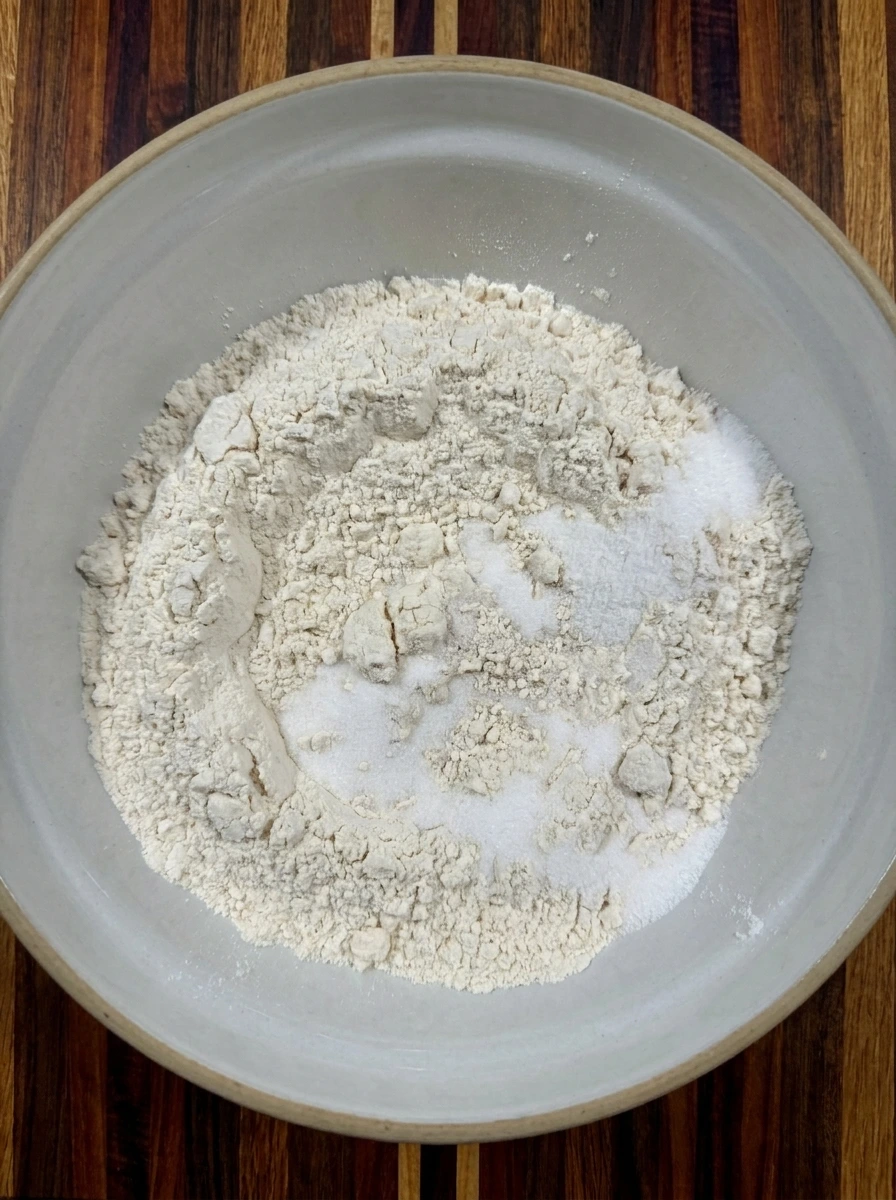
Add 2 cups of all-purpose flour to a large mixing bowl. Pour 1 cup of fine table salt over the flour and stir until the two dry ingredients are evenly distributed. The mixture should look powdery and pale with a slightly grainy texture from the salt. Make sure the salt is mixed throughout the flour rather than sitting in one large pile. This helps the finished dough develop a more consistent texture when you add the water.
Tip: Fine table salt works best because its small grains blend more evenly into the flour and help create smoother ornaments.
Step 2: Add warm water and knead the dough
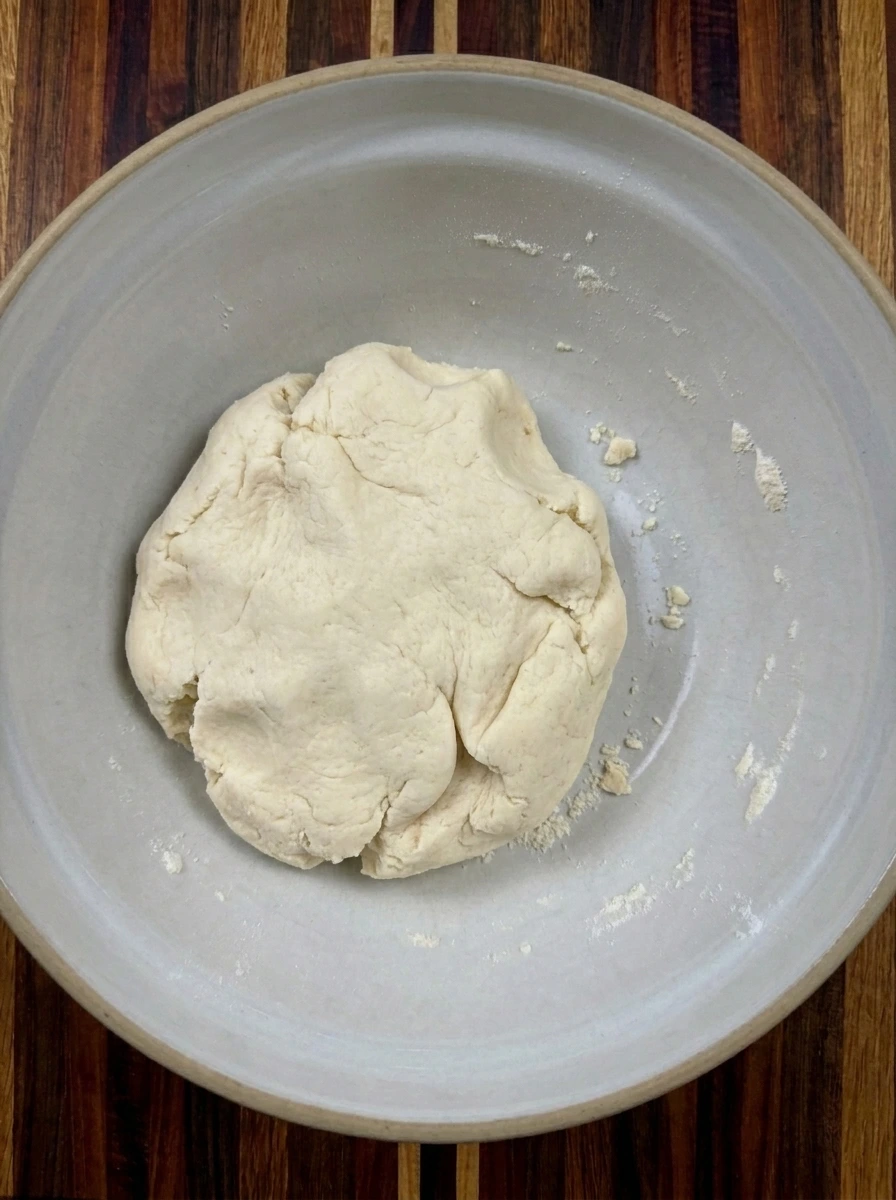
Gradually pour 3/4 cup of warm water into the flour and salt mixture while stirring. The dry ingredients will begin forming small clumps and eventually gather into a rough dough. If dry flour remains after thorough mixing add extra water one tablespoon at a time until the mixture holds together. Knead the dough for about 5 to 7 minutes until it becomes smooth and flexible. The finished dough should hold its shape without sticking heavily to your hands. If it feels sticky work in a small amount of extra flour from your pantry until the texture is easy to handle. The dough should look soft and slightly rustic with a few natural creases rather than perfectly smooth like commercial modeling clay.
Tip: Add water slowly because different flour brands absorb moisture differently and too much water can make the dough sticky.
Step 3: Roll the dough into an even sheet
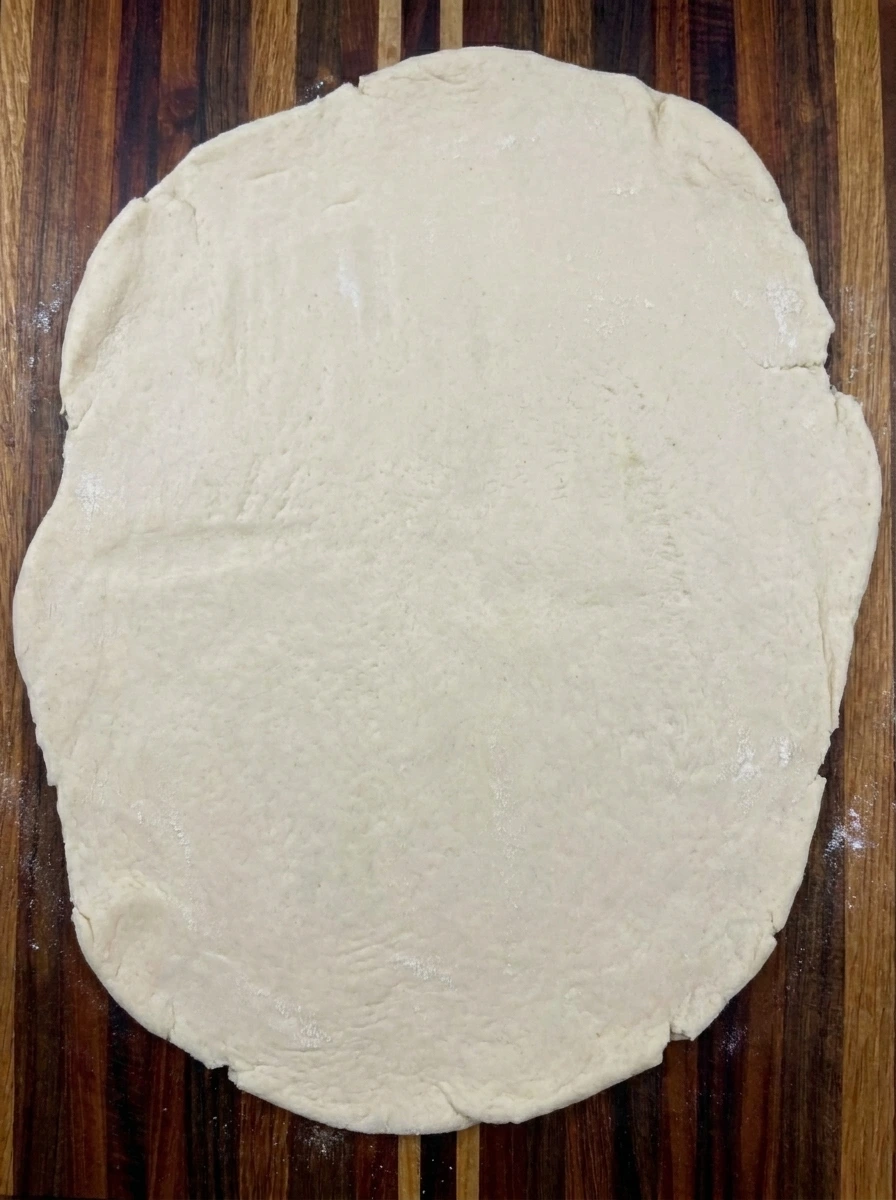
Transfer the dough from the mixing bowl to a lightly floured wooden cutting board. Flatten the ball with your hands and roll it into a sheet about 1/4 inch thick. Try to keep the thickness reasonably consistent so the ornaments dry at similar rates. The sheet does not need perfectly straight edges because the shapes will be cut from the center. Natural curves and small surface marks are completely normal for homemade salt dough.
Tip: Keep the dough close to 1/4 inch thick because thicker ornaments take longer to dry and are more likely to crack.
Step 4: Cut the Christmas ornament shapes
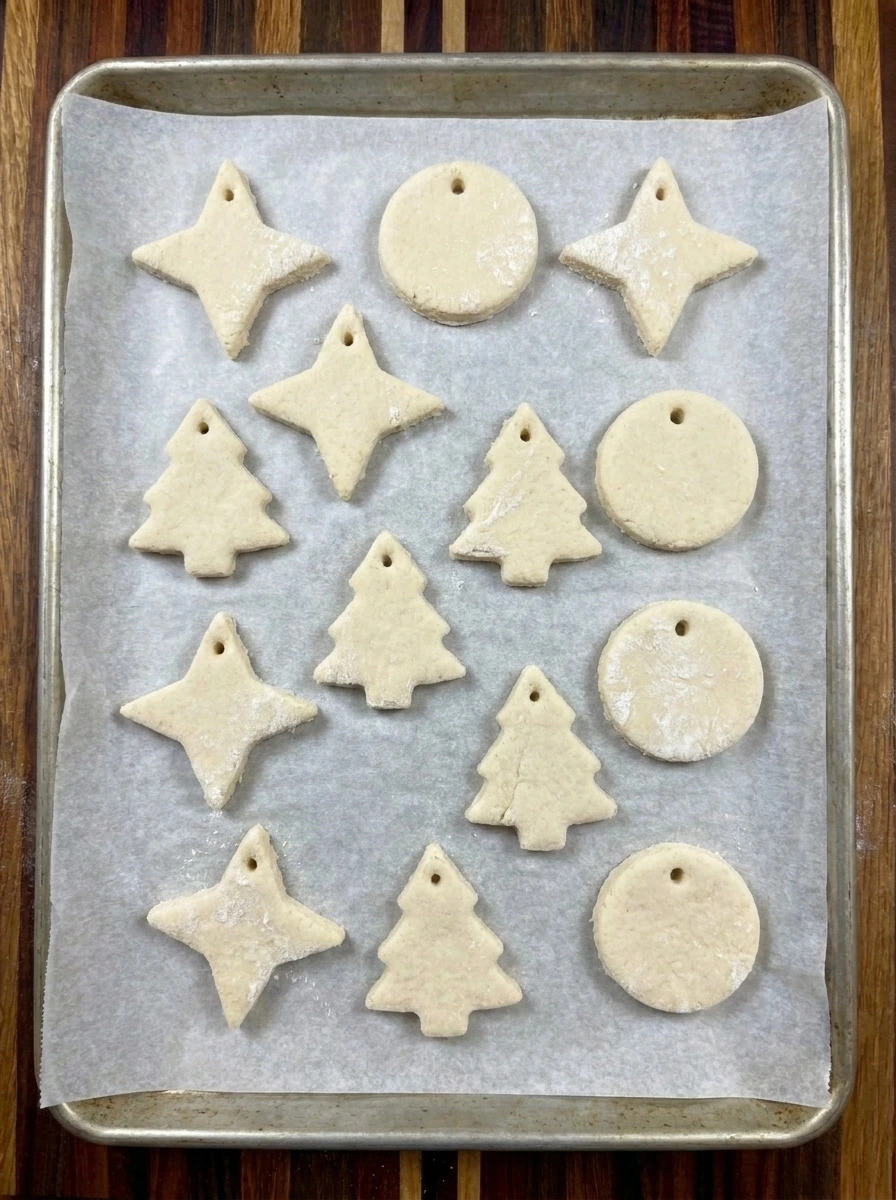
Cut the rolled dough into approximately 12 ornaments using your favorite Christmas cookie cutters. Stars and Christmas trees and circles are all great choices. Gather the leftover pieces and gently reroll them so you can make additional shapes if needed. Create a small hanging hole near the top of each ornament using a drinking straw or another suitable tool. Keep the holes far enough from the edges to prevent the ornaments from breaking when you add ribbon later. Arrange the shapes on a parchment-lined baking sheet with a little space between each ornament. The pieces should have slight handmade imperfections and different decorative outlines while remaining about 1/4 inch thick.
Tip: Make hanging holes before baking because dried salt dough becomes hard and may crack if you try to pierce it afterward.
Step 5: Bake until the ornaments are completely dry
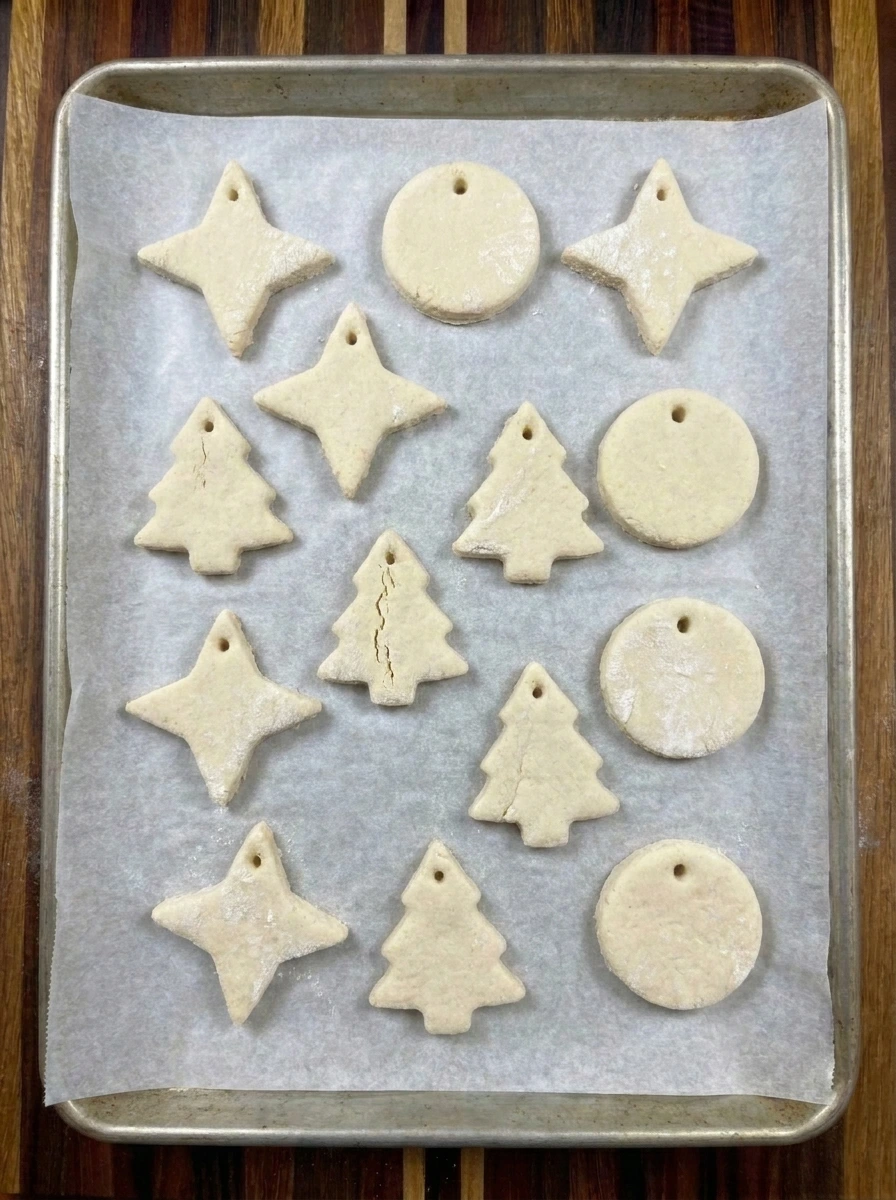
Preheat the oven to 200°F or 95°C. Place the baking sheet on the middle rack and bake the salt dough ornaments for approximately 2 hours or until they are completely dry and firm. Thicker shapes may need additional time while thinner pieces can finish earlier. The ornaments should remain mostly pale rather than turning deeply golden. Check that the centers and undersides feel dry and firm before removing the tray. If necessary turn the ornaments carefully and continue drying them until no soft areas remain. Allow the ornaments to cool completely on the baking sheet before handling them. Their surfaces should feel solid and slightly rough with small natural variations that make each ornament unique.
Tip: Use low oven heat and allow extra drying time when needed because high temperatures can cause salt dough to puff or brown.
Step 6: Display a finished homemade ornament
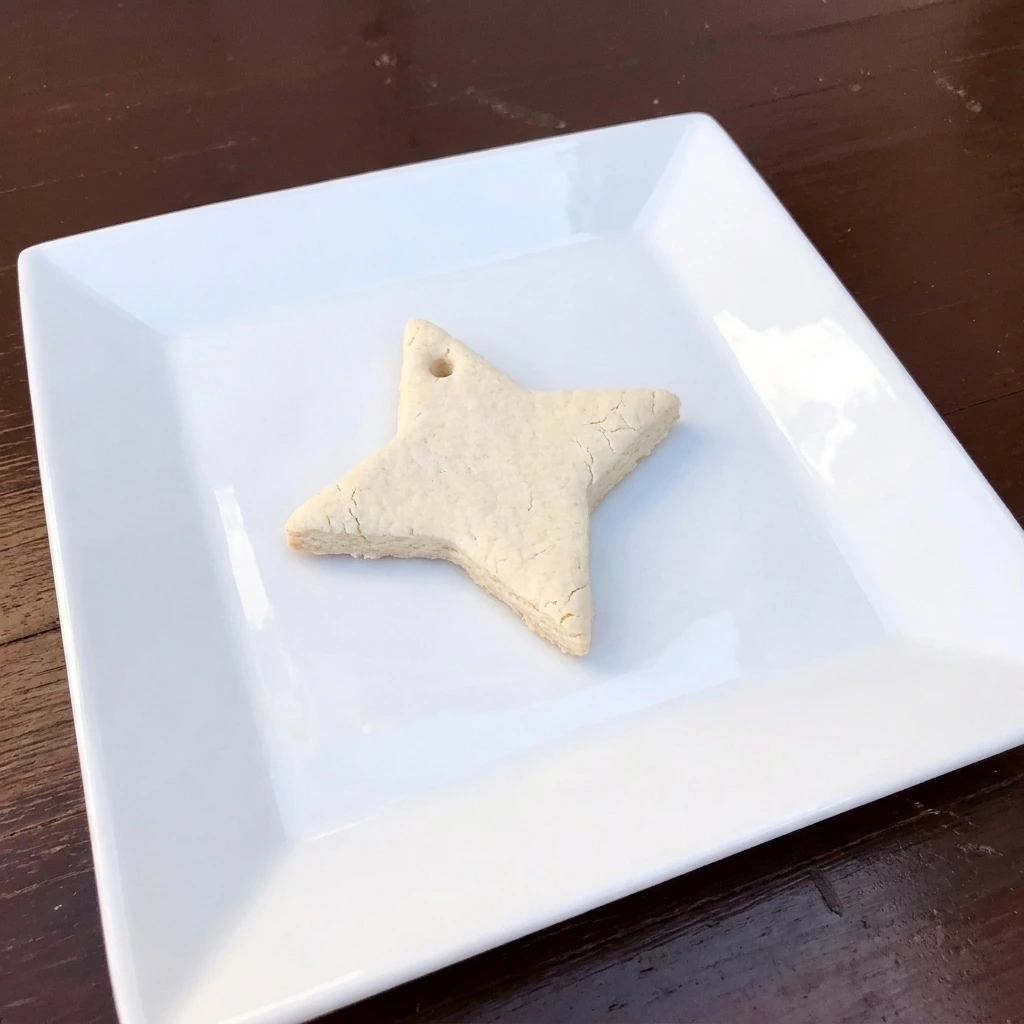
Choose one completely cooled ornament and transfer it to a clean white plate to admire its handmade finish. A star ornament makes a lovely example because its defined edges and slightly rough texture show how the dough changes during baking. Once the ornaments are fully cooled and dried you can decorate them separately with craft paint and add ribbon through the hanging holes. If you paint them allow the paint to dry completely and use a suitable clear craft sealer according to its instructions before storing or displaying your keepsakes.
Tip: Let the ornaments cool fully before painting because leftover warmth or moisture can interfere with the decorative finish.
Pro Tips
- Always measure your flour and salt carefully because the right balance helps create sturdy ornaments without excessive cracking.
- Knead the dough until it feels flexible and smooth because a crumbly mixture can break when you cut small Christmas shapes.
- Roll every ornament to approximately the same thickness so the pieces dry evenly and maintain their handmade shapes.
- Store completely dried ornaments away from moisture and consider sealing them after decorating to help preserve your keepsakes.
Storage Instructions
Store unbaked salt dough in an airtight container or tightly wrapped in reusable food-safe wrap inside the refrigerator for up to 24 hours. The dough may become slightly sticky or dry during storage so knead it briefly before rolling. Keep the craft dough clearly labeled and separate from edible foods. Once the ornaments are fully baked allow them to cool completely before storing. Any remaining moisture can cause soft spots or deterioration over time. If an ornament still feels flexible in the center return it to a low oven for additional drying before putting it away.
For finished ornaments consider decorating with acrylic craft paint and applying a suitable clear sealant once all surfaces are completely dry. Follow the manufacturer’s instructions and seal all sides when appropriate. Sealing can improve resistance to humidity but does not make salt dough fully waterproof. Wrap dried ornaments individually in tissue paper and place them inside a sturdy storage box. Keep the box in a cool and dry indoor location away from bathrooms and damp storage spaces.
Properly dried and protected ornaments can often last for several holiday seasons. Salt dough ornaments are not edible and should never be used as pet treats or left where young children or animals could swallow them. The high concentration of salt can cause serious poisoning especially in dogs. Supervise children during crafting and store all pieces securely.
Frequently Asked Questions
Yes you can air dry the shapes for several days in a dry area while turning them occasionally until completely firm.
Most ornaments need about two hours at 200°F although thicker pieces may require additional drying time.
Cracks can develop when the dough is too dry or the oven is too hot so add water slowly and use gentle heat.
No this dough is strictly for crafts because its high salt content can be harmful if swallowed by people or pets.
See You in the Kitchen
This salt dough recipe is a great way to enjoy homemade Christmas crafts without spending a lot of money on store-bought decorations.
I typically plan a festive family afternoon with Christmas Bruschetta Wreath and Gingerbread Pizza while our ornaments are drying so all of our holiday activities feel extra special.
Even my kids love this one!
Print
salt dough recipe
- Total Time: 2 hours 45 minutes
- Yield: 12 servings
Description
This easy salt dough recipe is one of the best Christmas craft ideas for making homemade ornaments with kids. With just three simple pantry ingredients and quick hands-on preparation you can create beautiful holiday decorations and personalized keepsakes. This fun activity is perfect for Christmas parties and family craft afternoons and winter weekends. It offers a healthy alternative to screen time while helping little hands practice creativity and make special memories together.
Ingredients
- 2 cups (240 g) All-purpose flour
- 1 cup (approximately 288 g) Fine table salt
- 3/4 cup (180 ml) plus up to 1/4 cup (60 ml) as needed Warm water
Instructions
- Add 2 cups of all-purpose flour to a large mixing bowl. Pour 1 cup of fine table salt over the flour and stir until the two dry ingredients are evenly distributed. The mixture should look powdery and pale with a slightly grainy texture from the salt.
Make sure the salt is mixed throughout the flour rather than sitting in one large pile. This helps the finished dough develop a more consistent texture when you add the water.
- Gradually pour 3/4 cup of warm water into the flour and salt mixture while stirring. The dry ingredients will begin forming small clumps and eventually gather into a rough dough. If dry flour remains after thorough mixing add extra water one tablespoon at a time until the mixture holds together.
Knead the dough for about 5 to 7 minutes until it becomes smooth and flexible. The finished dough should hold its shape without sticking heavily to your hands. If it feels sticky work in a small amount of extra flour from your pantry until the texture is easy to handle.
The dough should look soft and slightly rustic with a few natural creases rather than perfectly smooth like commercial modeling clay.
- Transfer the dough from the mixing bowl to a lightly floured wooden cutting board. Flatten the ball with your hands and roll it into a sheet about 1/4 inch thick. Try to keep the thickness reasonably consistent so the ornaments dry at similar rates.
The sheet does not need perfectly straight edges because the shapes will be cut from the center. Natural curves and small surface marks are completely normal for homemade salt dough.
- Cut the rolled dough into approximately 12 ornaments using your favorite Christmas cookie cutters. Stars and Christmas trees and circles are all great choices. Gather the leftover pieces and gently reroll them so you can make additional shapes if needed.
Create a small hanging hole near the top of each ornament using a drinking straw or another suitable tool. Keep the holes far enough from the edges to prevent the ornaments from breaking when you add ribbon later.
Arrange the shapes on a parchment-lined baking sheet with a little space between each ornament. The pieces should have slight handmade imperfections and different decorative outlines while remaining about 1/4 inch thick.
- Preheat the oven to 200°F or 95°C. Place the baking sheet on the middle rack and bake the salt dough ornaments for approximately 2 hours or until they are completely dry and firm. Thicker shapes may need additional time while thinner pieces can finish earlier.
The ornaments should remain mostly pale rather than turning deeply golden. Check that the centers and undersides feel dry and firm before removing the tray. If necessary turn the ornaments carefully and continue drying them until no soft areas remain.
Allow the ornaments to cool completely on the baking sheet before handling them. Their surfaces should feel solid and slightly rough with small natural variations that make each ornament unique.
- Choose one completely cooled ornament and transfer it to a clean white plate to admire its handmade finish. A star ornament makes a lovely example because its defined edges and slightly rough texture show how the dough changes during baking.
Once the ornaments are fully cooled and dried you can decorate them separately with craft paint and add ribbon through the hanging holes. If you paint them allow the paint to dry completely and use a suitable clear craft sealer according to its instructions before storing or displaying your keepsakes.
Notes
Pro Tips:
- Always measure your flour and salt carefully because the right balance helps create sturdy ornaments without excessive cracking.
- Knead the dough until it feels flexible and smooth because a crumbly mixture can break when you cut small Christmas shapes.
- Roll every ornament to approximately the same thickness so the pieces dry evenly and maintain their handmade shapes.
- Store completely dried ornaments away from moisture and consider sealing them after decorating to help preserve your keepsakes.
Storage: Store unbaked salt dough in an airtight container or tightly wrapped in reusable food-safe wrap inside the refrigerator for up to 24 hours. The dough may become slightly sticky or dry during storage so knead it briefly before rolling. Keep the craft dough clearly labeled and separate from edible foods.
Once the ornaments are fully baked allow them to cool completely before storing. Any remaining moisture can cause soft spots or deterioration over time. If an ornament still feels flexible in the center return it to a low oven for additional drying before putting it away.
For finished ornaments consider decorating with acrylic craft paint and applying a suitable clear sealant once all surfaces are completely dry. Follow the manufacturer’s instructions and seal all sides when appropriate. Sealing can improve resistance to humidity but does not make salt dough fully waterproof.
Wrap dried ornaments individually in tissue paper and place them inside a sturdy storage box. Keep the box in a cool and dry indoor location away from bathrooms and damp storage spaces. Properly dried and protected ornaments can often last for several holiday seasons.
Salt dough ornaments are not edible and should never be used as pet treats or left where young children or animals could swallow them. The high concentration of salt can cause serious poisoning especially in dogs. Supervise children during crafting and store all pieces securely.
- Prep Time: 15 minutes
- Cook Time: 2 hours
- Category: Dessert
- Cuisine: Holiday Crafts