


Learn how to make Grinch Cookies in your own kitchen for an easy and delicious Christmas treat idea. Whether you are serving cookies for a big holiday party or Christmas dessert for your family this recipe makes it so easy.
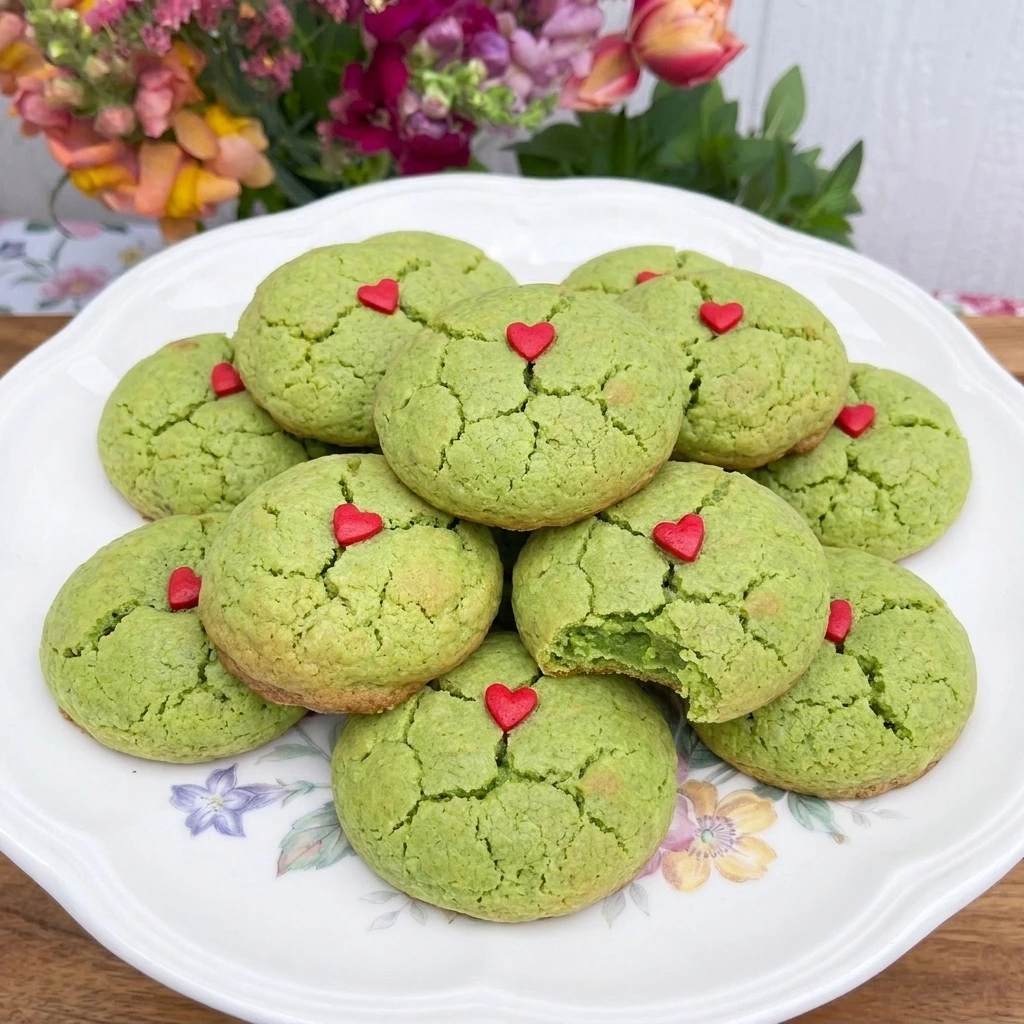
Being a mom of 3 I have become an expert at making delicious Christmas Cookie Recipes. With these Grinch Cookies my holiday baking just got easier. With only minutes of prep work you will have the cookies baking in no time. The results are soft and chewy with the perfect amount of sweetness and you get the cutest little red hearts too!
These fun green cookies are perfect for Christmas cookie exchanges and holiday dessert trays. If you love making festive treats for your family then you should also try our Cranberry Sauce Coffee Cake Muffins for another sweet holiday baking idea.
Ingredients
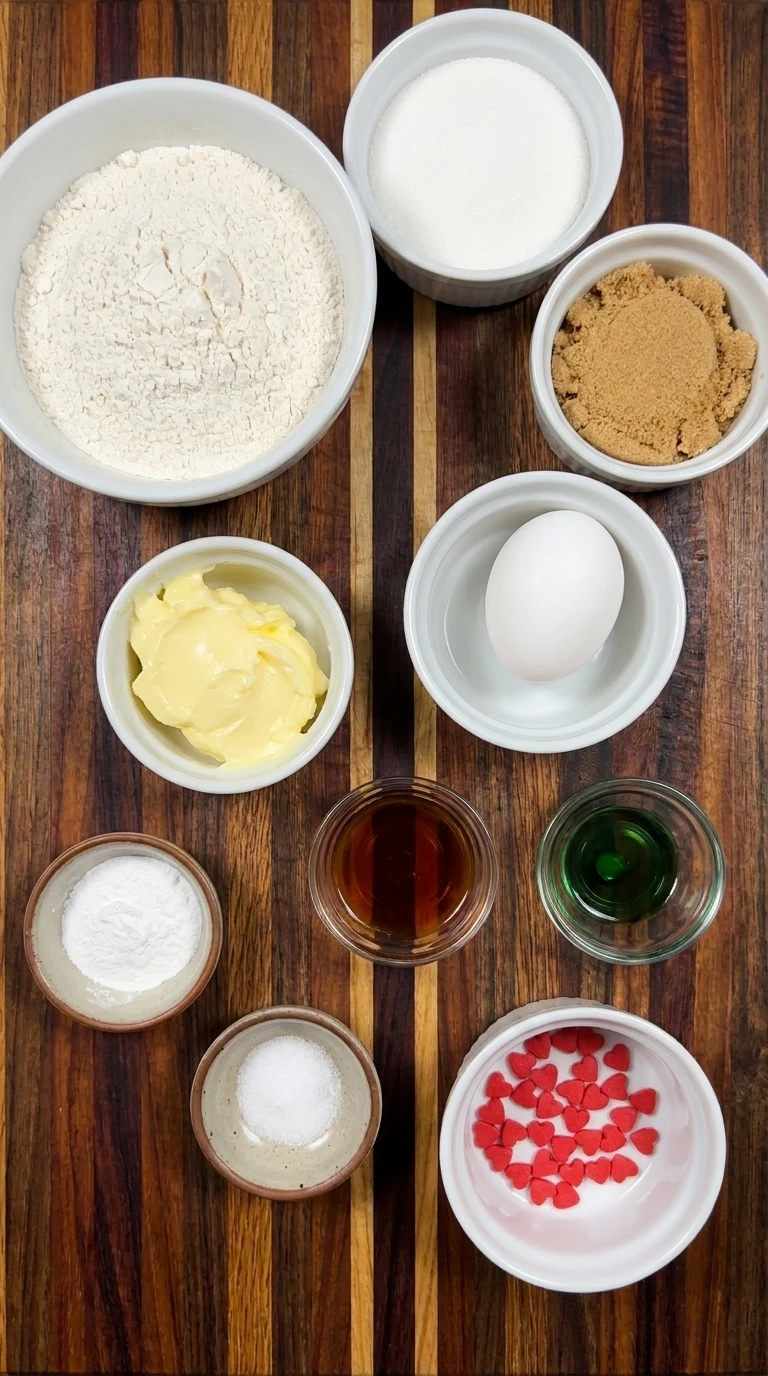
Here is what I use for this recipe :
- All-purpose flour: Provides the main structure of the cookies and helps them hold their shape while developing soft and tender centers.
- Unsalted butter: Adds rich buttery flavor and creates a tender cookie texture while allowing better control over the salt level.
- Granulated sugar: Sweetens the dough and encourages delicate crispness around the edges while keeping the centers soft.
- Light brown sugar: Adds a subtle caramel flavor and contributes moisture for a pleasantly chewy cookie texture.
- Large egg: Binds the ingredients together and adds moisture while helping the cookies maintain their structure during baking.
- Vanilla extract: Provides a warm and sweet aroma that complements the buttery sugar cookie base.
- Green gel food coloring: Creates the signature bright green Grinch appearance without adding excessive liquid to the dough.
- Baking powder: Provides gentle lift during baking and helps create tender cookies with slightly rounded surfaces.
- Fine salt: Balances the sweetness and enhances the butter and vanilla flavors.
- Red heart-shaped candy sprinkles: Adds one bright red heart to each cookie and creates the recognizable Grinch-inspired holiday decoration.
Tools I Use :
- Large mixing bowl: Holds the butter and sugars during creaming and provides enough space for incorporating the remaining cookie dough ingredients.
- Medium mixing bowl: Allows the flour and baking powder and salt to be combined before adding them to the wet ingredients.
- Electric hand mixer or stand mixer: Creams the butter and sugars efficiently while incorporating the egg and producing a smooth cookie dough base.
- Measuring cups and spoons: Help portion the flour and sugars and flavorings accurately so the cookie dough has the correct consistency.
- Kitchen scale: Provides accurate ingredient measurements and helps produce consistent results when preparing the dough.
- Rubber spatula: Scrapes ingredients from the mixing bowl and gently folds any remaining flour into the cookie dough.
- Two large baking trays: Provide enough room for baking 24 cookies in two batches of 12 while allowing space for spreading.
- Parchment paper: Prevents the cookie dough from sticking to the baking trays and makes cleanup easier.
- Cookie scoop: Helps divide the green dough into 24 similarly sized portions for more consistent baking.
- Wire cooling rack: Allows air to circulate around the baked cookies as they cool and helps prevent overly soft bottoms.
- White dessert plate: Presents a finished cookie for serving while providing contrast against the festive green color and red candy heart.
Instructions
Step 1: Cream the butter with both sugars
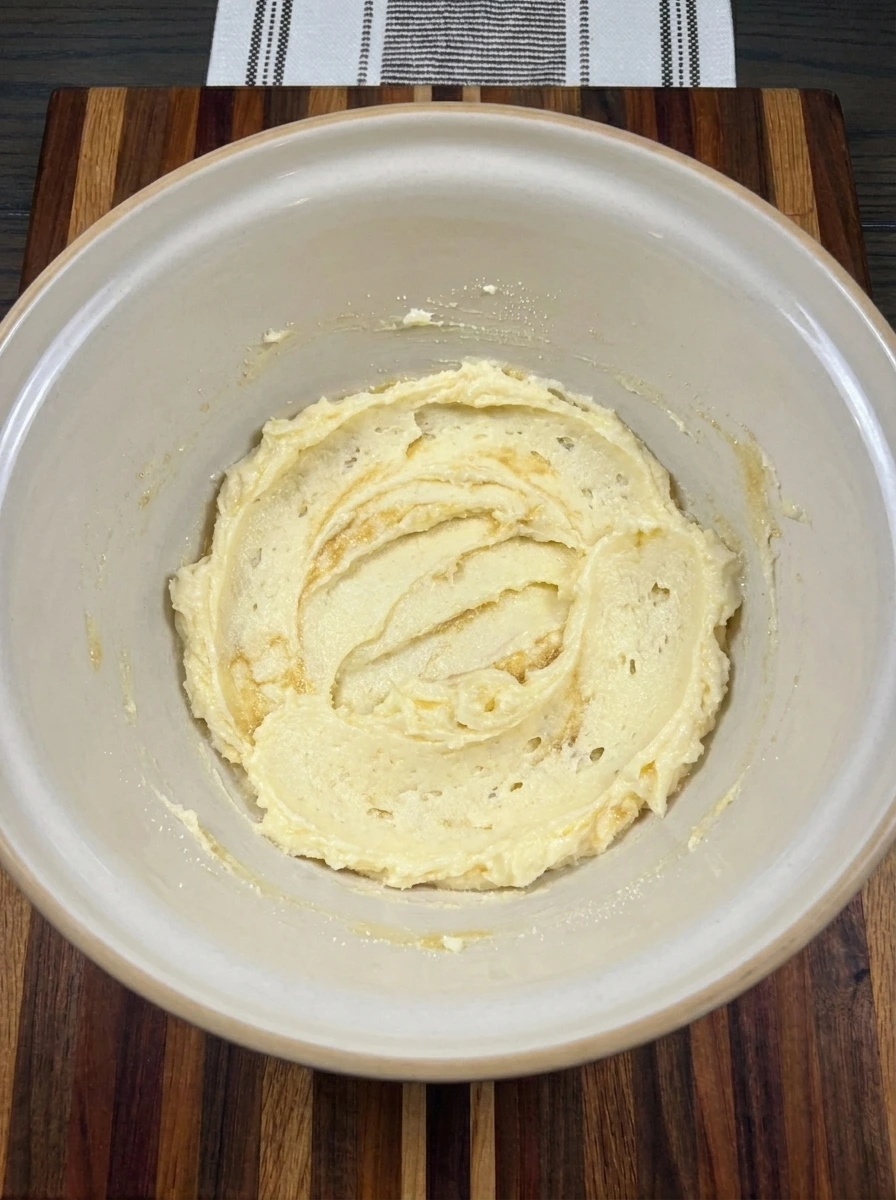
Place the softened unsalted butter in a large mixing bowl along with the granulated sugar and light brown sugar. Beat the ingredients together for about 2 to 3 minutes until the mixture becomes lighter in color and develops a soft fluffy consistency. The granulated sugar should gradually disappear into the butter while the brown sugar creates subtle golden streaks. Scrape the mixture from the sides of the bowl so everything combines evenly. The finished mixture should look creamy and slightly aerated rather than oily or separated. This first transformation creates a soft foundation for cookies with tender centers and gently crisp edges.
Tip: Use softened butter rather than melted butter because melted butter can make the cookies spread excessively.
Step 2: Mix in the egg and create the green dough base
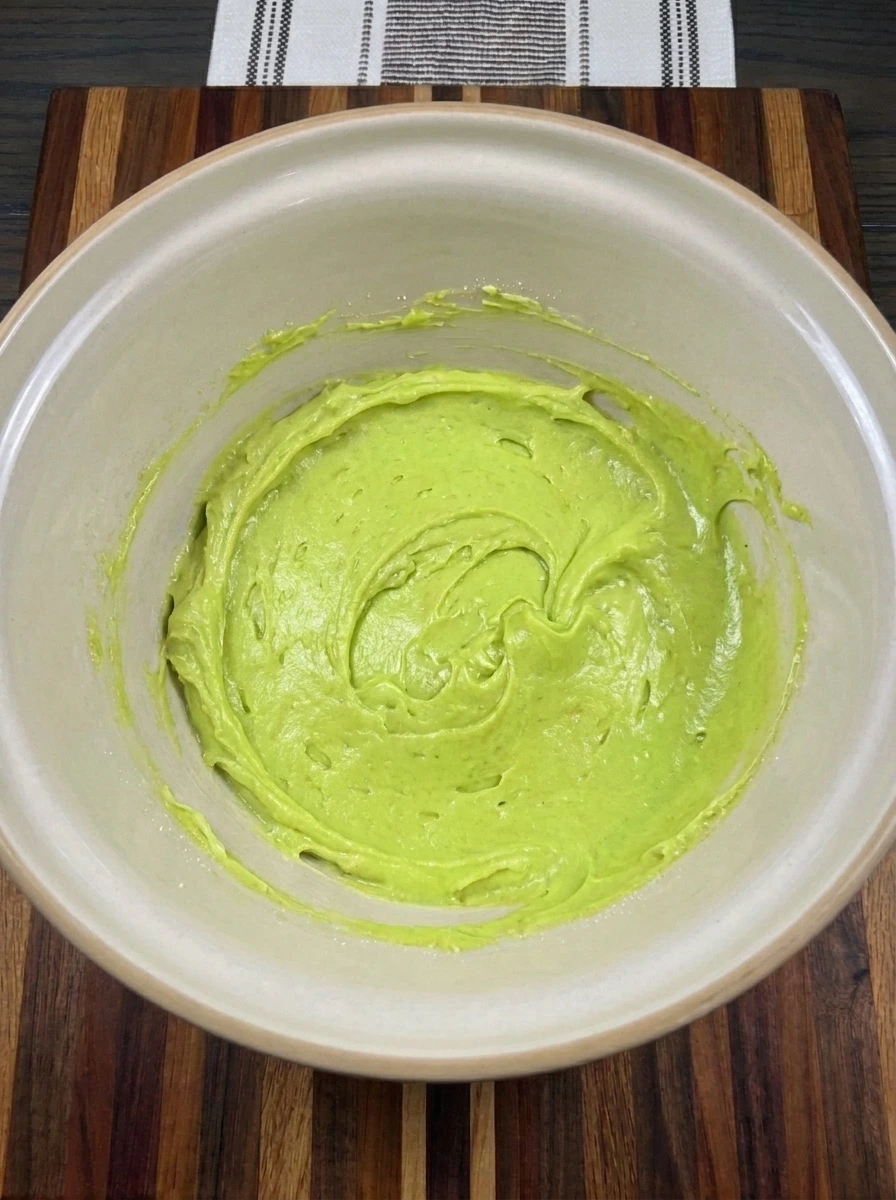
Add the large egg and vanilla extract to the creamed butter mixture. Beat until the egg disappears into the mixture and the texture becomes smooth and cohesive. Add the green gel food coloring and continue mixing until the dough base develops its recognizable bright green appearance. Start with the measured amount of coloring and add a tiny additional amount only if needed. The mixture should become evenly green with soft swirls and slightly irregular ridges. Remember that the color will look a little less intense after the flour is incorporated and the cookies are baked.
Tip: Gel food coloring produces a stronger green color with less added moisture than conventional liquid coloring.
Step 3: Fold the dry ingredients into the green mixture
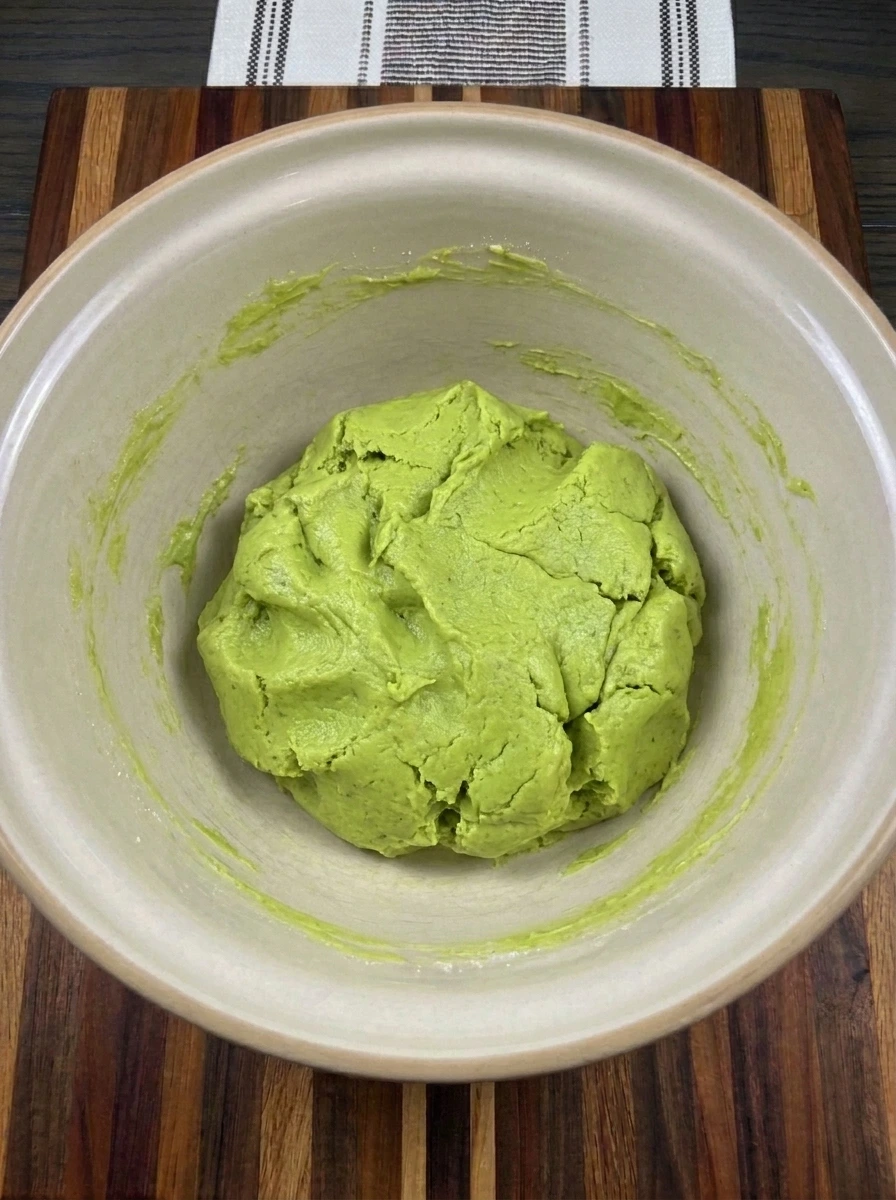
In a separate bowl combine the all-purpose flour with the baking powder and fine salt. Gradually add this dry mixture to the green cookie base while mixing on low speed. Stop as soon as the flour disappears and the dough becomes thick enough to hold its shape. The previously smooth green mixture should transform into a soft and slightly sticky cookie dough. Fold any remaining flour pockets into the dough without overmixing. If the dough feels too soft to portion neatly then refrigerate it for about 15 minutes before shaping. The finished dough should remain bright green with small natural creases and a dense but tender consistency.
Tip: Mix only until the dry ingredients disappear because too much mixing can create dense cookies instead of tender centers.
Step 4: Scoop the green dough onto baking trays
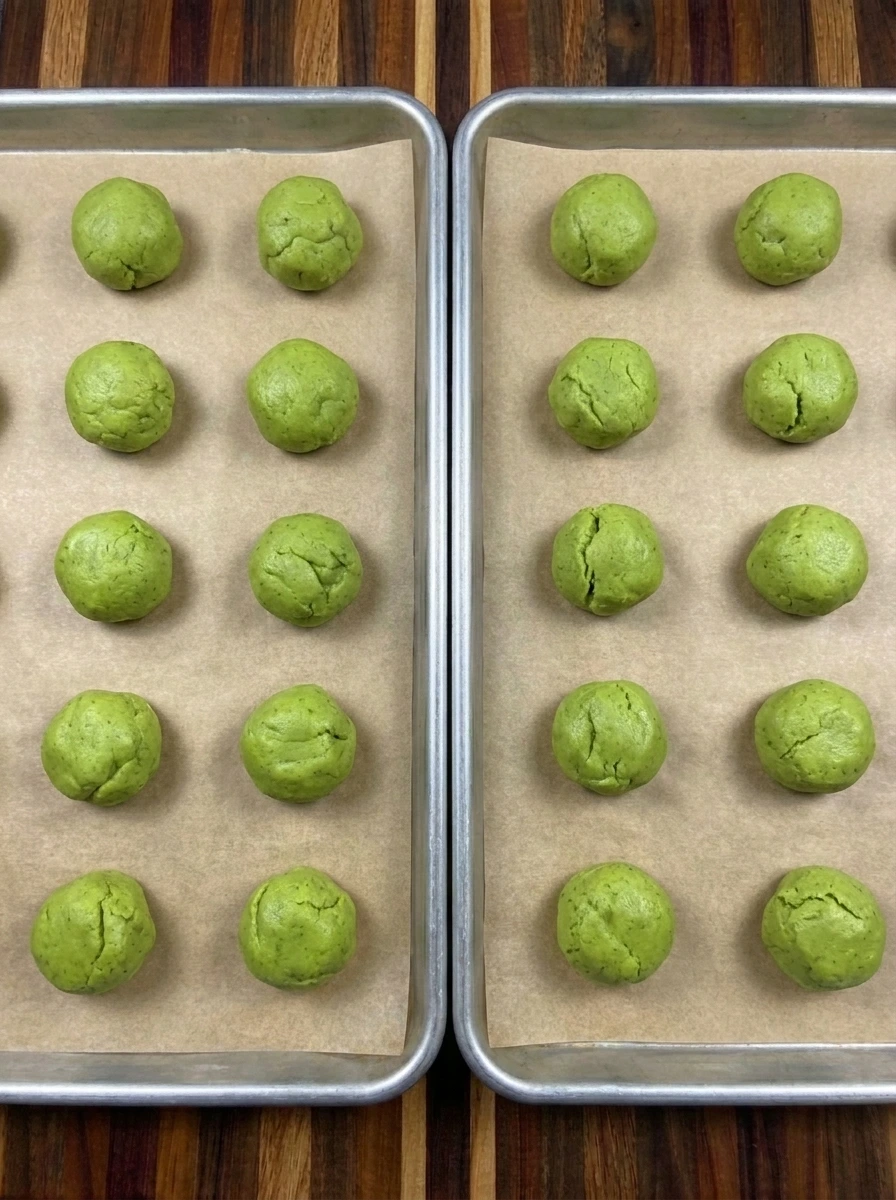
Line two large baking trays with parchment paper. Divide the prepared green dough into 24 portions of approximately 1 1/2 tablespoons each and gently roll them into loose balls. Arrange 12 dough balls on each prepared tray with about 2 inches of space between them. Keep the dough balls similar in size so they bake evenly but do not worry about creating perfectly smooth spheres. Their natural folds and minor shape differences will give the finished Grinch Cookies a homemade appearance. The dough should now look like individual green mounds rather than one continuous mixture.
Tip: Leave enough room between the dough balls because they will spread as they bake and need space to develop soft edges.
Step 5: Bake the green cookies until softly set
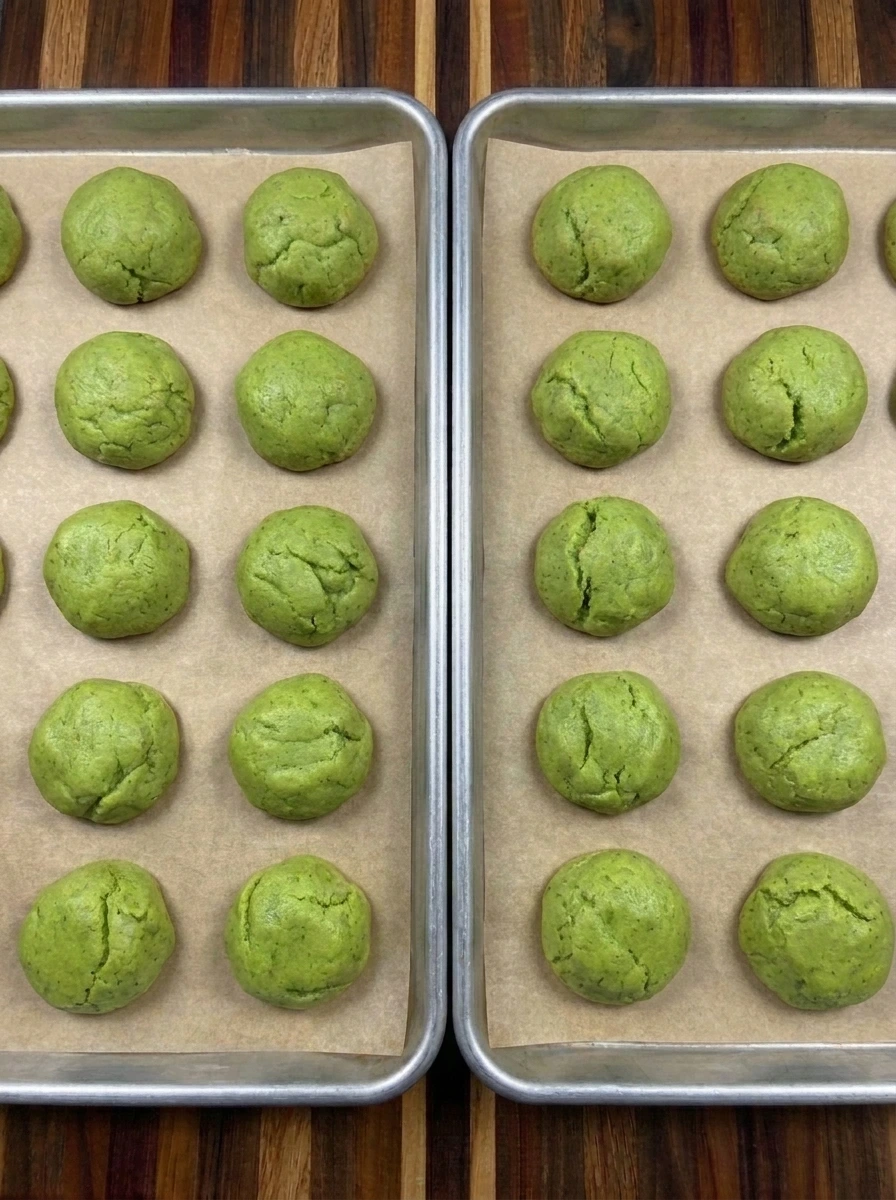
Preheat the oven to 350 degrees Fahrenheit or 175 degrees Celsius. Bake the prepared cookie trays for approximately 10 to 12 minutes or until the cookie edges are set and the centers still appear slightly soft. Bake the trays separately for the most consistent results or rotate their positions halfway through baking if using both oven racks. During baking the thick green dough balls will spread into rounded cookies with softly puffed centers. Fine cracks will form across the surfaces and the edges may develop a little golden color. Remove the cookies while their centers remain tender because they will continue setting on the hot baking trays as they cool.
Tip: Remove the cookies when the edges are set but the centers still look soft because they will firm up as they cool.
Step 6: Add a red candy heart and serve a cookie
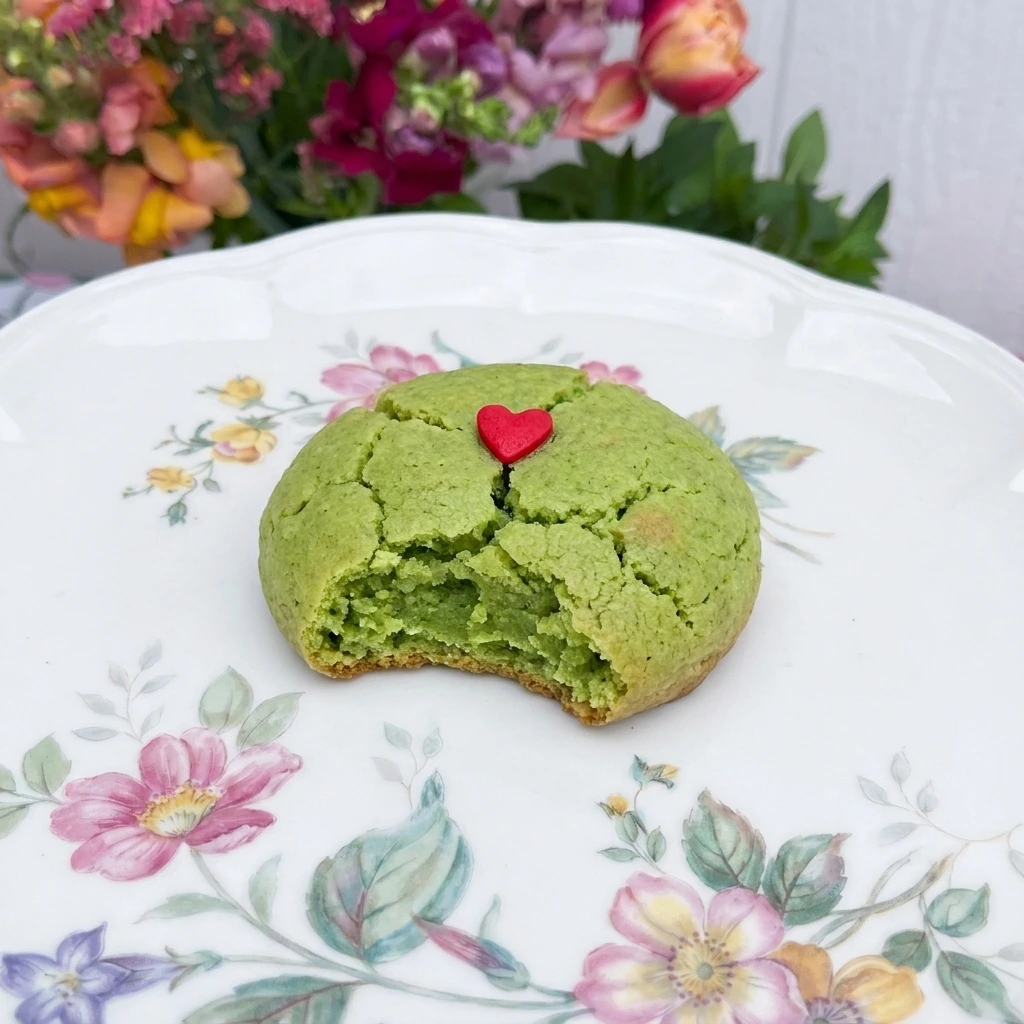
While the cookies are still warm gently press one red heart-shaped candy sprinkle onto each cookie. Position the hearts slightly off-center so they look playful and naturally arranged. Allow the decorated cookies to rest on their baking trays for about 5 minutes before transferring them to cool completely. Once cooled place one finished Grinch Cookie on a clean white dessert plate for serving. The cookie should have a bright green surface with delicate cracks and a soft center beneath its lightly browned edge. The red heart adds a cheerful finishing touch and creates a festive treat that is ready for your Christmas dessert table.
Tip: Press the candy hearts into the cookies while they are still warm so they stay in place without needing extra frosting.
Pro Tips
- Use room-temperature butter that is soft but not melted because this helps the dough hold its shape during baking.
- Start with a small amount of green gel coloring and increase gradually until the dough reaches a cheerful lime-green shade.
- Avoid overbaking the cookies because the centers continue setting after removal from the oven and should stay soft.
- Press each red candy heart into the warm cookie surface before cooling completely so the decoration stays attached.
Storage Instructions
Room Temperature Storage: Allow the Grinch Cookies to cool completely before transferring them to an airtight container. Keep the cookies at room temperature for up to 5 days in a cool and dry location. Place parchment paper between layers if necessary to protect the red heart decorations from being damaged. Refrigerator Storage: Refrigeration is generally unnecessary for these cookies because it can make them firmer and less tender.
However you can refrigerate the unbaked cookie dough in an airtight container for up to 2 days. Allow chilled dough to sit briefly at room temperature if it becomes too firm to scoop comfortably. Freezer Storage: Arrange fully cooled cookies in a single layer until frozen and then transfer them to a freezer-safe container. Place parchment paper between stacked layers to help protect the decorations. Freeze for up to 3 months and thaw the cookies at room temperature before serving. Freezing Unbaked Dough: Portion the prepared green cookie dough into individual balls and freeze them on a lined tray until firm.
Transfer the frozen portions to a sealed freezer-safe bag and store for up to 2 months. Bake directly from frozen with approximately 1 to 2 additional minutes of baking time and add the candy hearts while the cookies are still warm. Serving After Storage: Allow refrigerated or frozen cookies to return to room temperature before serving for the best texture. Keep the cookies away from excessive heat because the decorative candy hearts may soften or lose their shape.
Frequently Asked Questions
Yes! Prepare the dough up to two days ahead and refrigerate it in a covered container before shaping and baking.
Avoid overbaking and remove the cookies when their edges are set. Store them in an airtight container after cooling.
Yes! Freeze the baked cookies in an airtight container for up to three months and thaw them at room temperature.
Butter that is too warm or insufficient flour can cause spreading. Chill soft dough briefly before baking.
See You in the Kitchen
These Grinch Cookies are a great way to satisfy your Christmas cookie cravings without spending hours in the kitchen baking complicated desserts.
I typically make a batch of these cookies at the same time I prepare my Southern Pecan Praline Cake or Pumpkin Cinnamon Rolls so all of my holiday dessert treats will be ready at the same time.
Even my kids love this one!
Print
Grinch Cookies
- Total Time: 32 minutes
- Yield: 24 servings
Description
These Grinch Cookies are an easy and fun Christmas dessert made with soft green sugar cookie dough and adorable red candy hearts. This quick and simple recipe uses everyday baking ingredients to create festive cookies with lightly crisp edges and tender centers. They are one of the best holiday baking ideas for Christmas parties and cookie exchanges. Serve them alongside healthy holiday snacks for a balanced party spread or package them as sweet homemade gifts for family and friends.
Ingredients
- 2 1/4 cups (270 g) All-purpose flour
- 3/4 cup (170 g) Unsalted butter
- 3/4 cup (150 g) Granulated sugar
- 1/4 cup (50 g) Light brown sugar
- 1 Large egg
- 1 1/2 teaspoons Vanilla extract
- 1/4 teaspoon or as needed Green gel food coloring
- 1 teaspoon Baking powder
- 1/4 teaspoon Fine salt
- 24 pieces Red heart-shaped candy sprinkles
Instructions
- Place the softened unsalted butter in a large mixing bowl along with the granulated sugar and light brown sugar. Beat the ingredients together for about 2 to 3 minutes until the mixture becomes lighter in color and develops a soft fluffy consistency. The granulated sugar should gradually disappear into the butter while the brown sugar creates subtle golden streaks.
Scrape the mixture from the sides of the bowl so everything combines evenly. The finished mixture should look creamy and slightly aerated rather than oily or separated. This first transformation creates a soft foundation for cookies with tender centers and gently crisp edges.
- Add the large egg and vanilla extract to the creamed butter mixture. Beat until the egg disappears into the mixture and the texture becomes smooth and cohesive. Add the green gel food coloring and continue mixing until the dough base develops its recognizable bright green appearance.
Start with the measured amount of coloring and add a tiny additional amount only if needed. The mixture should become evenly green with soft swirls and slightly irregular ridges. Remember that the color will look a little less intense after the flour is incorporated and the cookies are baked.
- In a separate bowl combine the all-purpose flour with the baking powder and fine salt. Gradually add this dry mixture to the green cookie base while mixing on low speed. Stop as soon as the flour disappears and the dough becomes thick enough to hold its shape.
The previously smooth green mixture should transform into a soft and slightly sticky cookie dough. Fold any remaining flour pockets into the dough without overmixing. If the dough feels too soft to portion neatly then refrigerate it for about 15 minutes before shaping. The finished dough should remain bright green with small natural creases and a dense but tender consistency.
- Line two large baking trays with parchment paper. Divide the prepared green dough into 24 portions of approximately 1 1/2 tablespoons each and gently roll them into loose balls. Arrange 12 dough balls on each prepared tray with about 2 inches of space between them.
Keep the dough balls similar in size so they bake evenly but do not worry about creating perfectly smooth spheres. Their natural folds and minor shape differences will give the finished Grinch Cookies a homemade appearance. The dough should now look like individual green mounds rather than one continuous mixture.
- Preheat the oven to 350 degrees Fahrenheit or 175 degrees Celsius. Bake the prepared cookie trays for approximately 10 to 12 minutes or until the cookie edges are set and the centers still appear slightly soft. Bake the trays separately for the most consistent results or rotate their positions halfway through baking if using both oven racks.
During baking the thick green dough balls will spread into rounded cookies with softly puffed centers. Fine cracks will form across the surfaces and the edges may develop a little golden color. Remove the cookies while their centers remain tender because they will continue setting on the hot baking trays as they cool.
- While the cookies are still warm gently press one red heart-shaped candy sprinkle onto each cookie. Position the hearts slightly off-center so they look playful and naturally arranged. Allow the decorated cookies to rest on their baking trays for about 5 minutes before transferring them to cool completely.
Once cooled place one finished Grinch Cookie on a clean white dessert plate for serving. The cookie should have a bright green surface with delicate cracks and a soft center beneath its lightly browned edge. The red heart adds a cheerful finishing touch and creates a festive treat that is ready for your Christmas dessert table.
Notes
Pro Tips:
- Use room-temperature butter that is soft but not melted because this helps the dough hold its shape during baking.
- Start with a small amount of green gel coloring and increase gradually until the dough reaches a cheerful lime-green shade.
- Avoid overbaking the cookies because the centers continue setting after removal from the oven and should stay soft.
- Press each red candy heart into the warm cookie surface before cooling completely so the decoration stays attached.
Storage: Room Temperature Storage: Allow the Grinch Cookies to cool completely before transferring them to an airtight container. Keep the cookies at room temperature for up to 5 days in a cool and dry location. Place parchment paper between layers if necessary to protect the red heart decorations from being damaged.
Refrigerator Storage: Refrigeration is generally unnecessary for these cookies because it can make them firmer and less tender. However you can refrigerate the unbaked cookie dough in an airtight container for up to 2 days. Allow chilled dough to sit briefly at room temperature if it becomes too firm to scoop comfortably.
Freezer Storage: Arrange fully cooled cookies in a single layer until frozen and then transfer them to a freezer-safe container. Place parchment paper between stacked layers to help protect the decorations. Freeze for up to 3 months and thaw the cookies at room temperature before serving.
Freezing Unbaked Dough: Portion the prepared green cookie dough into individual balls and freeze them on a lined tray until firm. Transfer the frozen portions to a sealed freezer-safe bag and store for up to 2 months. Bake directly from frozen with approximately 1 to 2 additional minutes of baking time and add the candy hearts while the cookies are still warm.
Serving After Storage: Allow refrigerated or frozen cookies to return to room temperature before serving for the best texture. Keep the cookies away from excessive heat because the decorative candy hearts may soften or lose their shape.
- Prep Time: 20 minutes
- Cook Time: 12 minutes
- Category: Dessert
- Cuisine: American