I honestly havent really shared many squash based desserts in my blog but these Patty Pan Squash Chocolate Brownies were one I had to share. This recipe is inspired by classic homemade brownies and is easy to prepare and make. It is a super tasty dessert packed full of rich cocoa flavor and is quite satisfying.
If you enjoy cozy homemade sweets then try our Salted Caramel Pumpkin Bars next. When people think about patty pan squash they probably avoid adding it to brownies since it is usually served in savory dishes. But trust me on this when it is grated and mixed in the right way it offers a soft and fudgy texture that is very satisfying.
This recipe is super tasty and quick to make and I recommend this dessert for those who want to use fresh summer squash in a fun chocolate treat.
Ingredients

Here is what I use for this recipe and you can adjust nuts or spices based on preference:
- Patty pan squash: Adds natural moisture and creates a tender fudgy brownie texture without a noticeable vegetable flavor.
- Unsalted butter: Provides richness and helps produce a soft center with slightly crisp edges.
- Granulated sugar: Sweetens the cocoa batter and supports the thin crackly finish across the baked surface.
- Light brown sugar: Adds caramel notes and extra moisture that keeps the brownies pleasantly chewy.
- Large eggs: Bind the batter and give the brownies enough structure to hold their shape after slicing.
- Vanilla extract: Rounds out the cocoa flavor and softens the earthy notes of the grated squash.
- All purpose flour: Forms the brownie structure while the modest amount keeps the finished crumb dense rather than cakey.
- Unsweetened cocoa powder: Creates the deep chocolate color and supplies the main rich cocoa flavor.
- Baking powder: Provides a small amount of lift so the dense batter bakes evenly without becoming heavy.
- Fine salt: Balances the sweetness and makes the chocolate flavor taste fuller and more defined.
- Semisweet chocolate chips: Create irregular melted chocolate pockets inside the brownies and a rustic finish on top.
Tools You’ll Need
- Box grater: Shreds the patty pan squash into fine moist strands that blend smoothly into the brownie batter.
- Measuring cups and spoons: Measure the squash and dry ingredients and wet ingredients accurately for a balanced brownie texture.
- Large mixing bowl: Provides enough space to combine the wet base and fold in the dry ingredients and grated squash.
- Whisk: Blends the melted butter and sugars and eggs into a smooth glossy mixture before the flour is added.
- Rubber spatula: Folds the cocoa mixture and squash together gently while limiting excess gluten development.
- Eight inch square baking dish: Holds the thick batter at the correct depth so the brownies develop moist centers and set edges.
- Parchment paper: Lines the baking dish and allows the cooled brownie slab to lift out cleanly before slicing.
- Wire cooling rack: Allows air to circulate beneath the baking dish so the brownies cool and set more evenly.
Instructions
Step 1: Grate the patty pan squash

Grate the medium patty pan squash until it forms one packed cup of pale yellow strands with irregular lengths. The firm squash changes into a loose moist pile that can blend evenly through the brownie batter. Gently press away only the obvious surface liquid while keeping the strands visibly moist. Do not squeeze the squash completely dry because its natural moisture helps create the fudgy center.
Tip: Use the fine or medium side of a grater so the squash disappears into the batter while still providing plenty of moisture.
Step 2: Whisk the sugars into the wet mixture

Combine the melted butter with the granulated sugar and packed brown sugar until the separate grains become a glossy tan mixture. Add the two eggs and vanilla so the mixture turns smoother and slightly thicker. The wet mixture should look unevenly foamy around the edges with a shiny center. Small sugar grains may remain visible because they will continue dissolving as the batter is completed.
Tip: Let the melted butter cool slightly before adding the eggs so the mixture stays smooth and the eggs do not begin cooking.
Step 3: Stir in the cocoa and flour
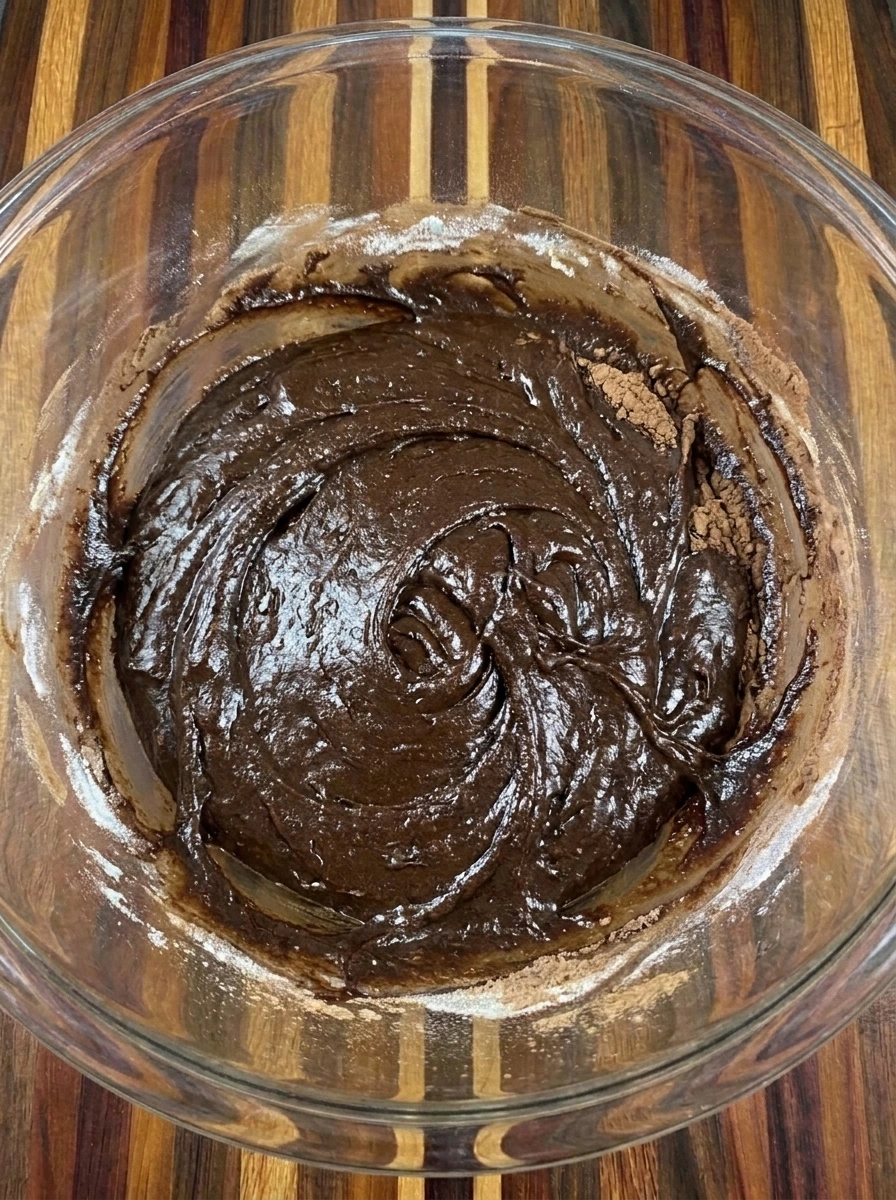
Add the flour and cocoa powder with the baking powder and salt to the wet mixture. Fold until the pale streaks disappear and the mixture changes into a thick dark chocolate batter. Stop mixing when a few uneven cocoa streaks remain near the edges. The batter should look dense and glossy with natural ridges rather than perfectly smooth.
Tip: Fold only until the dry pockets disappear because excessive mixing can make the finished brownies firm instead of fudgy.
Step 4: Fold in the squash and chocolate chips

Fold the one packed cup of grated patty pan squash and most of the chocolate chips through the dark batter. The moist strands loosen the batter slightly while the chips create scattered raised pockets. Continue folding only until the pale squash strands are partially hidden and evenly dispersed. Leave some strands and chocolate chips visible so the mixture looks naturally combined rather than overworked.
Tip: Reserve a small handful of chocolate chips for the top so the baked brownies have visible melted pockets and a rustic finish.
Step 5: Spread the batter in the baking dish
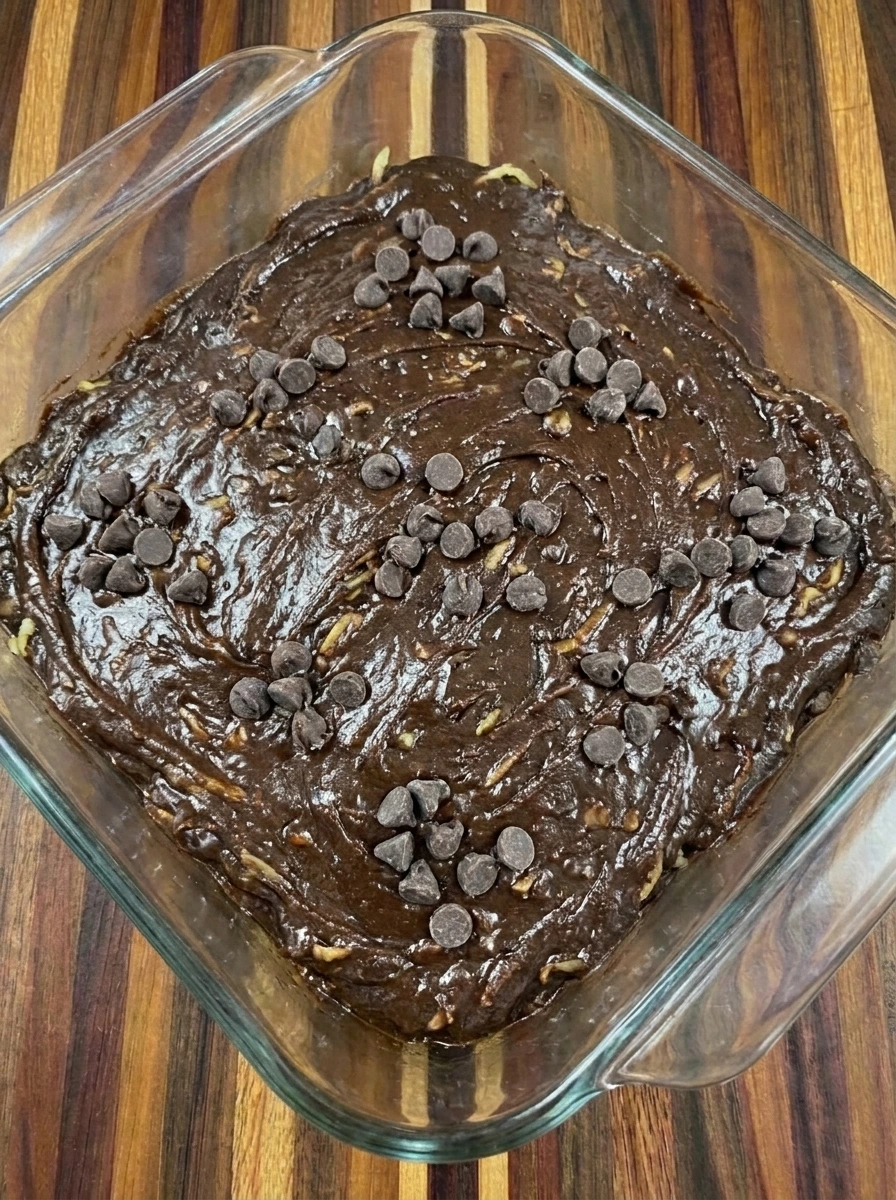
Transfer the finished batter into an eight inch square baking dish and spread it toward the corners. The loose bowl mixture becomes one thick rectangular layer with uneven swirls across the surface. Scatter the reserved chocolate chips over the top with natural gaps and slight clusters. Keep the surface gently ridged because small variations create a homemade crackly finish after baking.
Tip: Spread the batter to a similar depth across the dish while leaving natural surface swirls instead of flattening it perfectly.
Step 6: Bake and serve the brownies

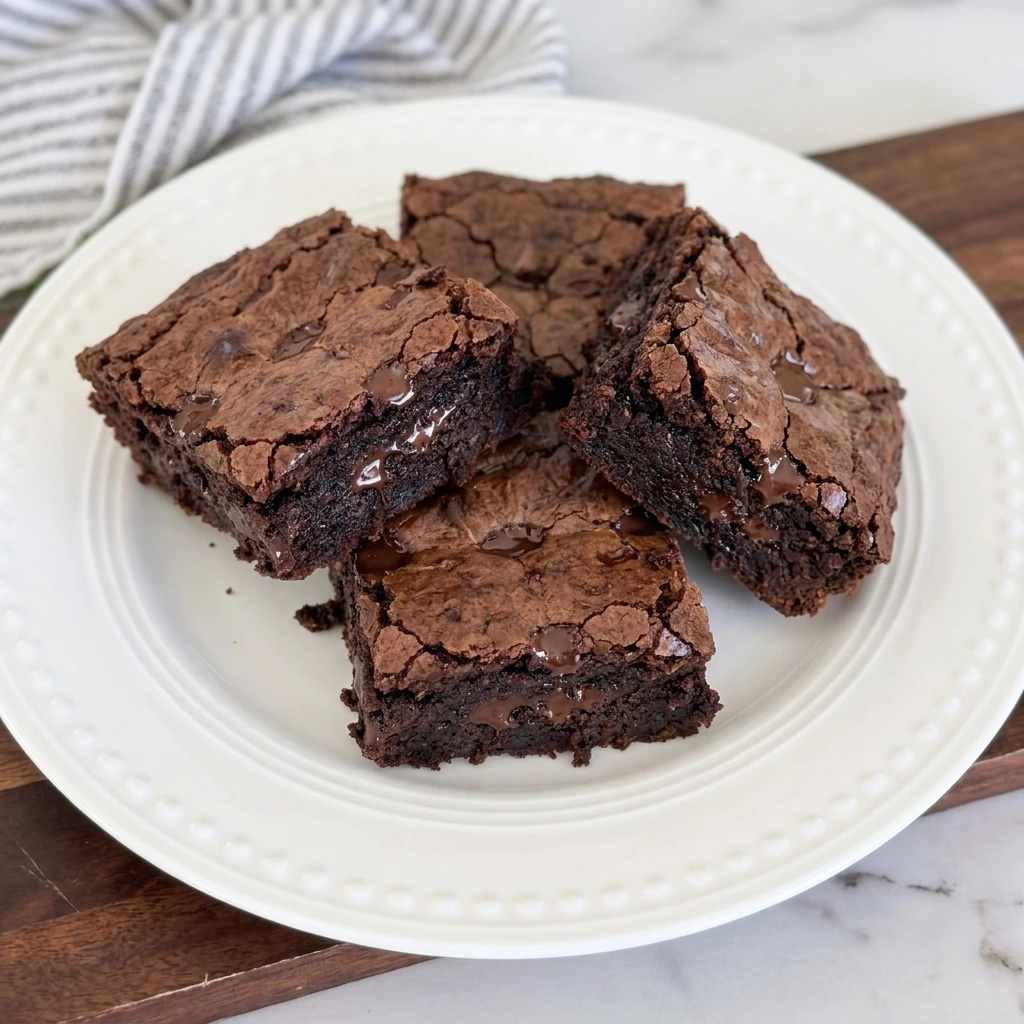
Bake until the batter rises slightly and changes into a set brownie slab with a thin crackly top. The edges should look firmer and a little darker while the center remains soft with melted chocolate pockets. Cool the slab before cutting it into four generous uneven squares. Place one brownie on a white plate with its moist dark interior exposed and its top showing natural cracks and non-uniform color.
Tip: Remove the brownies when a tester has moist crumbs rather than wet batter because they continue setting as they cool.
Pro Tips
- Measure the grated squash after shredding and press away only excess surface liquid so the brownies remain moist rather than watery.
- Use unsweetened natural cocoa powder for a bold chocolate flavor and avoid sweetened cocoa mixes that can upset the sugar balance.
- Fold the batter gently once the flour is added because overmixing develops gluten and can make the brownies tough or cakey.
- Allow the brownies to cool fully before slicing because the soft chocolate center firms as it rests and produces cleaner pieces.
Storage Instructions
Allow the brownies to cool completely before storing them because trapped warmth creates condensation and softens the crackly top. Place the four portions in a single layer inside an airtight container. Keep the brownies at room temperature for up to two days when the room is cool and dry. Separate stacked pieces with parchment so their moist surfaces do not stick together. Refrigerate the brownies for up to five days when you prefer a firmer and denser texture. Let each portion rest at room temperature before serving so the chocolate center softens again. For longer storage wrap each brownie tightly and place the wrapped portions in a freezer safe container. Freeze for up to three months and thaw overnight in the refrigerator or for about one hour at room temperature.
Frequently Asked Questions
No because finely grated squash blends into the cocoa batter and mainly contributes moisture rather than vegetable flavor.
Peeling is unnecessary when the squash is young and tender because its thin skin softens completely during baking.
Yes and cooled brownies can be wrapped individually then frozen for up to three months for convenient treats.
The squash may have held excess liquid or the brownies may need several more minutes of baking before cooling.
See You in the Kitchen
These Patty Pan Squash Chocolate Brownies are a great way to satisfy your chocolate cravings without letting fresh summer squash go unused.
I typically prepare a batch of Maple Pecan Granola at the same time I bake my brownies and that way all of my homemade snacks will be ready at the same time.
Even my kids love this one and they also enjoy our Caramel Apple Nachos.
Print
Patty Pan Squash Chocolate Brownies
- Total Time: 45 minutes
- Yield: 4 servings
Description
These Patty Pan Squash Chocolate Brownies are an easy way to turn summer squash into a rich chocolate dessert with a soft fudgy center. They are quick to mix and simple enough for beginner bakers while still tasting like the best homemade brownies. The grated squash adds moisture and a healthy touch without changing the deep cocoa flavor. Serve them for a weeknight dinner dessert or meal prep treat as well as a holiday potluck brunch or party table.
Ingredients
- 1 medium or 1 packed cup grated Patty pan squash
- 1/2 cup melted Unsalted butter
- 3/4 cup Granulated sugar
- 1/4 cup packed Light brown sugar
- 2 Large eggs
- 1 teaspoon Vanilla extract
- 3/4 cup All purpose flour
- 1/2 cup Unsweetened cocoa powder
- 1/2 teaspoon Baking powder
- 1/4 teaspoon Fine salt
- 1/2 cup divided Semisweet chocolate chips
Instructions
- Grate the medium patty pan squash until it forms one packed cup of pale yellow strands with irregular lengths. The firm squash changes into a loose moist pile that can blend evenly through the brownie batter. Gently press away only the obvious surface liquid while keeping the strands visibly moist. Do not squeeze the squash completely dry because its natural moisture helps create the fudgy center.
- Combine the melted butter with the granulated sugar and packed brown sugar until the separate grains become a glossy tan mixture. Add the two eggs and vanilla so the mixture turns smoother and slightly thicker. The wet mixture should look unevenly foamy around the edges with a shiny center. Small sugar grains may remain visible because they will continue dissolving as the batter is completed.
- Add the flour and cocoa powder with the baking powder and salt to the wet mixture. Fold until the pale streaks disappear and the mixture changes into a thick dark chocolate batter. Stop mixing when a few uneven cocoa streaks remain near the edges. The batter should look dense and glossy with natural ridges rather than perfectly smooth.
- Fold the one packed cup of grated patty pan squash and most of the chocolate chips through the dark batter. The moist strands loosen the batter slightly while the chips create scattered raised pockets. Continue folding only until the pale squash strands are partially hidden and evenly dispersed. Leave some strands and chocolate chips visible so the mixture looks naturally combined rather than overworked.
- Transfer the finished batter into an eight inch square baking dish and spread it toward the corners. The loose bowl mixture becomes one thick rectangular layer with uneven swirls across the surface. Scatter the reserved chocolate chips over the top with natural gaps and slight clusters. Keep the surface gently ridged because small variations create a homemade crackly finish after baking.
- Bake until the batter rises slightly and changes into a set brownie slab with a thin crackly top. The edges should look firmer and a little darker while the center remains soft with melted chocolate pockets. Cool the slab before cutting it into four generous uneven squares. Place one brownie on a white plate with its moist dark interior exposed and its top showing natural cracks and non-uniform color.
Notes
Pro Tips:
- Measure the grated squash after shredding and press away only excess surface liquid so the brownies remain moist rather than watery.
- Use unsweetened natural cocoa powder for a bold chocolate flavor and avoid sweetened cocoa mixes that can upset the sugar balance.
- Fold the batter gently once the flour is added because overmixing develops gluten and can make the brownies tough or cakey.
- Allow the brownies to cool fully before slicing because the soft chocolate center firms as it rests and produces cleaner pieces.
Storage: Allow the brownies to cool completely before storing them because trapped warmth creates condensation and softens the crackly top. Place the four portions in a single layer inside an airtight container. Keep the brownies at room temperature for up to two days when the room is cool and dry. Separate stacked pieces with parchment so their moist surfaces do not stick together. Refrigerate the brownies for up to five days when you prefer a firmer and denser texture. Let each portion rest at room temperature before serving so the chocolate center softens again. For longer storage wrap each brownie tightly and place the wrapped portions in a freezer safe container. Freeze for up to three months and thaw overnight in the refrigerator or for about one hour at room temperature.
- Prep Time: 15 minutes
- Cook Time: 30 minutes
- Category: Dessert
- Cuisine: American