Seriously no joke this is the best Butternut Squash Mac and Cheese recipe. It is the one my mom and before that my grandma would have made for years. It is a classic cozy recipe with simple delicious ingredients. Tender pasta is folded with sweet butternut squash creamy milk sharp cheddar and a silky cheese sauce.

Perfect for weeknight bowls or baked pasta nights with a crisp salad on the side. A classic Butternut Squash Mac and Cheese recipe is one of my go to easy dinners. Not only does it make for a super delicious meal but it has cozy squash and keeps me satisfied for hours. Also there are no complicated methods or ingredients needed.
And meal prep is a cinch. I often make a pan of this pasta on Sunday to enjoy for dinner and a quick lunch on Monday and Tuesday. If you love cozy family meals try our Creamy Crack Chicken Gnocchi for another creamy dinner. With just a few basic ingredients probably already in the fridge and pantry you can whip up a creamy pasta bake or serve it straight from the pot or even spoon it into small ramekins for a fancy dish.
Ingredients

Here is what I use for this recipe and you can adjust nuts or spices based on preference:
- Elbow macaroni: Creates the tender pasta base that holds the creamy squash cheese sauce in every curve.
- Butternut squash: Adds natural sweetness smooth body and warm golden color to the sauce.
- Olive oil: Helps the squash soften and lightly caramelize during roasting.
- Garlic powder: Adds savory depth without leaving raw garlic pieces in the smooth sauce.
- Onion powder: Builds a rounded savory flavor that balances the sweetness of the squash.
- Smoked paprika: Adds gentle warmth and a subtle smoky color to the cheese sauce.
- Salt: Seasoning that brings out the squash flavor and balances the richness of the cheese.
- Black pepper: Adds mild heat and keeps the creamy sauce from tasting flat.
- Milk: Thins the blended squash into a pourable sauce that coats the pasta smoothly.
- Vegetable broth: Adds savory liquid so the sauce blends smoothly without tasting too heavy.
- Sharp cheddar cheese: Melts into the sauce and gives the pasta its classic mac and cheese flavor.
- Mozzarella cheese: Adds stretchy melted texture and creamy pull through the baked pasta.
- Parmesan cheese: Adds salty nutty flavor and helps the top brown lightly.
- Panko breadcrumbs: Creates a lightly crisp topping that contrasts with the creamy pasta underneath.
- Butter: Moistens the breadcrumbs so they toast into golden uneven crumbs.
- Fresh parsley: Finishes the dish with fresh color and a light herbal note.
Tools You’ll Need
- Sheet pan: Roasts the butternut squash cubes until soft with lightly browned edges.
- Large pot: Boils the elbow macaroni and gives space to fold pasta with sauce.
- Saucepan: Warms the blended squash sauce and melts the cheeses smoothly.
- Blender: Turns roasted squash milk and broth into a creamy sauce base.
- Glass or ceramic baking dish: Holds the sauced pasta while the top bakes and browns.
- White plate: Presents one finished serving with visible creamy pasta and crisp topping.
Instructions
Step 1: Roast the squash cubes

The butternut squash begins as firm orange cubes and turns softer around the edges as it roasts. The pieces become slightly darker in spots and look uneven with some corners caramelized more than others. The oil and seasonings cling in thin patches so the cubes are not perfectly coated. A few pieces sit close together while others spread farther apart which gives the tray a homemade look.
Tip: Cut the squash into similar bite size cubes so the centers soften while the edges caramelize lightly.
Step 2: Boil the macaroni
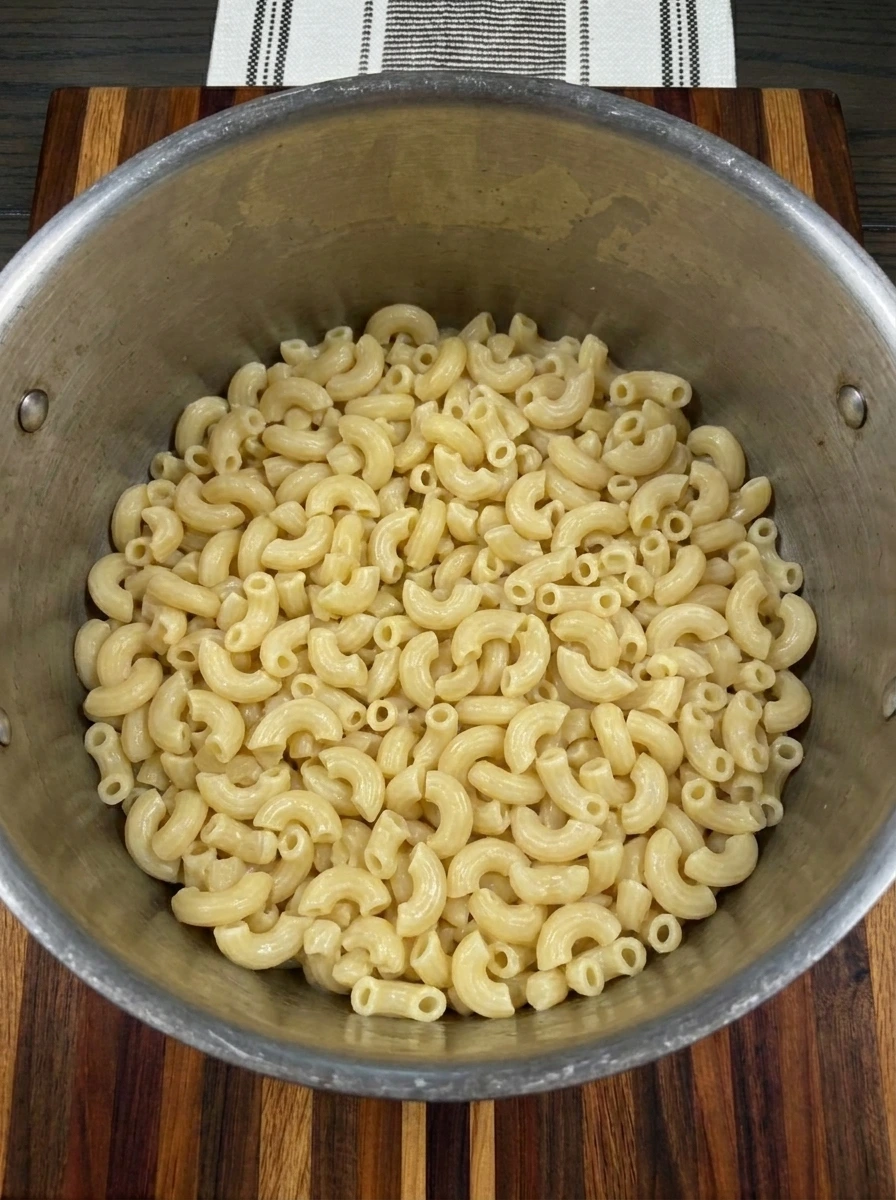
The dry elbow macaroni changes into plump tender pasta with curved shapes that look fuller and slightly glossy. The pasta sits loosely in the pot with a few pieces overlapping and turning in different directions. This step creates the base that will catch the sauce later. The pieces should look cooked but not mushy because they will keep their shape when folded with the cheese sauce.
Tip: Cook the pasta just until tender because it will keep softening once it is folded with the hot sauce.
Step 3: Blend the squash sauce

The roasted squash changes from separate cubes into a thick golden sauce. Milk and broth loosen the squash while the seasonings disappear into the smooth orange mixture. The sauce should not look perfectly flat. Small specks of roasted squash and paprika remain visible which makes the sauce look warm and homemade.
Tip: Blend until mostly smooth while keeping a little natural texture so the sauce tastes rich and homemade.
Step 4: Melt the cheese into the sauce

The sauce shifts from golden and thick to glossy and creamy as cheddar and mozzarella melt into it. Some cheese streaks disappear quickly while a few pale ribbons remain visible along the surface. The color deepens into a richer orange and the sauce looks heavier as it pulls slightly around the edges. This is the first full cheese transformation in the recipe.
Tip: Add cheese gradually so the sauce stays smooth and glossy instead of clumping into heavy pockets.
Step 5: Fold pasta with sauce
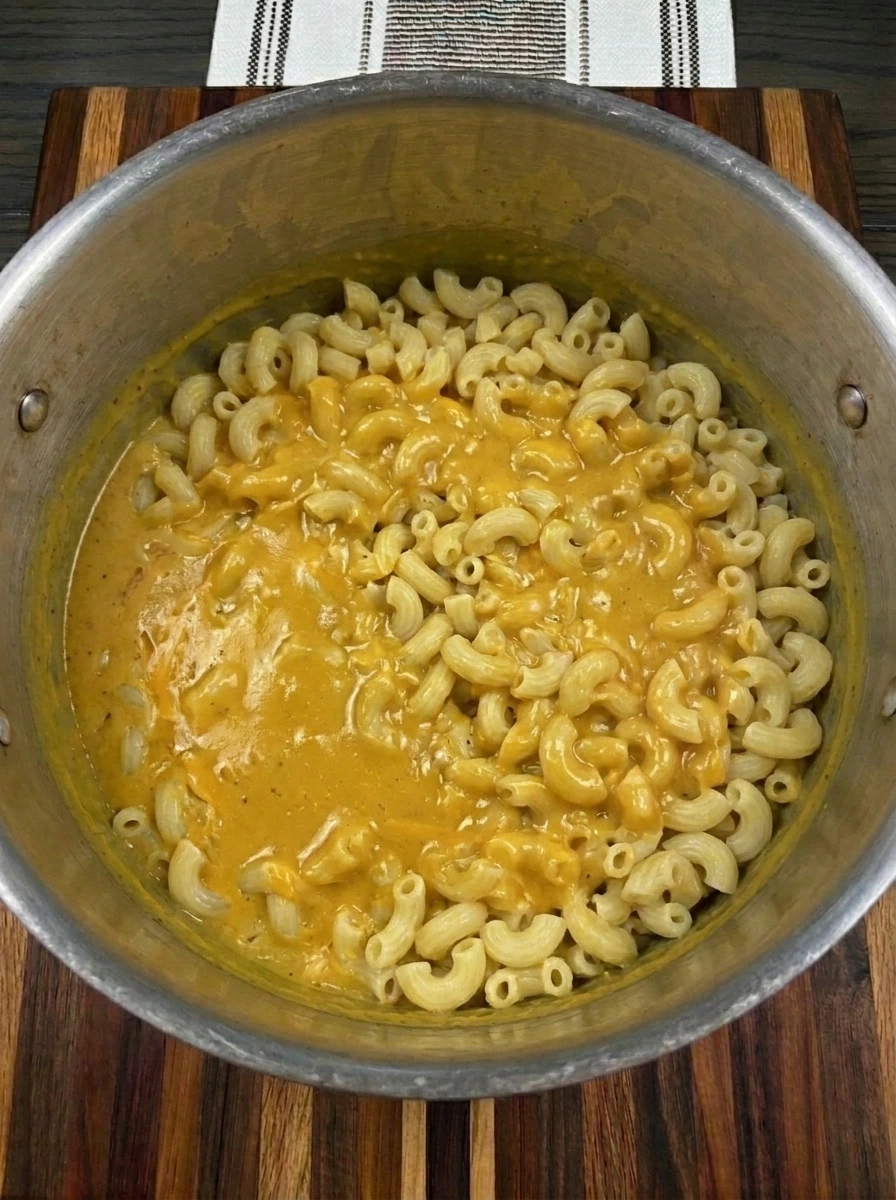
The plain macaroni changes into coated pasta as the orange cheese sauce wraps around every curve. Some elbows look fully covered while others show small pale edges where the sauce has not settled evenly. The pasta shifts from loose white noodles to a creamy orange mixture with sauce pooling lightly between pieces. This is the main combining stage before baking.
Tip: Fold gently so the pasta keeps its shape and the sauce settles into the curves without crushing the noodles.
Step 6: Bake with panko topping
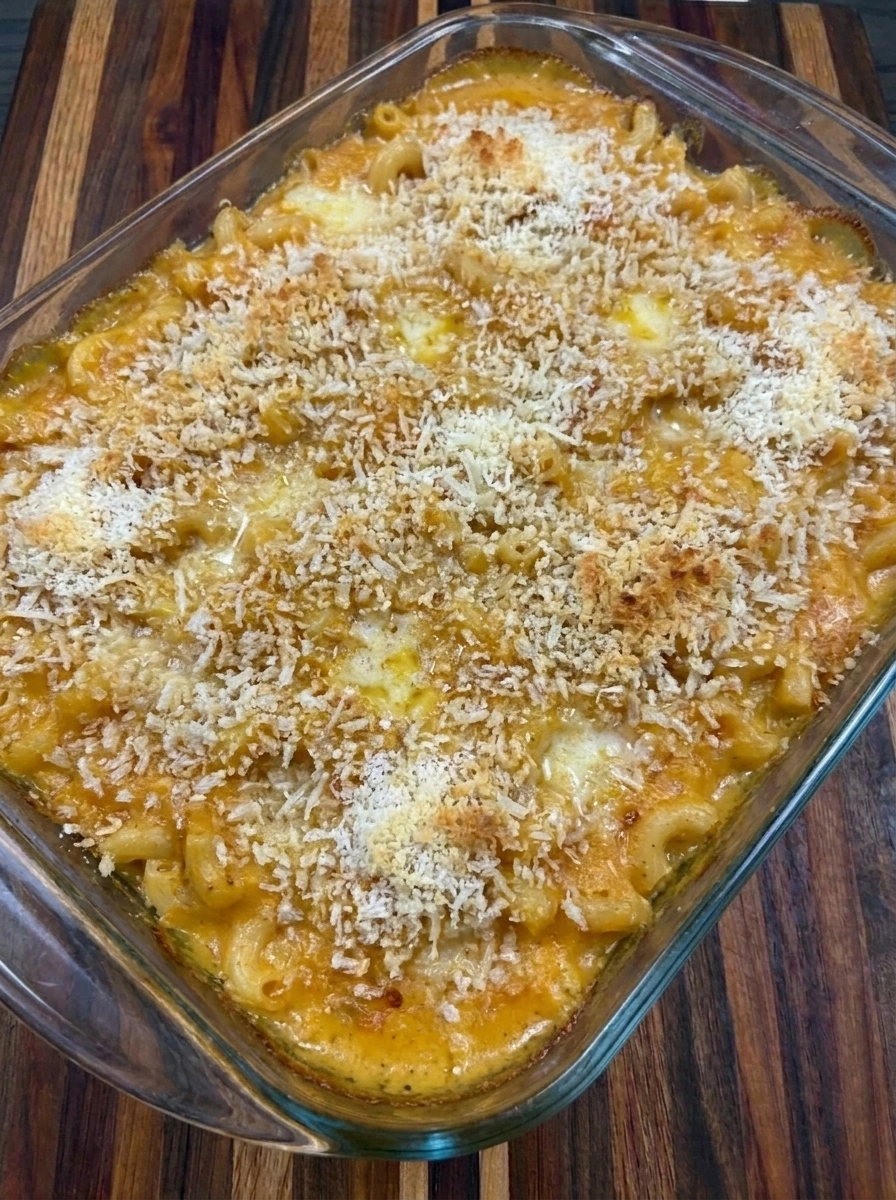
The sauced pasta moves into a ceramic baking dish and becomes a baked casserole with bubbling edges. Panko and parmesan brown in uneven patches while melted cheese peeks through the crumbs. The top should show natural imperfection with darker corners and creamy orange sauce visible in small gaps. It looks homemade and cozy rather than perfectly styled.
Tip: Leave a few sauce pockets uncovered by crumbs so the finished top shows both creamy and crisp textures.
Step 7: Serve one creamy portion

A single portion is scooped onto a white plate and the inside shows creamy pasta with stretchy melted cheese. The topping breaks into rough crumbs and a few browned pieces fall along the side. The plated serving looks rich and homemade with uneven orange color and a light parsley finish. It shows the contrast between crisp top and soft cheesy pasta underneath.
Tip: Scoop deeply from the baking dish so each serving gets creamy pasta and a little browned topping.
Pro Tips
- Roast the squash until fork tender with browned edges because this gives the sauce deeper flavor and richer color.
- Use freshly shredded cheese because it melts smoother and creates a creamier sauce than bagged shredded cheese.
- Keep the pasta slightly firm before baking so it stays tender instead of turning too soft in the sauce.
- Let the baked pasta rest for a few minutes so the sauce settles and each scoop holds together better.
Storage Instructions
Store leftover Butternut Squash Mac and Cheese in an airtight container in the refrigerator for up to four days. Let it cool before covering so extra steam does not make the topping soggy. For meal prep divide the pasta into individual containers while it is still easy to scoop. Add a small splash of milk before reheating so the sauce loosens and turns creamy again. To reheat bake covered until warm then uncover for the last few minutes if you want the top to crisp again. Microwave portions in short bursts and stir gently between each burst. Freeze cooled portions for up to two months. The sauce may thicken after thawing so add milk or broth and warm slowly until creamy.
Frequently Asked Questions
Yes make it one day ahead and bake when ready so the pasta stays creamy and the topping stays crisp.
It can be a healthier comfort dinner because squash adds fiber color and creamy texture with less heavy sauce.
Yes freeze portions in airtight containers then thaw overnight and reheat gently with a splash of milk.
Sharp cheddar gives classic flavor while mozzarella adds creamy stretch and parmesan adds salty browned topping.
See You in the Kitchen
This Butternut Squash Mac and Cheese is a great way to satisfy your cozy comfort food cravings without picking up the phone to call for takeout.
I typically start a simple salad at the same time I make my pasta and sometimes I add Apple Chicken Salad or save Meatloaf with Brown Sugar Glaze Dinner for another family dinner.
Even my kids love this one!
Print
Butternut Squash Mac and Cheese
- Total Time: 45 minutes
- Yield: 4 servings
Description
This Butternut Squash Mac and Cheese is an easy and quick comfort food idea for weeknight dinner and meal prep. Creamy roasted squash blends into a simple cheese sauce that feels cozy yet still healthy. It is one of the best fall pasta ideas for holiday tables and potluck nights because the sauce is smooth and rich without feeling heavy.
Ingredients
- 12 ounces Elbow macaroni
- 3 cups peeled and cubed Butternut squash
- 1 tablespoon Olive oil
- 1 teaspoon Garlic powder
- 1 teaspoon Onion powder
- 1/2 teaspoon Smoked paprika
- 1 teaspoon Salt
- 1/2 teaspoon Black pepper
- 1 1/2 cups Milk
- 1/2 cup Vegetable broth
- 2 cups shredded Sharp cheddar cheese
- 1 cup shredded Mozzarella cheese
- 1/4 cup grated Parmesan cheese
- 1/2 cup Panko breadcrumbs
- 2 tablespoons melted Butter
- 2 tablespoons chopped Fresh parsley
Instructions
- The butternut squash begins as firm orange cubes and turns softer around the edges as it roasts. The pieces become slightly darker in spots and look uneven with some corners caramelized more than others. The oil and seasonings cling in thin patches so the cubes are not perfectly coated. A few pieces sit close together while others spread farther apart which gives the tray a homemade look.
- The dry elbow macaroni changes into plump tender pasta with curved shapes that look fuller and slightly glossy. The pasta sits loosely in the pot with a few pieces overlapping and turning in different directions. This step creates the base that will catch the sauce later. The pieces should look cooked but not mushy because they will keep their shape when folded with the cheese sauce.
- The roasted squash changes from separate cubes into a thick golden sauce. Milk and broth loosen the squash while the seasonings disappear into the smooth orange mixture. The sauce should not look perfectly flat. Small specks of roasted squash and paprika remain visible which makes the sauce look warm and homemade.
- The sauce shifts from golden and thick to glossy and creamy as cheddar and mozzarella melt into it. Some cheese streaks disappear quickly while a few pale ribbons remain visible along the surface. The color deepens into a richer orange and the sauce looks heavier as it pulls slightly around the edges. This is the first full cheese transformation in the recipe.
- The plain macaroni changes into coated pasta as the orange cheese sauce wraps around every curve. Some elbows look fully covered while others show small pale edges where the sauce has not settled evenly. The pasta shifts from loose white noodles to a creamy orange mixture with sauce pooling lightly between pieces. This is the main combining stage before baking.
- The sauced pasta moves into a ceramic baking dish and becomes a baked casserole with bubbling edges. Panko and parmesan brown in uneven patches while melted cheese peeks through the crumbs. The top should show natural imperfection with darker corners and creamy orange sauce visible in small gaps. It looks homemade and cozy rather than perfectly styled.
- A single portion is scooped onto a white plate and the inside shows creamy pasta with stretchy melted cheese. The topping breaks into rough crumbs and a few browned pieces fall along the side. The plated serving looks rich and homemade with uneven orange color and a light parsley finish. It shows the contrast between crisp top and soft cheesy pasta underneath.
Notes
Pro Tips:
- Roast the squash until fork tender with browned edges because this gives the sauce deeper flavor and richer color.
- Use freshly shredded cheese because it melts smoother and creates a creamier sauce than bagged shredded cheese.
- Keep the pasta slightly firm before baking so it stays tender instead of turning too soft in the sauce.
- Let the baked pasta rest for a few minutes so the sauce settles and each scoop holds together better.
Storage: Store leftover Butternut Squash Mac and Cheese in an airtight container in the refrigerator for up to four days. Let it cool before covering so extra steam does not make the topping soggy. For meal prep divide the pasta into individual containers while it is still easy to scoop. Add a small splash of milk before reheating so the sauce loosens and turns creamy again. To reheat bake covered until warm then uncover for the last few minutes if you want the top to crisp again. Microwave portions in short bursts and stir gently between each burst. Freeze cooled portions for up to two months. The sauce may thicken after thawing so add milk or broth and warm slowly until creamy.
- Prep Time: 15 minutes
- Cook Time: 30 minutes
- Category: Dinner
- Cuisine: American