


Making a delicious family breakfast is so EASY with recipes like these Cinnamon Chocolate Chip Scones. Just a handful of simple baking ingredients come together to make soft and buttery scones that can be enjoyed in so many different ways. The sweetness of chocolate chips and warm cinnamon combine to make flavors both kids and adults will love and it will only take you 15 minutes of hands on time to make.
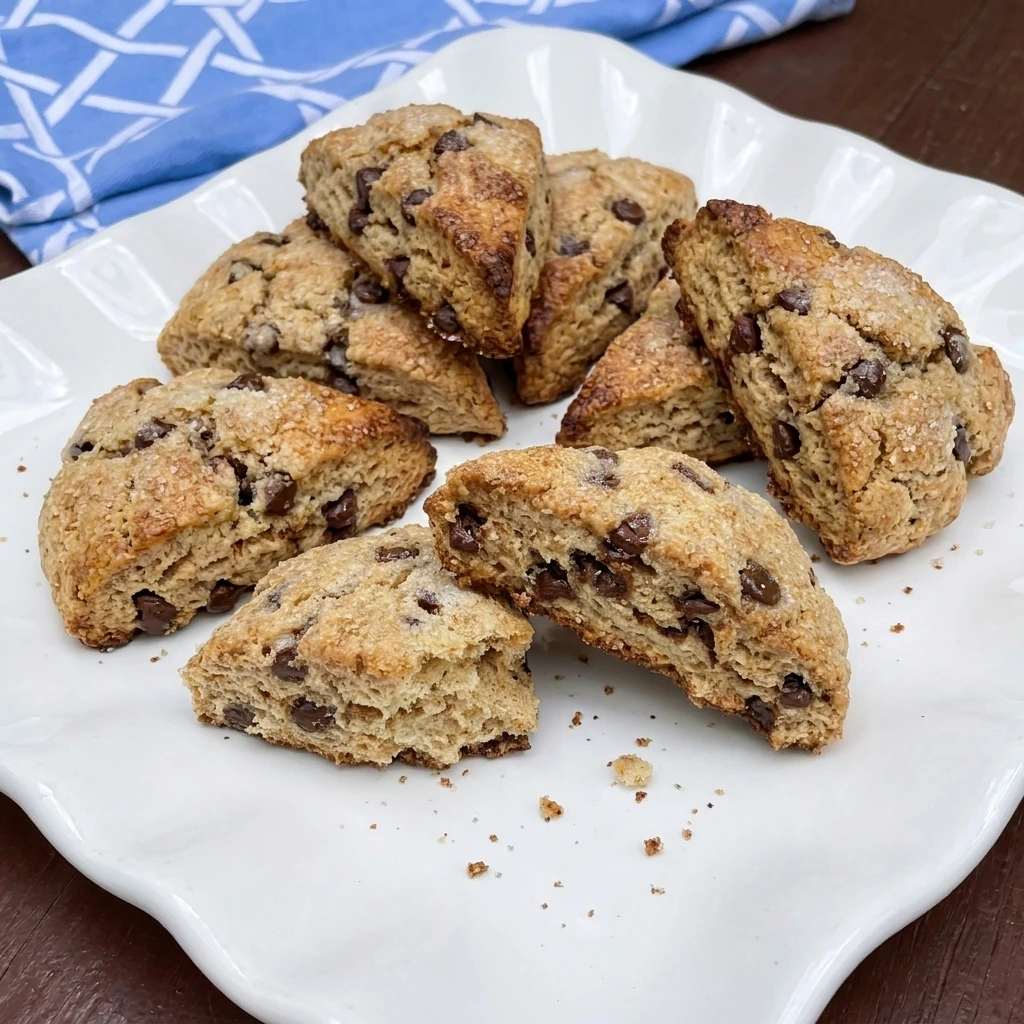
Homemade scones are one of those well-loved classic bakery treats for a ton of great reasons. Making them in your own oven will make you love them even more! They are so easy to make and require ZERO complicated techniques and in the end you get delicious golden scones with tender centers and rich chocolate in every bite.
These Cinnamon Chocolate Chip Scones are perfect for a cozy weekend breakfast or a special holiday brunch because they taste wonderful with a warm cup of coffee or tea. If you love simple homemade treats that bring everyone together then you should also try our Peanut Butter Blossoms for another delicious chocolate-filled favorite.
Ingredients
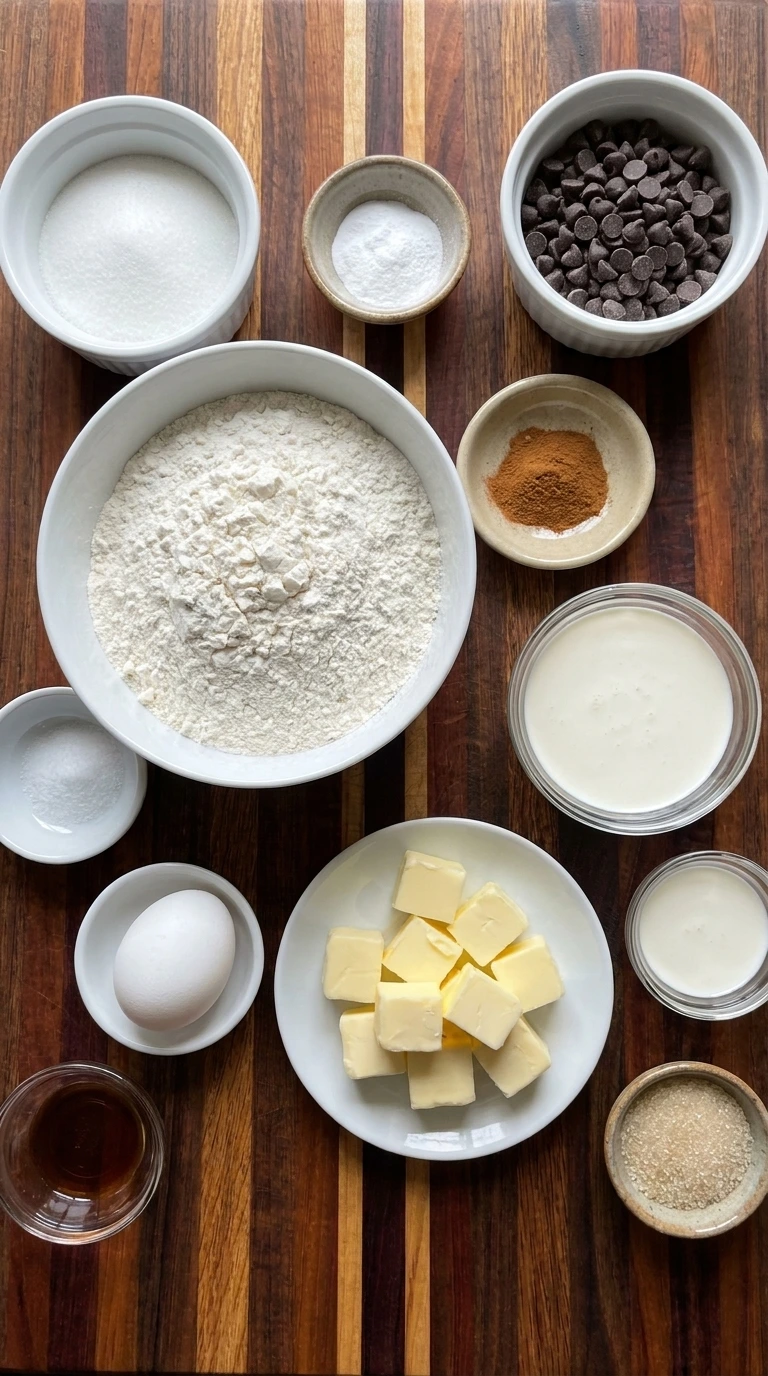
Here is what I use for this recipe :
- All-purpose flour: Provides the main structure for the scones while creating a tender crumb that holds together without becoming too dense.
- Granulated sugar: Adds gentle sweetness to balance the cinnamon and chocolate while helping the outside develop a delicate golden color.
- Baking powder: Acts as the primary leavening ingredient and helps the scones rise into thick fluffy wedges during baking.
- Ground cinnamon: Brings a warm aromatic flavor throughout the dough and complements the sweetness of the chocolate chips.
- Fine salt: Balances the sweetness and enhances the buttery flavor while making the chocolate and cinnamon more noticeable.
- Unsalted butter: Cold butter forms small pockets throughout the dough that produce tender flaky layers and rich buttery flavor during baking.
- Heavy cream: Adds richness and moisture to the dough while the reserved tablespoon helps create a lightly golden finished crust.
- Large egg: Binds the ingredients together while helping create a soft interior and supporting the structure of the baked scones.
- Vanilla extract: Adds a subtle sweet aroma that rounds out the warm cinnamon and rich chocolate flavors.
- Semi-sweet chocolate chips: Create scattered pockets of rich chocolate that become soft and slightly melted as the scones bake.
- Coarse sparkling sugar: Creates a delicate crunchy topping that contrasts with the soft scone centers and adds a subtle bakery-style finish.
Tools I Use :
- Large mixing bowl: Provides enough space to combine the flour mixture and incorporate the cold butter before forming the dough.
- Small mixing bowl: Holds the heavy cream and egg and vanilla while they are whisked together before being added to the dry ingredients.
- Measuring cups and spoons: Help measure the flour and sugar and cream and spices accurately for consistent baking results.
- Kitchen scale: Allows accurate measurement of the flour and other ingredients to prevent dry or overly dense scones.
- Whisk: Distributes the cinnamon and baking powder evenly throughout the dry ingredients and combines the wet ingredients.
- Pastry cutter: Works cold butter into the flour mixture while preserving small pieces needed for a tender flaky texture.
- Rubber spatula: Gently folds the cream mixture and chocolate chips into the dough without excessive mixing.
- Bench scraper or sharp knife: Divides the shaped dough disc into eight triangular wedges with minimal compression.
- Rimmed baking sheet: Holds the eight scone wedges with enough space for even heat circulation and consistent browning.
- Parchment paper: Prevents the scones from sticking to the baking sheet while making cleanup easier.
- Pastry brush: Applies the reserved heavy cream to the dough surfaces to help produce a delicately golden crust.
- Cooling rack: Allows air to circulate around the baked scones after their initial resting period and prevents soggy bottoms.
Instructions
Step 1: Whisk the flour and cinnamon with the dry ingredients
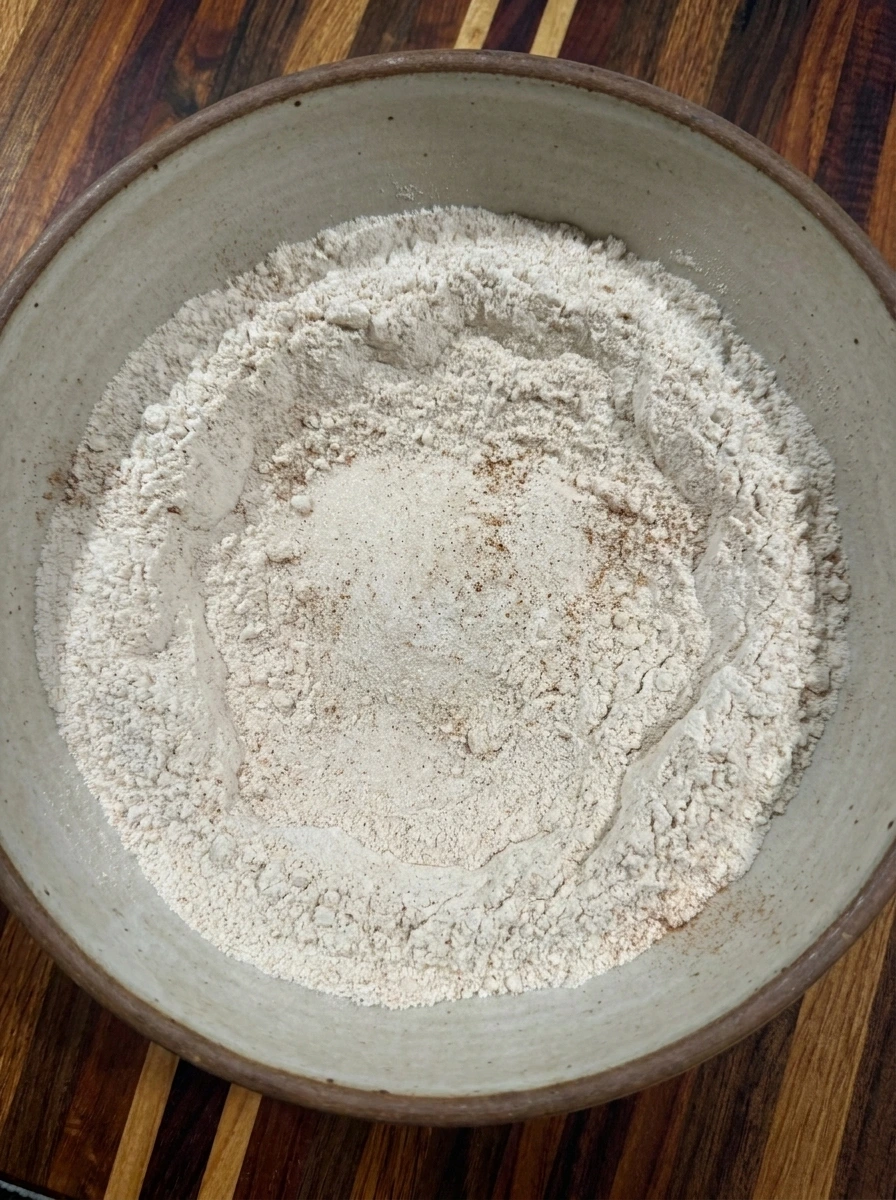
Add the all-purpose flour to a large mixing bowl and sprinkle the granulated sugar over the top. Add the baking powder followed by the ground cinnamon and fine salt. Whisk everything together until the cinnamon is distributed throughout the pale flour mixture. The dry ingredients should change from separate piles into one light beige mixture with tiny cinnamon speckles throughout. Make sure the baking powder is evenly incorporated because this will help the scones rise consistently during baking.
Tip: Mix the dry ingredients thoroughly before adding butter so the cinnamon and baking powder spread evenly through every scone.
Step 2: Cut the cold butter into the flour mixture
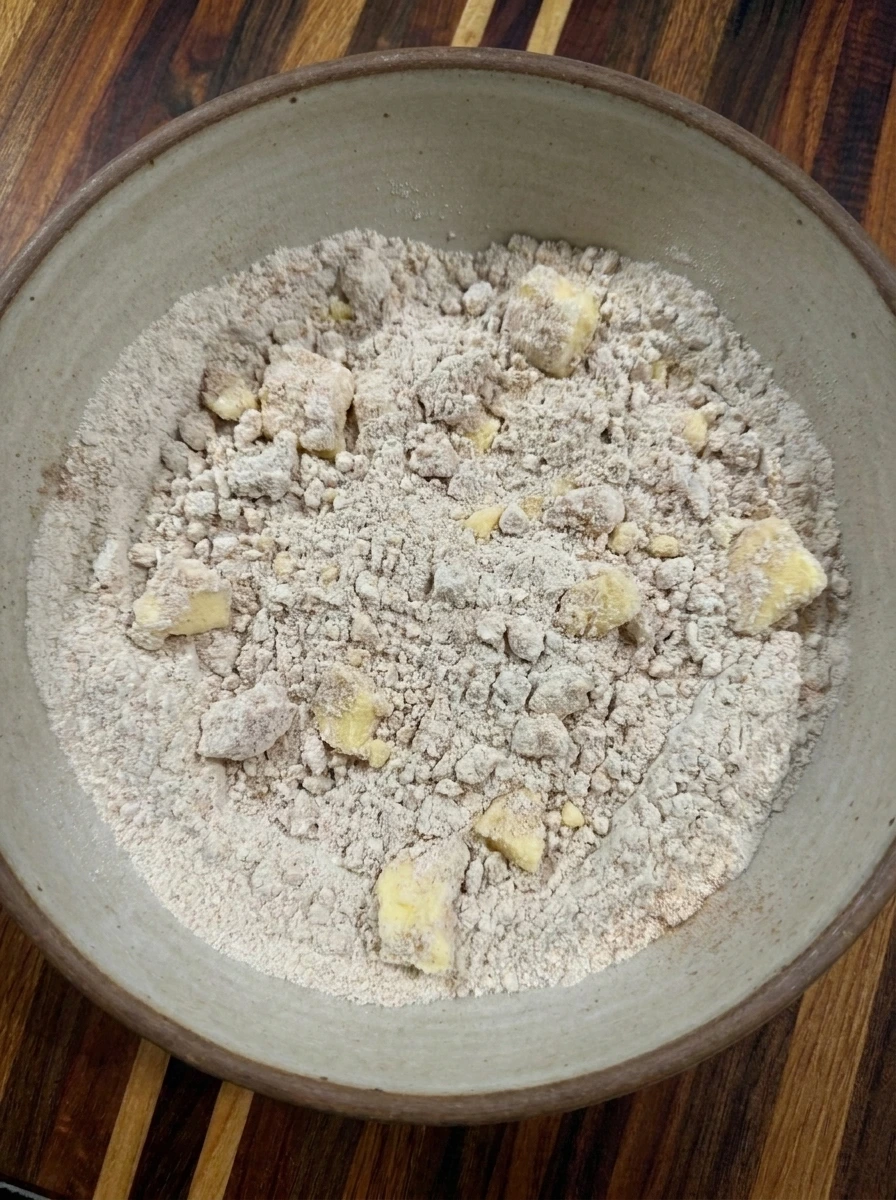
Add the cold cubed unsalted butter directly to the cinnamon flour mixture. Work the butter into the dry ingredients using a pastry cutter or your fingertips until the mixture resembles coarse crumbs with some larger butter pieces remaining. The texture should change from fine powder into a rough crumbly mixture with visible irregular butter pieces. These cold butter pockets are important because they release moisture during baking and help create the tender flaky layers that make homemade scones so delicious.
Tip: Keep the butter cold and leave a few pea-sized pieces in the flour mixture because these create delicate flaky pockets.
Step 3: Fold the cream mixture and chocolate chips into the dough
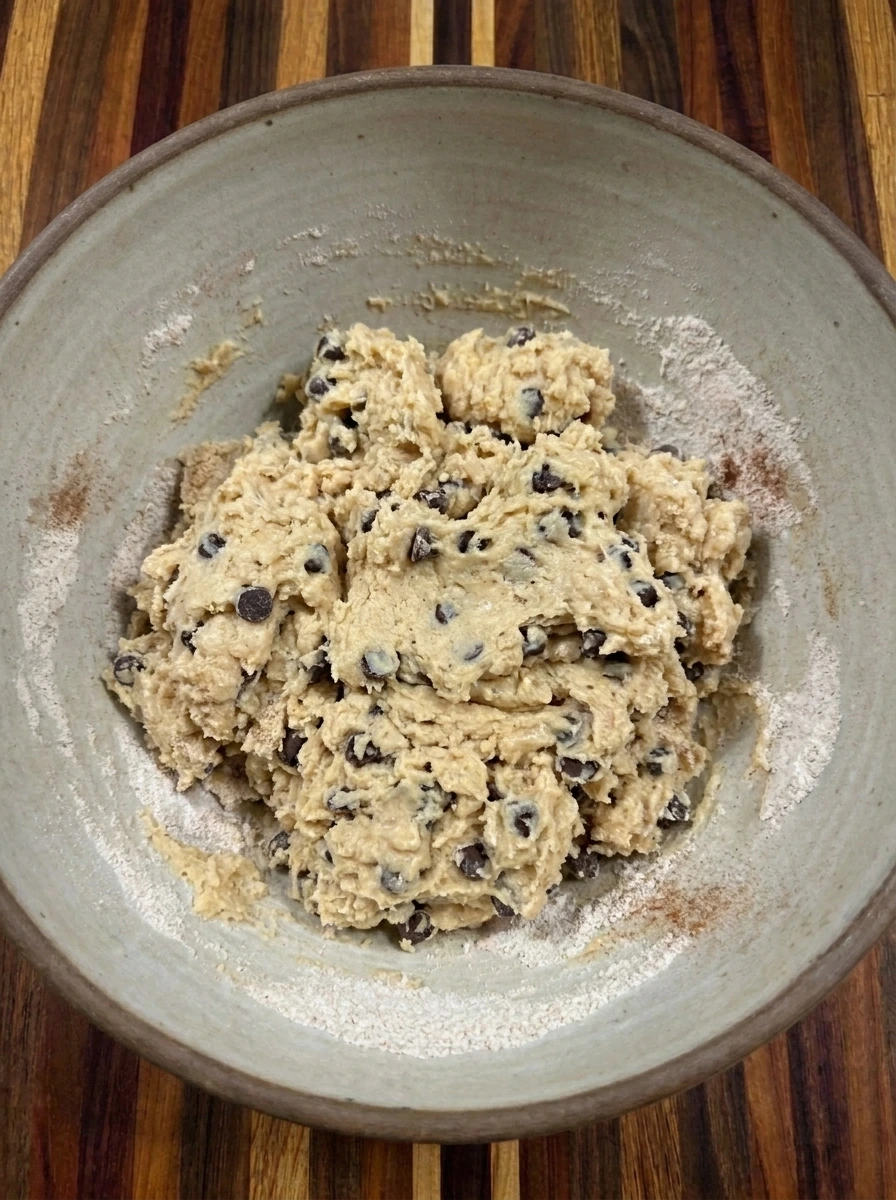
In a separate small bowl whisk together 3/4 cup of heavy cream with the egg and vanilla extract. Pour the liquid mixture into the crumbly flour mixture and gently fold until a thick shaggy dough begins to form. Add the semi-sweet chocolate chips and fold just until they are distributed throughout the dough. The loose crumbs should gradually become a soft and slightly sticky dough containing visible cinnamon flecks and chocolate chips. Some dry patches may remain around the edges but avoid excessive mixing because overworked dough can produce tough scones.
Tip: Stop mixing as soon as the dough holds together with a few rough patches because overmixing develops too much gluten.
Step 4: Shape the dough and cut eight triangular scones
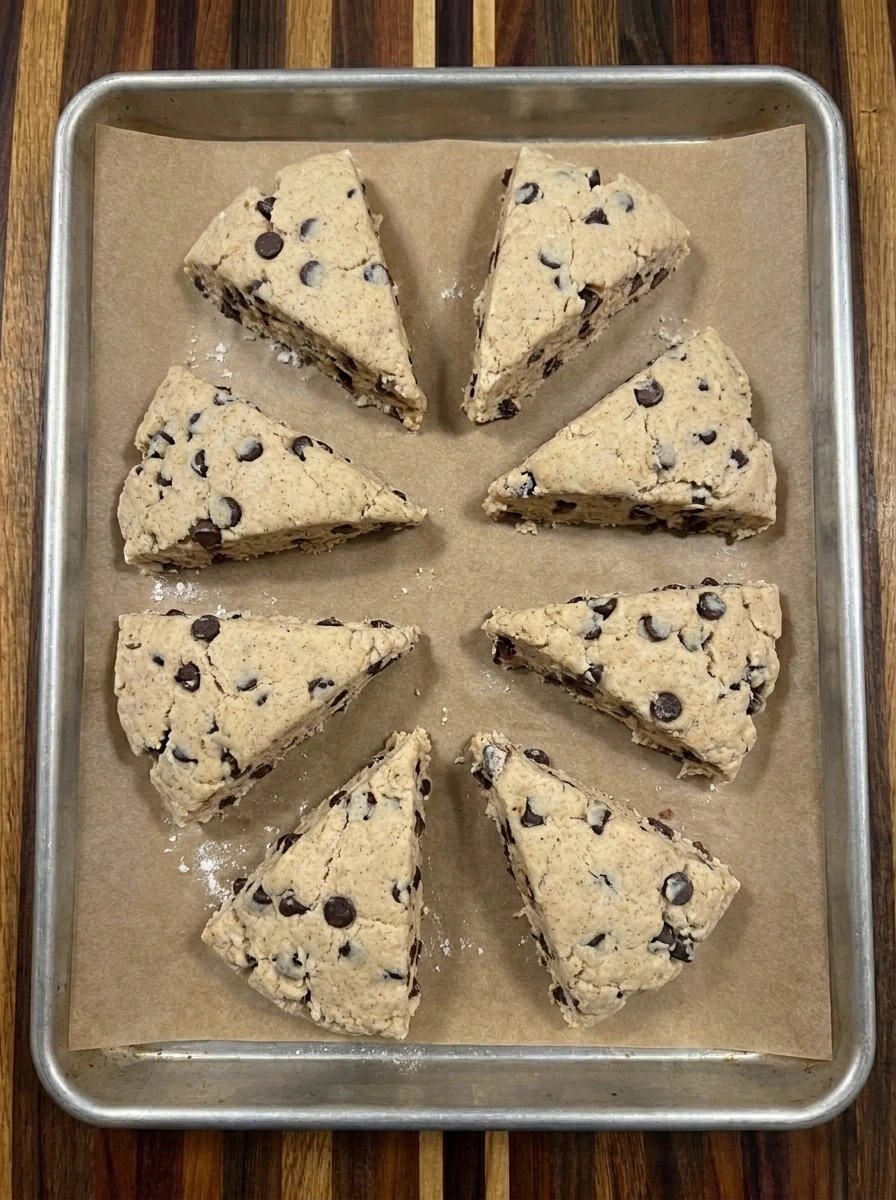
Transfer the shaggy dough onto a lightly floured work surface and gently press it together into one thick round disc measuring approximately 7 inches across and 1 inch thick. Avoid kneading the dough aggressively because the butter should remain cold and the texture should stay tender. Cut the disc into eight roughly equal triangular wedges. Arrange the eight pieces on a parchment-lined baking sheet with space between them so the heat can circulate around every scone. The pieces should look rustic with slightly uneven edges and chocolate chips visible along the cut sides.
Tip: Keep the dough about one inch thick and cut eight wedges with confident strokes to maintain tall and tender scones.
Step 5: Brush the scones and bake until golden brown
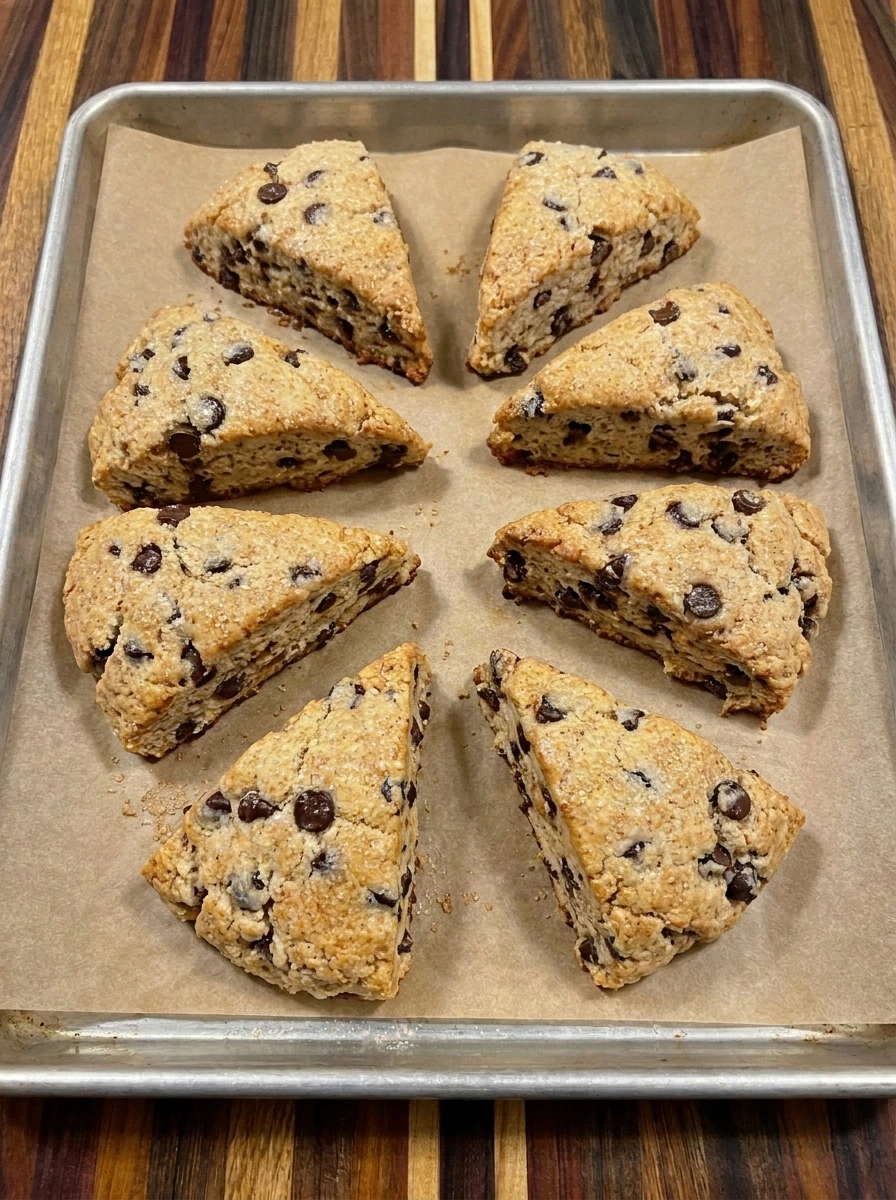
Preheat the oven to 400°F or 200°C. Brush the tops of all eight unbaked scones with the reserved tablespoon of heavy cream and sprinkle the coarse sparkling sugar unevenly over their surfaces. Place the baking tray in the oven and bake for 20 to 25 minutes until the scones have risen and their edges become lightly golden brown. The dough will expand into thick triangular scones with lightly cracked tops and soft chocolate pockets. The butter creates tender layers while the cream-brushed surfaces develop golden patches and a delicate sugar crust. Allow the scones to cool on the tray for about 5 minutes before serving.
Tip: Look for lightly golden edges and set centers rather than relying only on the baking time because oven temperatures vary.
Step 6: Serve one warm scone with its tender center exposed
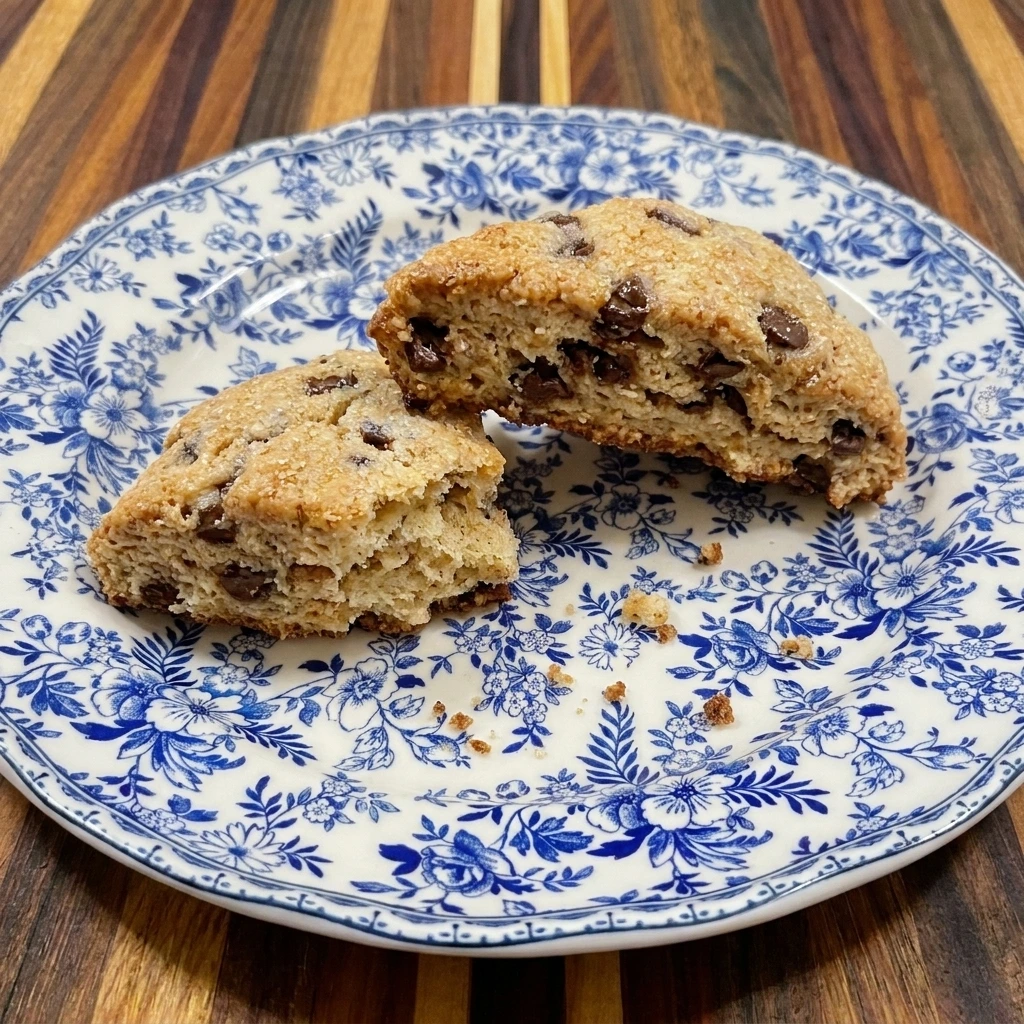
Transfer one cooled but still slightly warm scone from the baking tray onto a white serving plate. Break the scone gently into two uneven pieces to reveal the soft interior and the scattered pockets of chocolate chips inside. Place the pieces close together with the exposed crumb facing outward. The finished scone should have a lightly crisp golden exterior and a tender buttery center with warm cinnamon flavor. The chocolate chips will remain slightly soft and the sparkling sugar topping will add a gentle crunch. Enjoy the scone while it is fresh with your favorite coffee or tea.
Tip: Let the scone rest briefly before breaking it open so the crumb stays tender and the chocolate remains pleasantly soft.
Pro Tips
- Use very cold butter straight from the refrigerator because small solid butter pieces create the best flaky layers during baking.
- Measure the flour carefully with a kitchen scale because too much flour makes the dough dry and produces dense crumbly scones.
- Avoid overworking the dough after adding the cream because gentle mixing keeps the centers tender and prevents tough scones.
- Leave enough space between the eight wedges so the scones can rise naturally and develop lightly golden edges on every side.
Storage Instructions
Room temperature storage is perfect when you plan to enjoy these Cinnamon Chocolate Chip Scones within the next couple of days. Allow the baked scones to cool completely before transferring them to an airtight container. Store them at room temperature for up to 2 days and keep the container away from direct heat to help preserve the buttery texture. Refrigeration works when you need to keep the scones slightly longer although it can make their texture firmer.
Place the completely cooled scones in an airtight container and refrigerate for up to 5 days. Warm them gently before serving to bring back their soft centers and pleasant chocolate texture. Freezing is a wonderful option for preparing homemade scones ahead of time. Wrap each completely cooled scone individually and place the wrapped portions in a freezer-safe bag or container. Freeze for up to 2 months and thaw at room temperature when you are ready to enjoy them. Reheating helps restore the fresh baked texture and makes the chocolate chips slightly soft again.
Place a thawed scone in a 300°F oven for about 5 to 8 minutes until warmed through. You can also microwave an individual portion for approximately 10 to 15 seconds although the oven gives the outside a slightly crisper finish. Unbaked scone wedges can also be frozen for convenient future breakfasts. Arrange the shaped wedges separately until frozen solid and then transfer them into a freezer-safe container. Bake directly from frozen at 400°F and allow a few additional minutes beyond the usual baking time until the centers are fully cooked and the edges are golden.
Frequently Asked Questions
Yes! Shape the scones and refrigerate them overnight before baking fresh the next morning for a convenient breakfast.
Too much flour or overbaking can dry out the scones so measure carefully and remove them once the centers are set.
Absolutely! Freeze the shaped wedges until firm and store them in a freezer-safe container for up to 2 months.
Keep the butter cold and avoid overmixing the dough because both techniques help preserve a light and tender crumb.
See You in the Kitchen
I hope you enjoy all the recipes I share with you including these delicious Cinnamon Chocolate Chip Scones and our Chocolate Peppermint Cookies and Italian Christmas Cookies recipes for more homemade sweet treats.
I hope you try them and enjoy them and rate them and share them with your friends and family!
Print
Cinnamon Chocolate Chip Scones
- Total Time: 40 minutes
- Yield: 8 servings
Description
These Cinnamon Chocolate Chip Scones are an easy homemade treat with tender buttery centers and golden edges filled with warm cinnamon and rich chocolate chips. This quick and simple recipe is one of the best breakfast ideas for a cozy weekend brunch or holiday gathering. Enjoy these sweet bakery-style scones with coffee or tea and serve them as a special party treat. They also make a lovely addition to healthy balanced breakfast menus when enjoyed with fresh fruit.
Ingredients
- 2 1/2 cups (300 g) All-purpose flour
- 1/3 cup (67 g) Granulated sugar
- 1 tablespoon (12 g) Baking powder
- 2 teaspoons (5 g) Ground cinnamon
- 1/2 teaspoon (3 g) Fine salt
- 1/2 cup (113 g) Unsalted butter
- 3/4 cup (180 ml) plus 1 tablespoon (15 ml) for brushing Heavy cream
- 1 Large egg
- 1 teaspoon (5 ml) Vanilla extract
- 3/4 cup (130 g) Semi-sweet chocolate chips
- 1 tablespoon (12 g) Coarse sparkling sugar
Instructions
- Add the all-purpose flour to a large mixing bowl and sprinkle the granulated sugar over the top. Add the baking powder followed by the ground cinnamon and fine salt. Whisk everything together until the cinnamon is distributed throughout the pale flour mixture.
The dry ingredients should change from separate piles into one light beige mixture with tiny cinnamon speckles throughout. Make sure the baking powder is evenly incorporated because this will help the scones rise consistently during baking.
- Add the cold cubed unsalted butter directly to the cinnamon flour mixture. Work the butter into the dry ingredients using a pastry cutter or your fingertips until the mixture resembles coarse crumbs with some larger butter pieces remaining.
The texture should change from fine powder into a rough crumbly mixture with visible irregular butter pieces. These cold butter pockets are important because they release moisture during baking and help create the tender flaky layers that make homemade scones so delicious.
- In a separate small bowl whisk together 3/4 cup of heavy cream with the egg and vanilla extract. Pour the liquid mixture into the crumbly flour mixture and gently fold until a thick shaggy dough begins to form. Add the semi-sweet chocolate chips and fold just until they are distributed throughout the dough.
The loose crumbs should gradually become a soft and slightly sticky dough containing visible cinnamon flecks and chocolate chips. Some dry patches may remain around the edges but avoid excessive mixing because overworked dough can produce tough scones.
- Transfer the shaggy dough onto a lightly floured work surface and gently press it together into one thick round disc measuring approximately 7 inches across and 1 inch thick. Avoid kneading the dough aggressively because the butter should remain cold and the texture should stay tender.
Cut the disc into eight roughly equal triangular wedges. Arrange the eight pieces on a parchment-lined baking sheet with space between them so the heat can circulate around every scone. The pieces should look rustic with slightly uneven edges and chocolate chips visible along the cut sides.
- Preheat the oven to 400°F or 200°C. Brush the tops of all eight unbaked scones with the reserved tablespoon of heavy cream and sprinkle the coarse sparkling sugar unevenly over their surfaces. Place the baking tray in the oven and bake for 20 to 25 minutes until the scones have risen and their edges become lightly golden brown.
The dough will expand into thick triangular scones with lightly cracked tops and soft chocolate pockets. The butter creates tender layers while the cream-brushed surfaces develop golden patches and a delicate sugar crust. Allow the scones to cool on the tray for about 5 minutes before serving.
- Transfer one cooled but still slightly warm scone from the baking tray onto a white serving plate. Break the scone gently into two uneven pieces to reveal the soft interior and the scattered pockets of chocolate chips inside. Place the pieces close together with the exposed crumb facing outward.
The finished scone should have a lightly crisp golden exterior and a tender buttery center with warm cinnamon flavor. The chocolate chips will remain slightly soft and the sparkling sugar topping will add a gentle crunch. Enjoy the scone while it is fresh with your favorite coffee or tea.
Notes
Pro Tips:
- Use very cold butter straight from the refrigerator because small solid butter pieces create the best flaky layers during baking.
- Measure the flour carefully with a kitchen scale because too much flour makes the dough dry and produces dense crumbly scones.
- Avoid overworking the dough after adding the cream because gentle mixing keeps the centers tender and prevents tough scones.
- Leave enough space between the eight wedges so the scones can rise naturally and develop lightly golden edges on every side.
Storage: Room temperature storage is perfect when you plan to enjoy these Cinnamon Chocolate Chip Scones within the next couple of days. Allow the baked scones to cool completely before transferring them to an airtight container. Store them at room temperature for up to 2 days and keep the container away from direct heat to help preserve the buttery texture.
Refrigeration works when you need to keep the scones slightly longer although it can make their texture firmer. Place the completely cooled scones in an airtight container and refrigerate for up to 5 days. Warm them gently before serving to bring back their soft centers and pleasant chocolate texture.
Freezing is a wonderful option for preparing homemade scones ahead of time. Wrap each completely cooled scone individually and place the wrapped portions in a freezer-safe bag or container. Freeze for up to 2 months and thaw at room temperature when you are ready to enjoy them.
Reheating helps restore the fresh baked texture and makes the chocolate chips slightly soft again. Place a thawed scone in a 300°F oven for about 5 to 8 minutes until warmed through. You can also microwave an individual portion for approximately 10 to 15 seconds although the oven gives the outside a slightly crisper finish.
Unbaked scone wedges can also be frozen for convenient future breakfasts. Arrange the shaped wedges separately until frozen solid and then transfer them into a freezer-safe container. Bake directly from frozen at 400°F and allow a few additional minutes beyond the usual baking time until the centers are fully cooked and the edges are golden.
- Prep Time: 15 minutes
- Cook Time: 25 minutes
- Category: Breakfast
- Cuisine: American