

When you want something different from traditional Christmas cookies then these Peanut Butter Blossoms offer a delicious twist. This peanut butter cookie recipe is soft and sweet and packed with rich peanut butter flavor and finished with a chocolate kiss on top which makes it perfect for cozy afternoons or holiday gatherings.
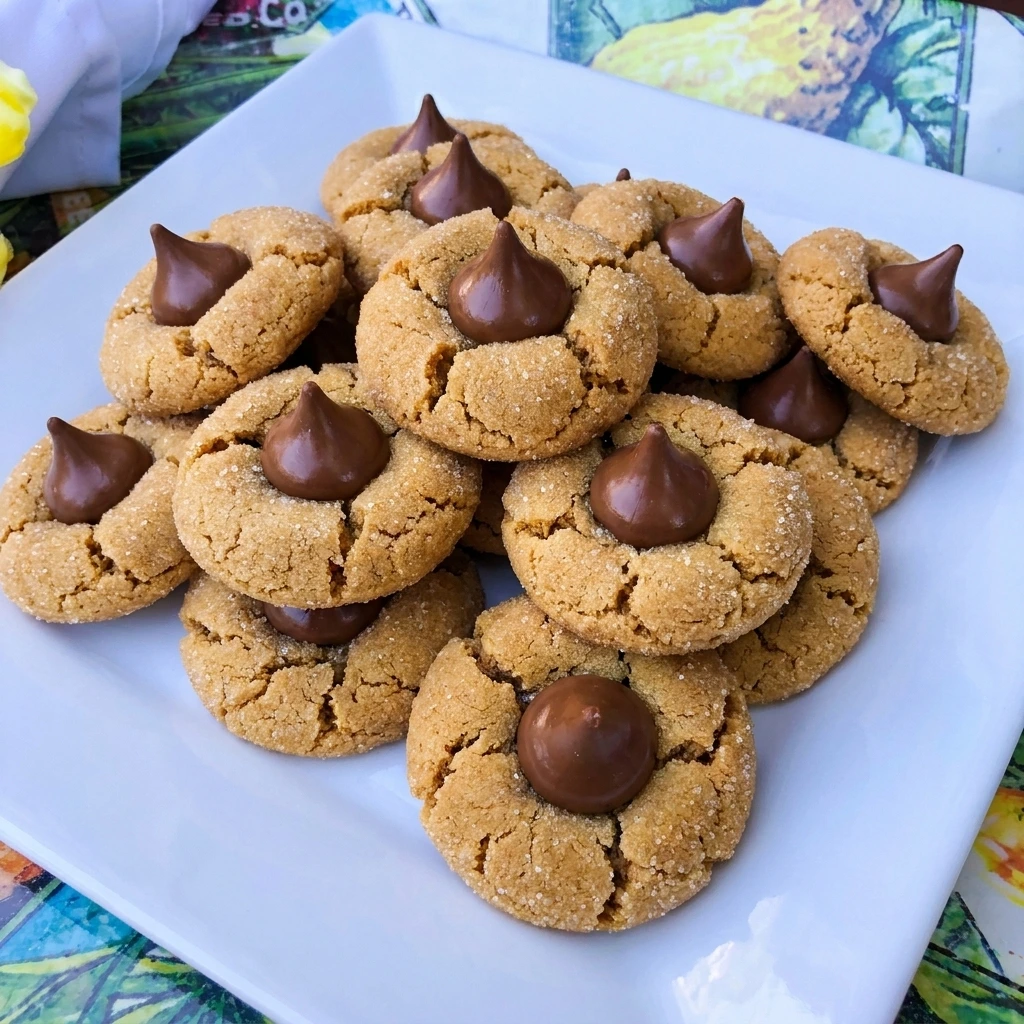
This recipe is perfect for Thanksgiving and Christmas cookie exchanges and holiday parties or as a sweet treat for family gatherings. If you want more holiday baking ideas then also check out this Southern Pecan Praline Cake for another delicious dessert to share.
Ingredients
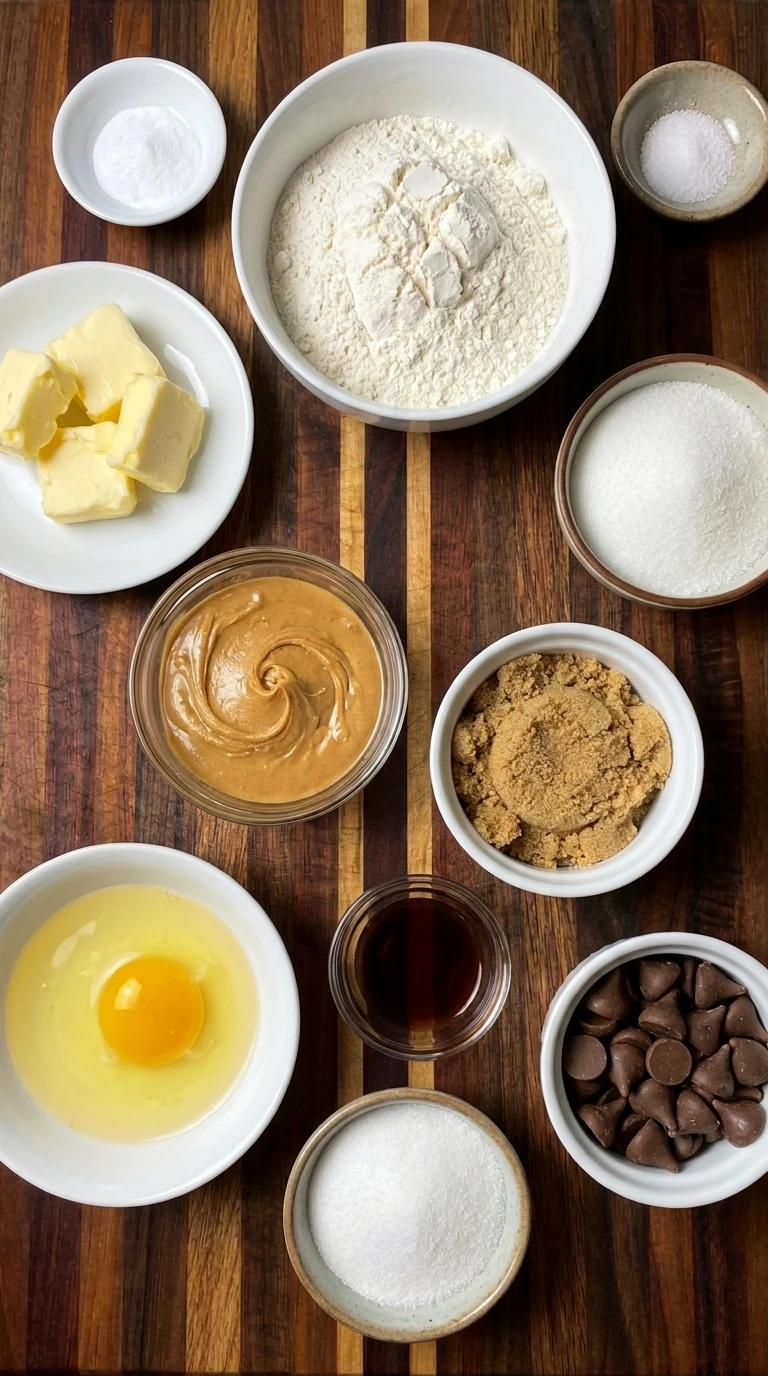
Here is what I use for this recipe :
- All-purpose flour: Provides structure for the cookie dough and helps each blossom hold its rounded shape while keeping the baked center tender.
- Baking soda: Helps the cookies spread gently and develop a soft texture with lightly golden edges during baking.
- Fine salt: Balances the sweetness of the dough and enhances the roasted peanut flavor and chocolate topping.
- Unsalted butter: Adds richness and moisture while helping the dough develop a tender texture and delicate golden edges.
- Creamy peanut butter: Provides the signature nutty flavor and smooth texture while helping the cookies remain soft after baking.
- Granulated sugar: Sweetens the dough and encourages light browning while helping create the familiar delicate exterior.
- Light brown sugar: Adds moisture and a subtle caramel flavor that complements the peanut butter and keeps the cookies pleasantly tender.
- Large egg: Binds the cookie ingredients together and gives the dough enough structure to support the chocolate centers.
- Vanilla extract: Adds warm aromatic sweetness and rounds out the rich peanut butter flavor without overpowering the chocolate.
- Granulated sugar for rolling: Coats the outside of each dough ball and creates a delicate sparkling crust with a lightly crisp finish.
- Milk chocolate kisses: Create the classic chocolate center and gently soften against the warm baked cookies while keeping their recognizable pointed shape.
Tools I Use :
- Large mixing bowl: Holds the butter and peanut butter mixture while providing enough space to incorporate the egg and dry ingredients into a uniform dough.
- Medium mixing bowl: Allows the flour and baking soda and salt to be combined evenly before being added to the wet ingredients.
- Electric hand mixer: Creams the butter and peanut butter with the sugars to develop a smooth mixture with an even consistency.
- Measuring cups and spoons: Measure the wet and dry ingredients accurately so the dough maintains the correct balance of moisture and structure.
- Silicone spatula: Scrapes the sides of the mixing bowl and helps fold the dry ingredients into the creamed peanut butter mixture.
- Small shallow dish: Holds the additional granulated sugar used to coat each shaped cookie dough ball.
- Cookie scoop: Helps portion the dough into approximately equal pieces so the cookies bake at a consistent rate.
- Two baking sheets: Provide sufficient space for 24 shaped cookies to spread during baking without touching each other.
- Parchment paper: Prevents the cookie dough from sticking and allows the finished cookies to release without breaking.
- Oven: Provides consistent heat to bake the peanut butter dough until the cookies develop set edges and tender centers.
- Cooling rack: Allows air to circulate around the baked cookies so they cool evenly and their chocolate centers can firm up.
- White dessert plate: Provides a clean serving container for presenting individual finished Peanut Butter Blossoms.
Instructions
Step 1: Cream the peanut butter with butter and sugars
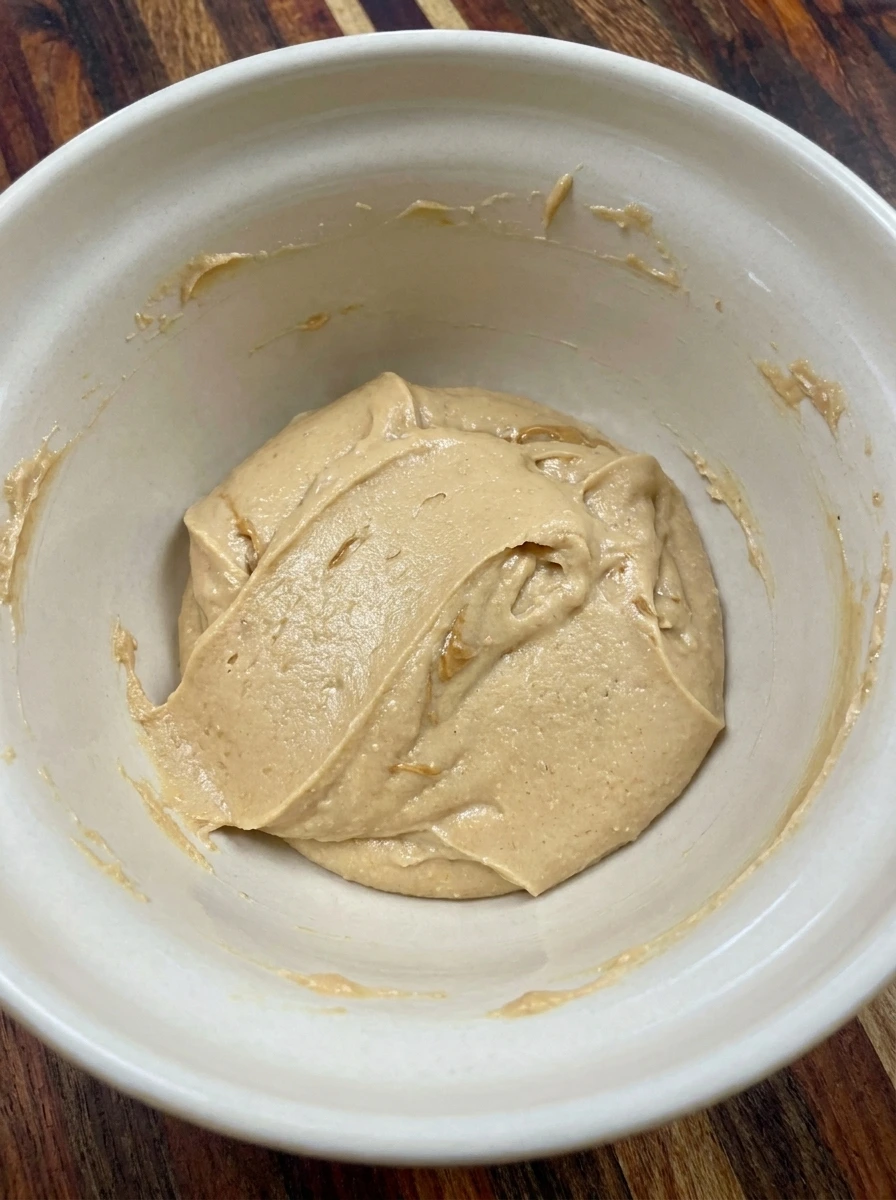
Place the softened unsalted butter and creamy peanut butter into a large mixing bowl. Add the granulated sugar and packed light brown sugar before beating everything together until the mixture becomes creamy and visibly lighter. The separate ingredients should gradually turn into one thick and smooth peanut butter mixture. Continue mixing for about 2 minutes until the sugar is evenly distributed and the mixture holds soft ridges. The color should be pale tan with a few slightly darker areas where the peanut butter has folded into the butter.
Tip: Use regular creamy peanut butter for consistent results because natural peanut butter can make the dough oily or crumbly.
Step 2: Mix the egg and dry ingredients into the dough
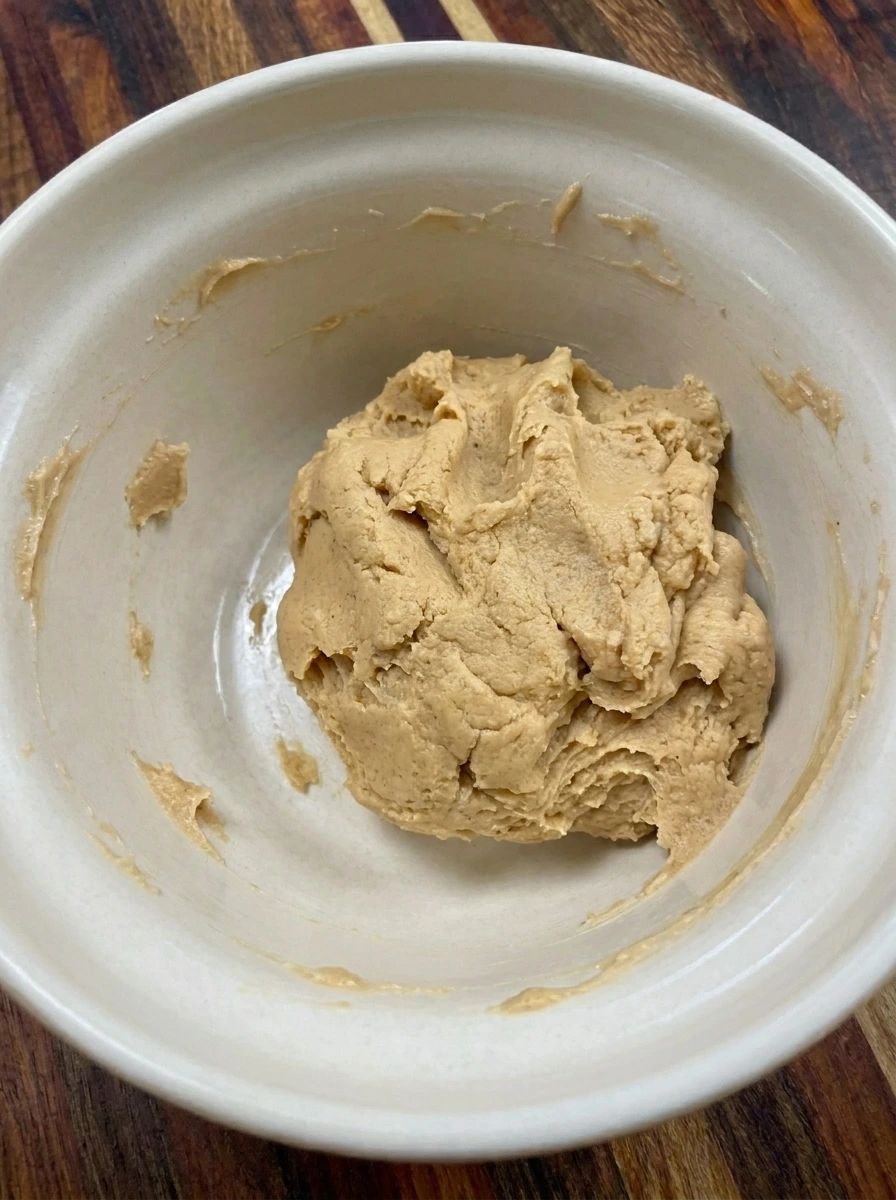
Add the egg and vanilla extract to the creamy peanut butter mixture and beat until the egg disappears into the mixture. In a separate bowl combine the flour with baking soda and salt so the dry ingredients are evenly distributed. Gradually fold the dry mixture into the peanut butter mixture until a thick and soft cookie dough forms. Stop mixing once there are no visible pockets of dry flour because excessive mixing can make the cookies firm rather than tender.
Tip: Stop mixing as soon as the flour disappears into the dough because overworking the mixture can produce dense cookies.
Step 3: Roll the dough into sugar-coated balls
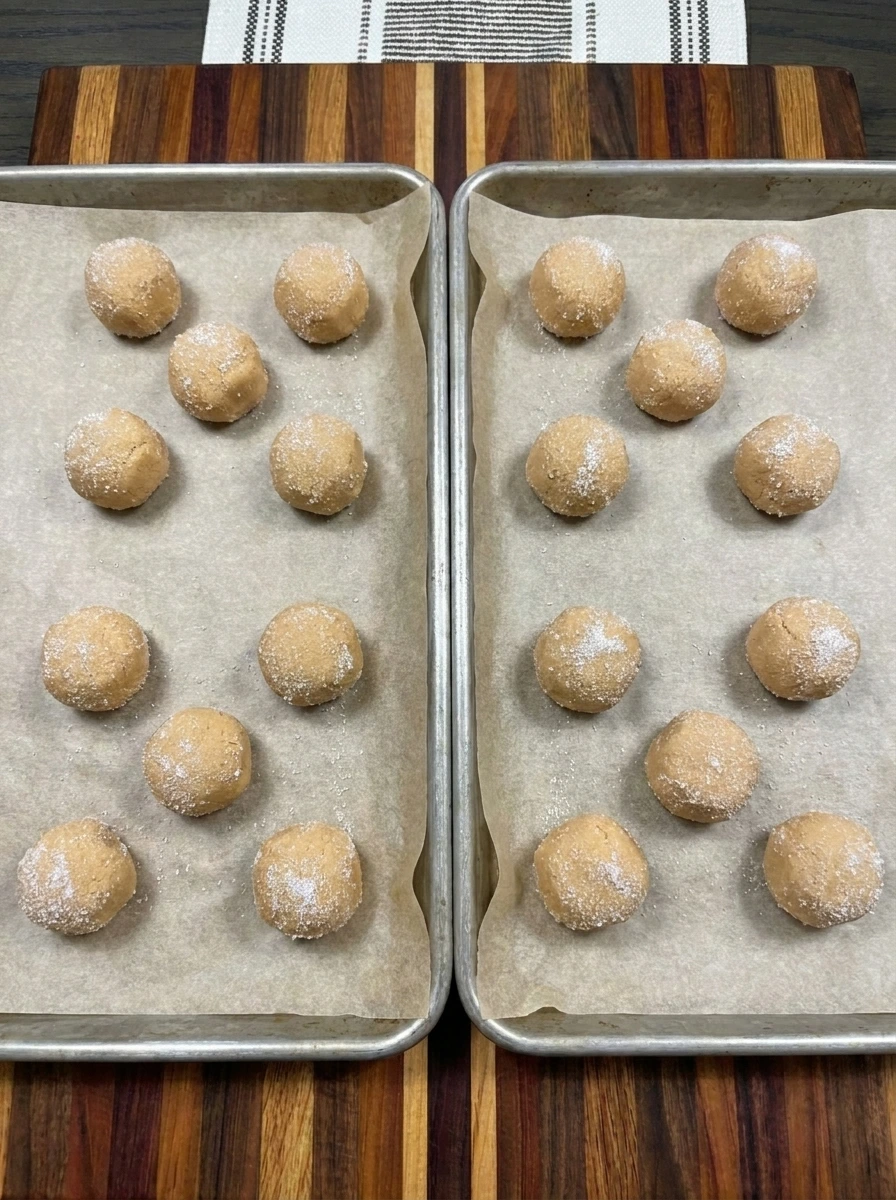
Preheat the oven to 375°F or 190°C and line two baking sheets with parchment paper. Divide the dough into 24 approximately equal portions and roll each piece between your palms to form a ball about 1 inch across. Place the additional granulated sugar into a shallow dish and roll each ball until the exterior is lightly coated. Transfer the dough balls onto the prepared baking sheets with approximately 2 inches between them so they have room to spread while baking.
Tip: Keep the dough balls close to the same weight for even baking while leaving enough space for the cookies to spread naturally.
Step 4: Bake the cookies until lightly golden
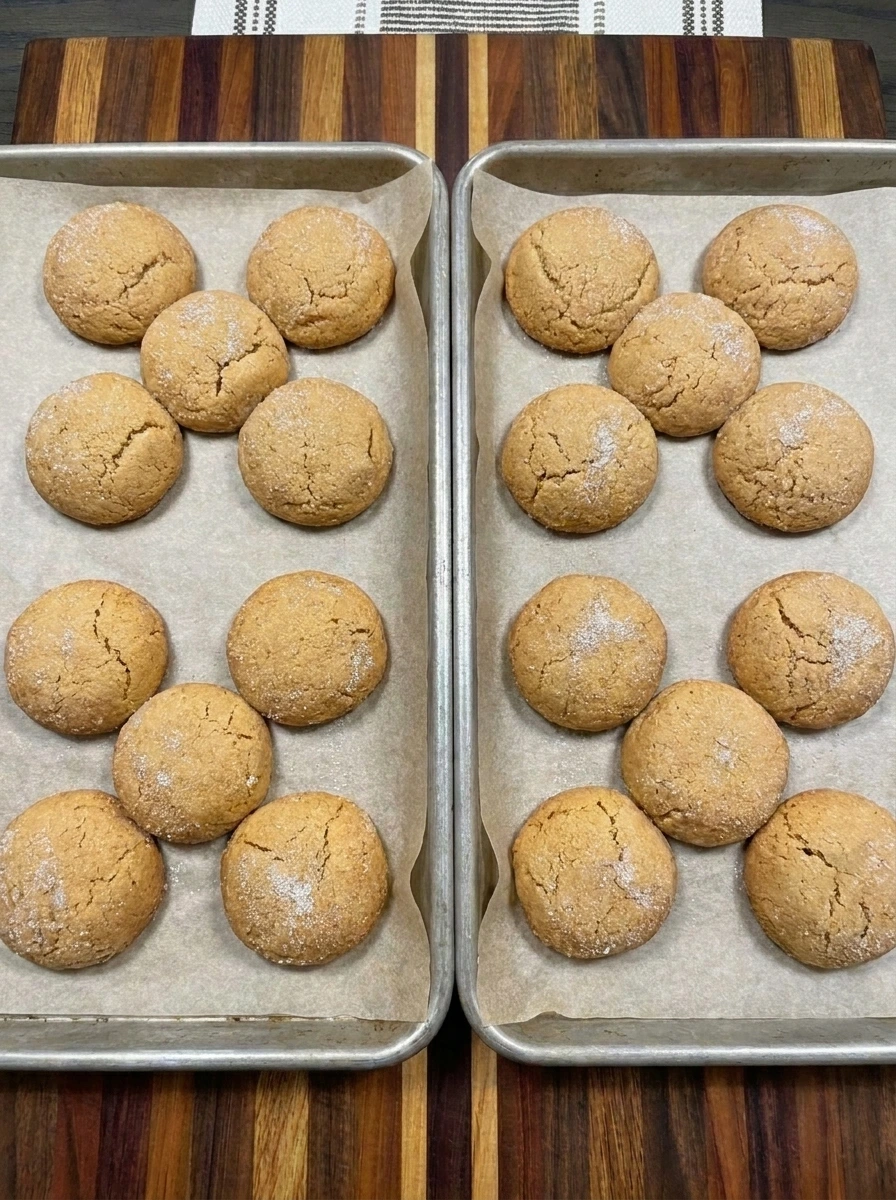
Place one baking sheet at a time into the preheated oven and bake for 8 to 10 minutes. The dough balls will spread into thicker rounded cookies as the exterior becomes pale golden and the edges begin to set. Remove the tray when the tops appear slightly puffed and the edges have just started turning golden. The centers should still look soft because the cookies will continue setting from the heat of the baking tray.
Tip: Remove the cookies when the edges are just set because slightly soft centers are essential for tender peanut butter blossoms.
Step 5: Press chocolate kisses into the warm cookies
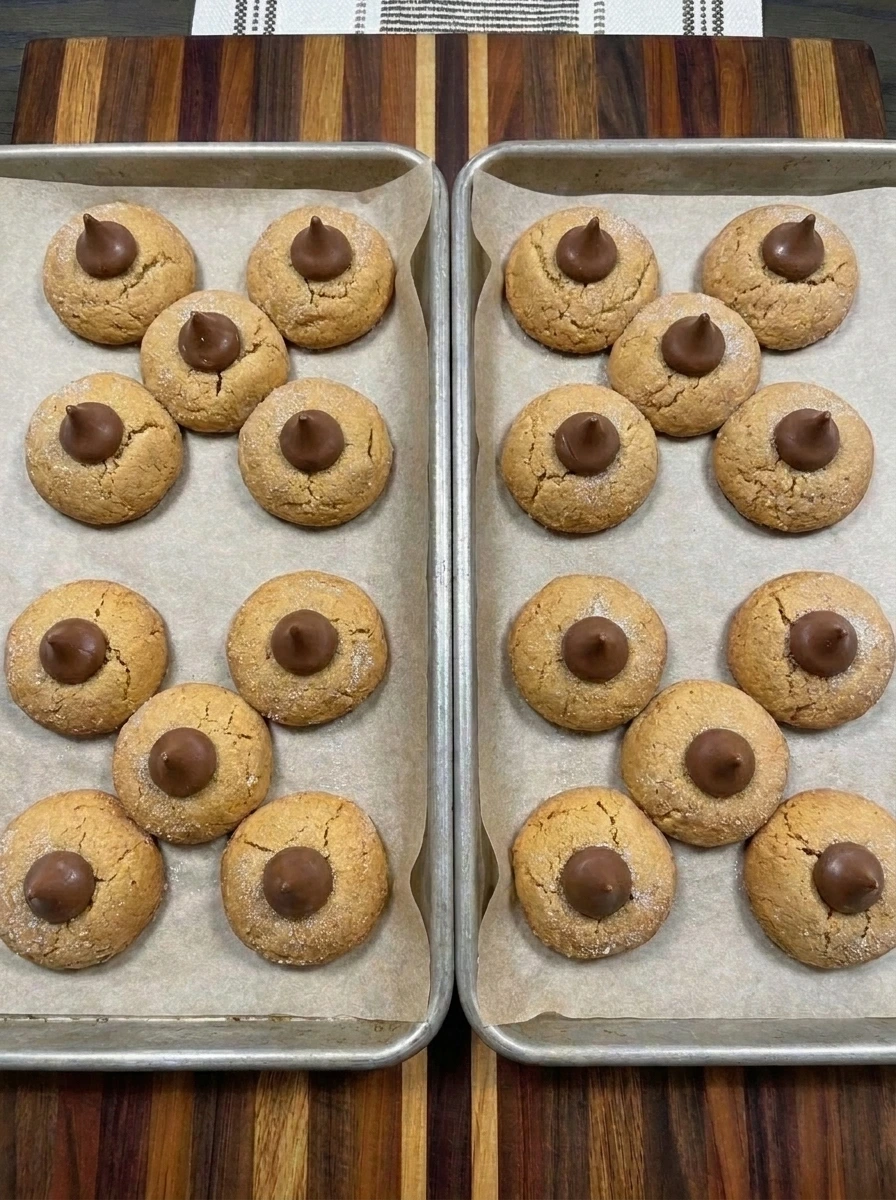
Unwrap all 24 chocolate kisses while the cookies are baking so they are ready when the trays come out of the oven. Immediately press one chocolate kiss gently into the center of each warm cookie after baking. The pressure will cause the tops to crack naturally around the chocolate while the soft centers flatten slightly. Let the cookies rest on their baking trays for 5 minutes before transferring them to cool completely so the chocolate can gradually firm up.
Tip: Press each chocolate kiss into the cookies immediately after baking so the warm centers crack around the chocolate without breaking.
Step 6: Cool and serve a Peanut Butter Blossom
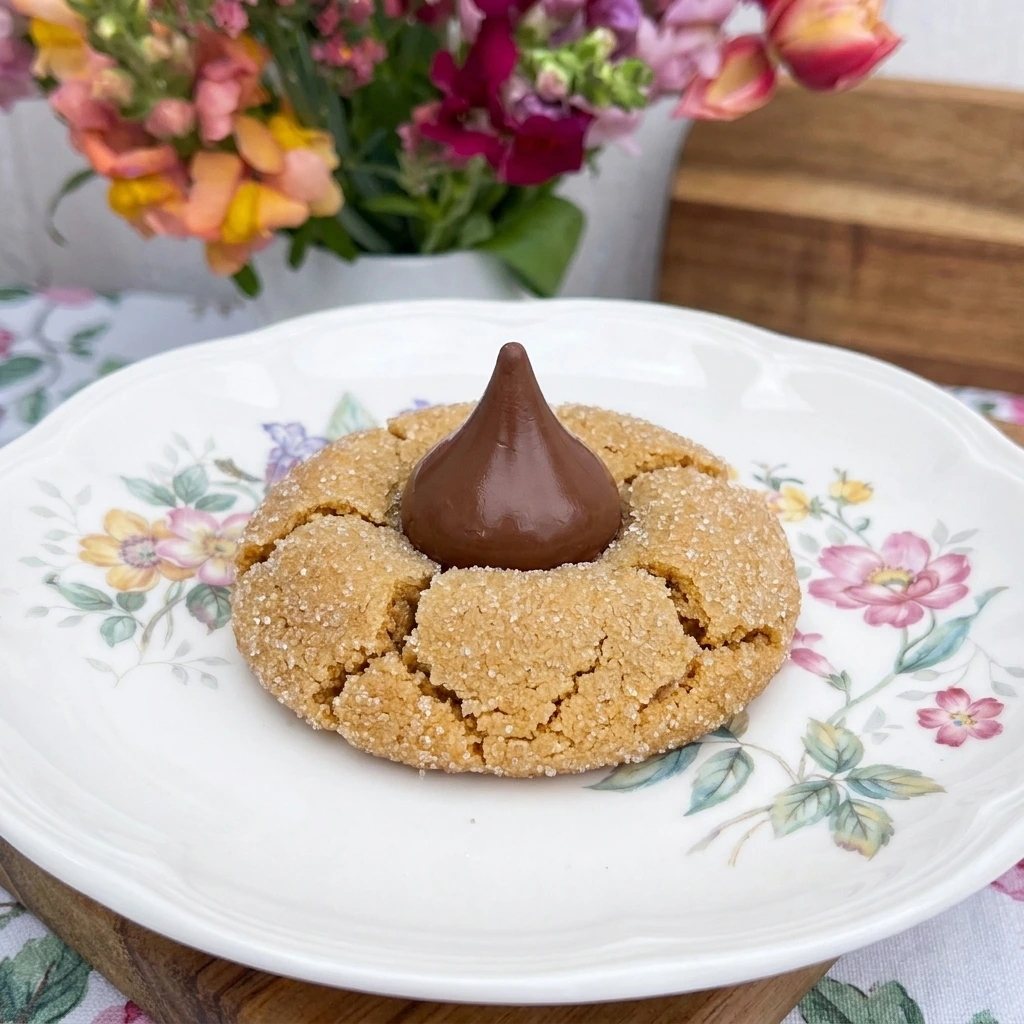
Allow the cookies to finish cooling until their centers become tender but stable and the chocolate kisses hold their shape. The finished cookies should have lightly crisp sugar-coated exteriors and soft peanut butter interiors with delicate cracks around the chocolate. Transfer one completely cooled cookie to a small white dessert plate and serve it as a single portion. The chocolate should sit firmly in the center while the golden peanut butter cookie keeps its homemade texture and slightly uneven edges.
Tip: Allow the chocolate to set before stacking or storing the cookies so the kisses retain their shape and stay neatly attached.
Pro Tips
- Use conventional creamy peanut butter rather than a runny natural variety because stable peanut butter creates softer cookies.
- Measure the flour carefully by spooning it into the measuring cup and leveling the top to avoid a dry or crumbly dough.
- Unwrap the chocolate kisses before baking finishes so you can press them into the warm cookies while the centers are soft.
- Let the chocolate centers cool completely before packing the cookies because warm chocolate can smear when the cookies overlap.
Storage Instructions
Room temperature storage works well for Peanut Butter Blossoms because the cookie centers remain tender when protected from air. Allow the cookies to cool completely before transferring them into an airtight container. Keep the container in a cool and dry location away from direct heat for up to 5 days.
For longer storage place the cooled cookies in a freezer-safe container with parchment paper between layers. The parchment helps protect the chocolate kisses and prevents the cookies from sticking together. Freeze for up to 3 months for the best flavor and texture. When you are ready to enjoy frozen cookies remove the desired number and allow them to thaw at room temperature for approximately 30 minutes.
Leave them loosely spaced until the chocolate centers return to their normal texture. Avoid heating the cookies excessively because the chocolate kisses may melt and lose their shape. You can also refrigerate the prepared cookie dough for up to 48 hours before baking. Keep it tightly covered and allow it to soften slightly if it becomes too firm to portion. Roll the dough into balls and coat them with sugar just before baking for the best texture.
Frequently Asked Questions
The warm cookies naturally split when you press a chocolate kiss into the soft center and this creates their classic appearance.
Yes you can prepare the dough a day ahead and refrigerate it before shaping and baking the cookies as directed.
Avoid overbaking and store the cooled cookies in an airtight container to preserve their tender peanut butter centers.
Yes the finished cookies freeze well for up to three months when packed carefully between layers of parchment paper.
See You in the Kitchen
These Peanut Butter Blossoms are a great way to satisfy your Christmas cookie cravings without buying a box of cookies from the store.
I typically make a batch of Pumpkin Cinnamon Rolls or prepare some Caramel Apple Punch at the same time I bake these cookies so all of my holiday treats will be ready to enjoy together.
Even my kids love this one!
Print
Peanut Butter Blossoms
- Total Time: 55 minutes
- Yield: 24 servings
Description
These Peanut Butter Blossoms are easy homemade cookies with soft peanut butter centers and sweet chocolate kisses pressed into every golden cookie. This quick and simple recipe is one of the best Christmas baking ideas for holiday parties and cookie exchanges. Made with familiar pantry ingredients and no complicated techniques they are perfect for beginners. Enjoy them as an occasional treat alongside healthy snacks or pack them for a festive potluck or family brunch.
Ingredients
- 1 3/4 cups (210 g) All-purpose flour
- 1 teaspoon Baking soda
- 1/2 teaspoon Fine salt
- 1/2 cup (113 g) Unsalted butter
- 3/4 cup (190 g) Creamy peanut butter
- 1/2 cup (100 g) Granulated sugar
- 1/2 cup packed (110 g) Light brown sugar
- 1 egg Large egg
- 1 teaspoon Vanilla extract
- 1/4 cup (50 g) Granulated sugar for rolling
- 24 individually wrapped chocolates (about 110 g unwrapped) Milk chocolate kisses
Instructions
- Place the softened unsalted butter and creamy peanut butter into a large mixing bowl. Add the granulated sugar and packed light brown sugar before beating everything together until the mixture becomes creamy and visibly lighter. The separate ingredients should gradually turn into one thick and smooth peanut butter mixture.
Continue mixing for about 2 minutes until the sugar is evenly distributed and the mixture holds soft ridges. The color should be pale tan with a few slightly darker areas where the peanut butter has folded into the butter.
- Add the egg and vanilla extract to the creamy peanut butter mixture and beat until the egg disappears into the mixture. In a separate bowl combine the flour with baking soda and salt so the dry ingredients are evenly distributed.
Gradually fold the dry mixture into the peanut butter mixture until a thick and soft cookie dough forms. Stop mixing once there are no visible pockets of dry flour because excessive mixing can make the cookies firm rather than tender.
- Preheat the oven to 375°F or 190°C and line two baking sheets with parchment paper. Divide the dough into 24 approximately equal portions and roll each piece between your palms to form a ball about 1 inch across.
Place the additional granulated sugar into a shallow dish and roll each ball until the exterior is lightly coated. Transfer the dough balls onto the prepared baking sheets with approximately 2 inches between them so they have room to spread while baking.
- Place one baking sheet at a time into the preheated oven and bake for 8 to 10 minutes. The dough balls will spread into thicker rounded cookies as the exterior becomes pale golden and the edges begin to set.
Remove the tray when the tops appear slightly puffed and the edges have just started turning golden. The centers should still look soft because the cookies will continue setting from the heat of the baking tray.
- Unwrap all 24 chocolate kisses while the cookies are baking so they are ready when the trays come out of the oven. Immediately press one chocolate kiss gently into the center of each warm cookie after baking.
The pressure will cause the tops to crack naturally around the chocolate while the soft centers flatten slightly. Let the cookies rest on their baking trays for 5 minutes before transferring them to cool completely so the chocolate can gradually firm up.
- Allow the cookies to finish cooling until their centers become tender but stable and the chocolate kisses hold their shape. The finished cookies should have lightly crisp sugar-coated exteriors and soft peanut butter interiors with delicate cracks around the chocolate.
Transfer one completely cooled cookie to a small white dessert plate and serve it as a single portion. The chocolate should sit firmly in the center while the golden peanut butter cookie keeps its homemade texture and slightly uneven edges.
Notes
Pro Tips:
- Use conventional creamy peanut butter rather than a runny natural variety because stable peanut butter creates softer cookies.
- Measure the flour carefully by spooning it into the measuring cup and leveling the top to avoid a dry or crumbly dough.
- Unwrap the chocolate kisses before baking finishes so you can press them into the warm cookies while the centers are soft.
- Let the chocolate centers cool completely before packing the cookies because warm chocolate can smear when the cookies overlap.
Storage: Room temperature storage works well for Peanut Butter Blossoms because the cookie centers remain tender when protected from air. Allow the cookies to cool completely before transferring them into an airtight container. Keep the container in a cool and dry location away from direct heat for up to 5 days.
For longer storage place the cooled cookies in a freezer-safe container with parchment paper between layers. The parchment helps protect the chocolate kisses and prevents the cookies from sticking together. Freeze for up to 3 months for the best flavor and texture.
When you are ready to enjoy frozen cookies remove the desired number and allow them to thaw at room temperature for approximately 30 minutes. Leave them loosely spaced until the chocolate centers return to their normal texture. Avoid heating the cookies excessively because the chocolate kisses may melt and lose their shape.
You can also refrigerate the prepared cookie dough for up to 48 hours before baking. Keep it tightly covered and allow it to soften slightly if it becomes too firm to portion. Roll the dough into balls and coat them with sugar just before baking for the best texture.
- Prep Time: 20 minutes
- Cook Time: 20 minutes
- Category: Dessert
- Cuisine: American