Seriously and no joke this is the best Halloween Cookies and Cream Cheesecake recipe. It is the one my family asks for every spooky season and before that it started as a simple cookies and cream dessert we made together for Halloween. It is a classic cheesecake with simple and delicious ingredients. Crushed chocolate cookies are layered with a creamy vanilla filling plus more cookie pieces plus colorful Halloween candy.
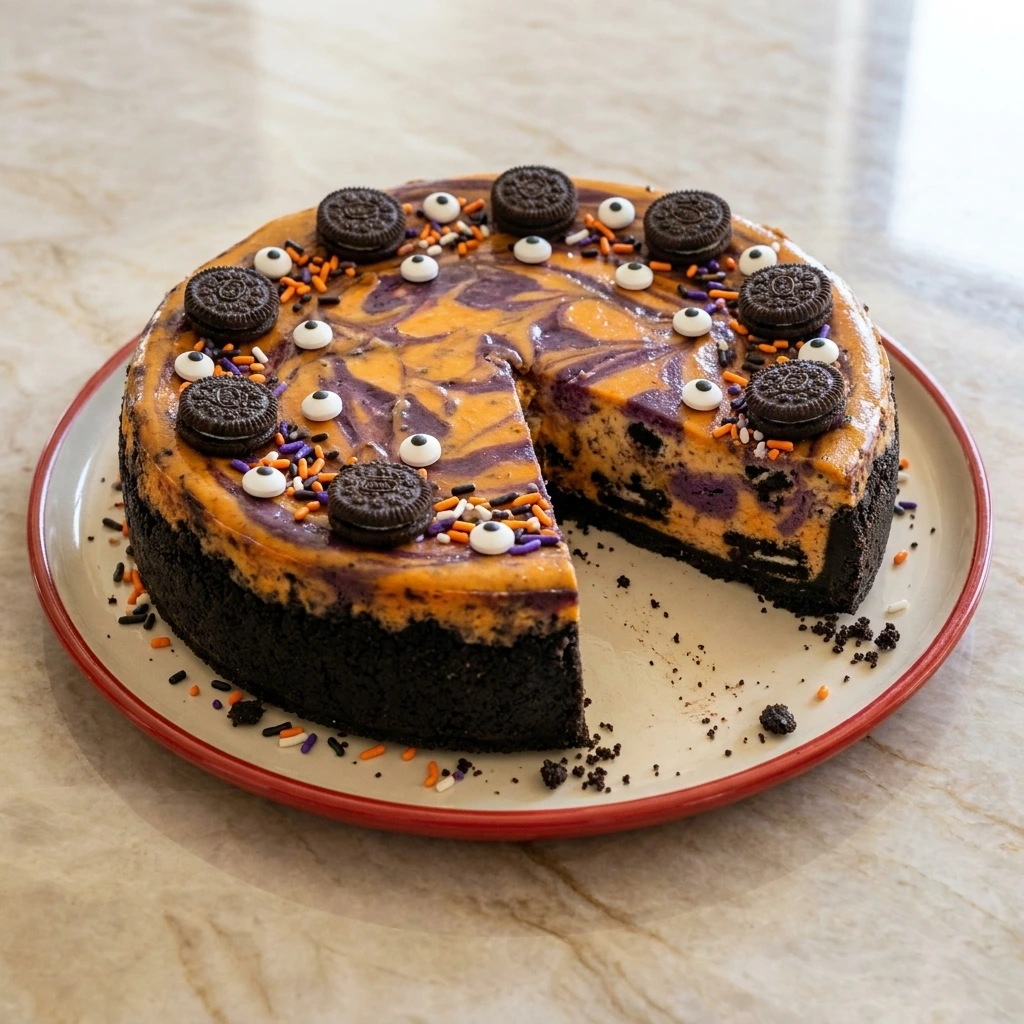
It is perfect for a party dessert table or a cozy movie night with a cold glass of milk on the side. A Halloween Cookies and Cream Cheesecake is one of my go to easy holiday desserts. Not only does it make for a super delicious treat but it also looks festive without complicated decorating. Also there are no difficult methods or unusual ingredients needed.
And party prep is a cinch. I often make this cheesecake the day before and serve it beside Mini Oreo Cheesecake Cups so everything is chilled and ready when guests arrive. With just a few basic ingredients probably already in the fridge and pantry you can whip up a full cheesecake or neat slices or even small party portions for a fancy and spooky dessert.
Ingredients

Here is what I use for this recipe and you can adjust nuts or spices based on preference:
- Chocolate sandwich cookies: Forms the dark crumb crust plus adds crunchy cookie pieces throughout the filling and over the finished cheesecake.
- Unsalted butter: Binds the crushed cookie crumbs so the crust holds together after baking and chilling.
- Cream cheese: Creates the rich and smooth cheesecake base while providing structure after chilling.
- Granulated sugar: Sweetens the tangy cream cheese filling without overpowering the chocolate cookie flavor.
- Sour cream: Adds moisture plus a gentle tang while helping the filling stay creamy and tender.
- Vanilla extract: Rounds out the chocolate and cream flavors with a warm bakery style aroma.
- Large eggs: Set the cheesecake filling during baking while keeping the finished texture smooth and sliceable.
- Orange gel food coloring: Adds a vivid Halloween accent to part of the filling without thinning the cheesecake mixture.
- Purple gel food coloring: Creates a contrasting spooky swirl through the orange and white cheesecake filling.
- Mini chocolate sandwich cookies: Decorate the top with irregular cookie shapes that clearly show the cookies and cream theme.
- Candy eyes: Add playful Halloween character to the finished cheesecake without changing the filling texture.
- Halloween sprinkles: Provide small orange plus purple plus black accents over the chilled cheesecake surface.
Tools You’ll Need
- Food processor: Crushes the chocolate sandwich cookies into fine crumbs while leaving a few natural coarse pieces.
- 9 inch springform cake pan: Holds the crust plus filling and allows the chilled cheesecake to release without damaging the sides.
- Large mixing bowl: Provides enough space to blend the cream cheese filling and fold in cookie pieces evenly.
- Electric mixer: Smooths the softened cream cheese and sugar into a creamy filling with fewer lumps.
- Rubber spatula: Folds cookie pieces into the batter and scrapes the bowl without crushing every chunk.
- Small bowls: Hold the orange and purple filling portions separately before swirling them into the cheesecake.
- Cooling rack: Allows air to circulate around the baked cheesecake so it cools gradually before refrigeration.
- White serving plate: Displays the whole cheesecake and supports clean slicing plus final presentation.
Instructions
Step 1: Press the cookie crumb crust

Crush 22 chocolate sandwich cookies into uneven fine crumbs and combine them with the melted butter until the mixture looks dark plus damp plus clumpy. Press the crumbs into the bottom of the cake pan with slightly thicker areas around the edge so the crust looks compact but naturally imperfect.
Tip: Press firmly enough to remove loose gaps yet avoid polishing the surface perfectly because a lightly uneven crust looks homemade.
Step 2: Fold cookie pieces into the filling
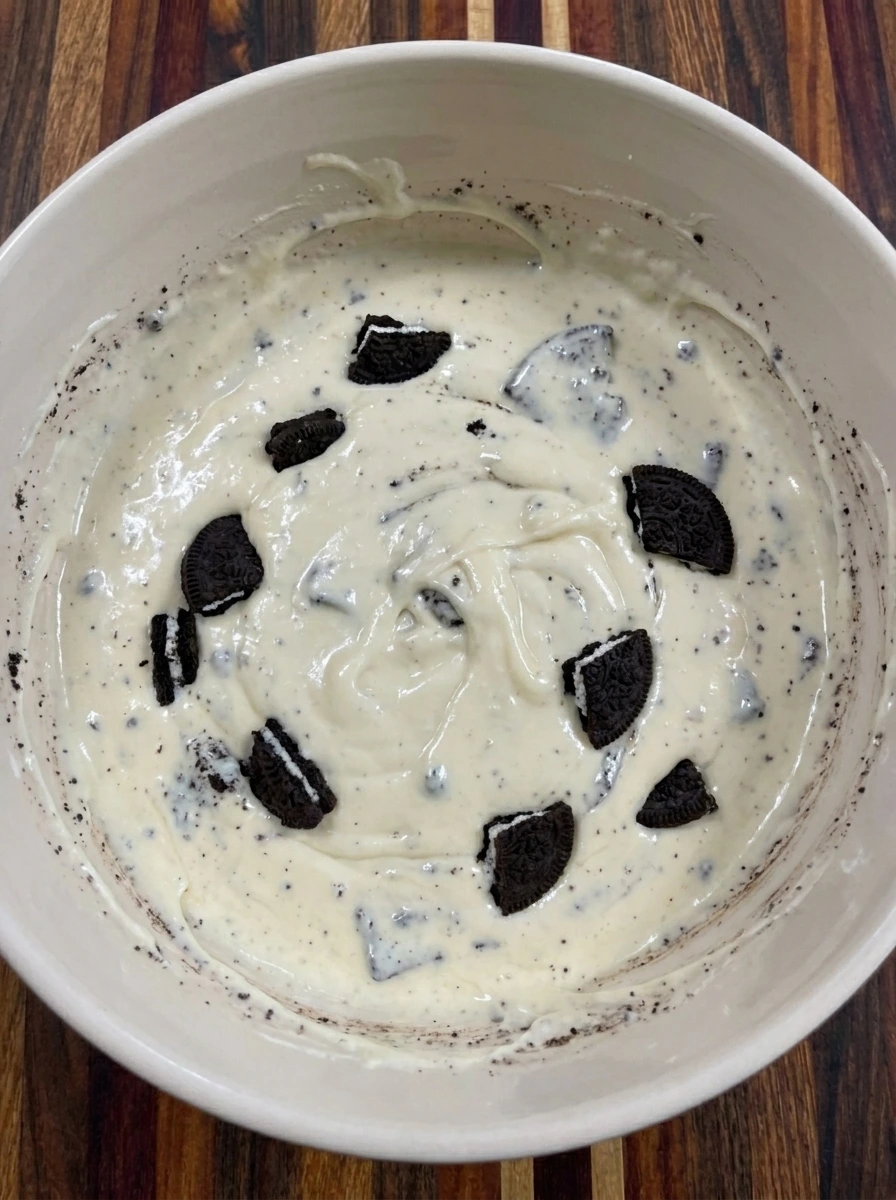
Beat the softened cream cheese with sugar plus sour cream plus vanilla until the mixture changes from thick blocks into a smooth pale cream. Blend in exactly three eggs and then fold in 8 roughly broken chocolate sandwich cookies so dark pieces remain scattered through the filling instead of disappearing completely.
Tip: Mix only until the eggs disappear because overmixing adds extra air and can cause large cracks while the cheesecake bakes.
Step 3: Layer and swirl the colored filling

Pour most of the cookie filled batter over the pressed crust and spread it loosely so the surface settles into gentle uneven waves. Tint two small portions orange and purple and drop them across the pale filling before swirling them together just enough to create visible ribbons without blending the colors into one shade.
Tip: Use only a few broad swirls so the orange plus purple plus white colors stay distinct and remain visible after baking.
Step 4: Bake until the center gently wobbles
Bake the filled cake pan until the outer ring changes from glossy batter into a set creamy surface while the center remains slightly softer. The swirls deepen in color plus the top develops tiny irregular cracks plus the edges rise a little before settling as the cheesecake cools.
Tip: Remove the cheesecake while the center still has a gentle wobble because carryover heat will finish setting the filling.
Step 5: Chill and decorate the cheesecake

Chill the baked cheesecake until the filling changes from soft and warm into a firm sliceable texture and the crust holds cleanly beneath it. Transfer the cheesecake to a serving plate and arrange exactly 8 mini chocolate sandwich cookies plus 12 candy eyes plus two tablespoons Halloween sprinkles unevenly over the top with casual gaps and slight overlap.
Tip: Add the cookies shortly before serving when possible so they stay crisp against the smooth chilled cheesecake surface.
Step 6: Slice and serve one creamy portion

Cut one slice from the chilled cheesecake and place it on a white plate so the dark crust plus creamy filling plus scattered cookie pieces remain clearly visible. The slice should have a slightly uneven tip plus a few loose crumbs plus nonuniform orange and purple streaks while a mini cookie plus candy eye garnish rests naturally on top.
Tip: Use a clean warm knife for each cut while accepting a few crumbs because slight imperfections make the slice look inviting and homemade.
Pro Tips
- Bring the cream cheese plus sour cream plus eggs close to room temperature so the filling blends smoothly without stubborn lumps.
- Break the cookie pieces into mixed sizes so some melt into dark streaks while larger chunks stay visible inside every slice.
- Chill the cheesecake for at least six hours because the filling needs enough time to become firm plus creamy plus easy to cut.
- Keep the Halloween decorations uneven and playful because casual placement creates a more inviting homemade party dessert.
Storage Instructions
Store the cheesecake in the refrigerator within two hours of serving. Cover the whole cake loosely or place individual slices in airtight containers so the filling stays creamy and does not absorb refrigerator odors. The cheesecake keeps well for up to four days. Decorations may soften over time so add extra mini cookies shortly before serving when you want a crisp finish.
For longer storage freeze undecorated slices on a lined tray until firm and then wrap each slice tightly. Place the wrapped slices in a freezer safe container and keep them frozen for up to two months. Thaw frozen cheesecake overnight in the refrigerator. Do not thaw it at room temperature because the exterior can become too soft before the center is fully defrosted.
Frequently Asked Questions
Yes and it tastes even better after chilling overnight so the filling sets firmly and the cookie flavor deepens.
Avoid overmixing the eggs plus bake until the center gently wobbles plus cool the cheesecake gradually.
Yes and undecorated slices freeze well for up to two months when wrapped tightly and thawed overnight.
Classic chocolate sandwich cookies give the strongest contrast plus the most familiar cookies and cream flavor.
See You in the Kitchen
This Halloween Cookies and Cream Cheesecake is a great way to satisfy your spooky dessert cravings without picking up the phone to order something from a bakery.
I typically make Mini Oreo Cheesecake Cups and Chocolate Dipped Strawberry Crackers at the same time I decorate my cheesecake and that way all of my party desserts will be ready at the same time.
Even my kids love this one!
Print
Halloween Cookies and Cream Cheesecake
- Total Time: 7 hours 25 minutes
- Yield: 12 servings
Description
This easy Halloween Cookies and Cream Cheesecake is packed with a quick Oreo crust plus a simple creamy filling plus crushed cookies and festive candy. It is one of the best dessert ideas for a Halloween party plus a holiday potluck plus brunch or meal prep. Although cheesecake is a treat you can create a healthier balance with smaller slices and fresh fruit while still serving a rich homemade dessert that looks spooky and fun.
Ingredients
- 30 cookies divided Chocolate sandwich cookies
- 5 tablespoons melted Unsalted butter
- 24 ounces softened Cream cheese
- 3/4 cup Granulated sugar
- 1/2 cup Sour cream
- 2 teaspoons Vanilla extract
- 3 Large eggs
- 4 drops Orange gel food coloring
- 4 drops Purple gel food coloring
- 8 cookies Mini chocolate sandwich cookies
- 12 pieces Candy eyes
- 2 tablespoons Halloween sprinkles
Instructions
- Crush 22 chocolate sandwich cookies into uneven fine crumbs and combine them with the melted butter until the mixture looks dark plus damp plus clumpy. Press the crumbs into the bottom of the cake pan with slightly thicker areas around the edge so the crust looks compact but naturally imperfect.
- Beat the softened cream cheese with sugar plus sour cream plus vanilla until the mixture changes from thick blocks into a smooth pale cream. Blend in exactly three eggs and then fold in 8 roughly broken chocolate sandwich cookies so dark pieces remain scattered through the filling instead of disappearing completely.
- Pour most of the cookie filled batter over the pressed crust and spread it loosely so the surface settles into gentle uneven waves. Tint two small portions orange and purple and drop them across the pale filling before swirling them together just enough to create visible ribbons without blending the colors into one shade.
- Bake the filled cake pan until the outer ring changes from glossy batter into a set creamy surface while the center remains slightly softer. The swirls deepen in color plus the top develops tiny irregular cracks plus the edges rise a little before settling as the cheesecake cools.
- Chill the baked cheesecake until the filling changes from soft and warm into a firm sliceable texture and the crust holds cleanly beneath it. Transfer the cheesecake to a serving plate and arrange exactly 8 mini chocolate sandwich cookies plus 12 candy eyes plus two tablespoons Halloween sprinkles unevenly over the top with casual gaps and slight overlap.
- Cut one slice from the chilled cheesecake and place it on a white plate so the dark crust plus creamy filling plus scattered cookie pieces remain clearly visible. The slice should have a slightly uneven tip plus a few loose crumbs plus nonuniform orange and purple streaks while a mini cookie plus candy eye garnish rests naturally on top.
Notes
Pro Tips:
- Bring the cream cheese plus sour cream plus eggs close to room temperature so the filling blends smoothly without stubborn lumps.
- Break the cookie pieces into mixed sizes so some melt into dark streaks while larger chunks stay visible inside every slice.
- Chill the cheesecake for at least six hours because the filling needs enough time to become firm plus creamy plus easy to cut.
- Keep the Halloween decorations uneven and playful because casual placement creates a more inviting homemade party dessert.
Storage: Store the cheesecake in the refrigerator within two hours of serving. Cover the whole cake loosely or place individual slices in airtight containers so the filling stays creamy and does not absorb refrigerator odors. The cheesecake keeps well for up to four days. Decorations may soften over time so add extra mini cookies shortly before serving when you want a crisp finish. For longer storage freeze undecorated slices on a lined tray until firm and then wrap each slice tightly. Place the wrapped slices in a freezer safe container and keep them frozen for up to two months. Thaw frozen cheesecake overnight in the refrigerator. Do not thaw it at room temperature because the exterior can become too soft before the center is fully defrosted.
- Prep Time: 30 minutes
- Cook Time: 55 minutes
- Category: Dessert
- Cuisine: American