


Our family discovered this CrockPot Cheesesteak Tortellini during the height of summer. Our boys were hosting a cousin from Detroit at our remote lake cottage where they frolicked in the lake during the day and toasted marshmallows around the bonfire every night.
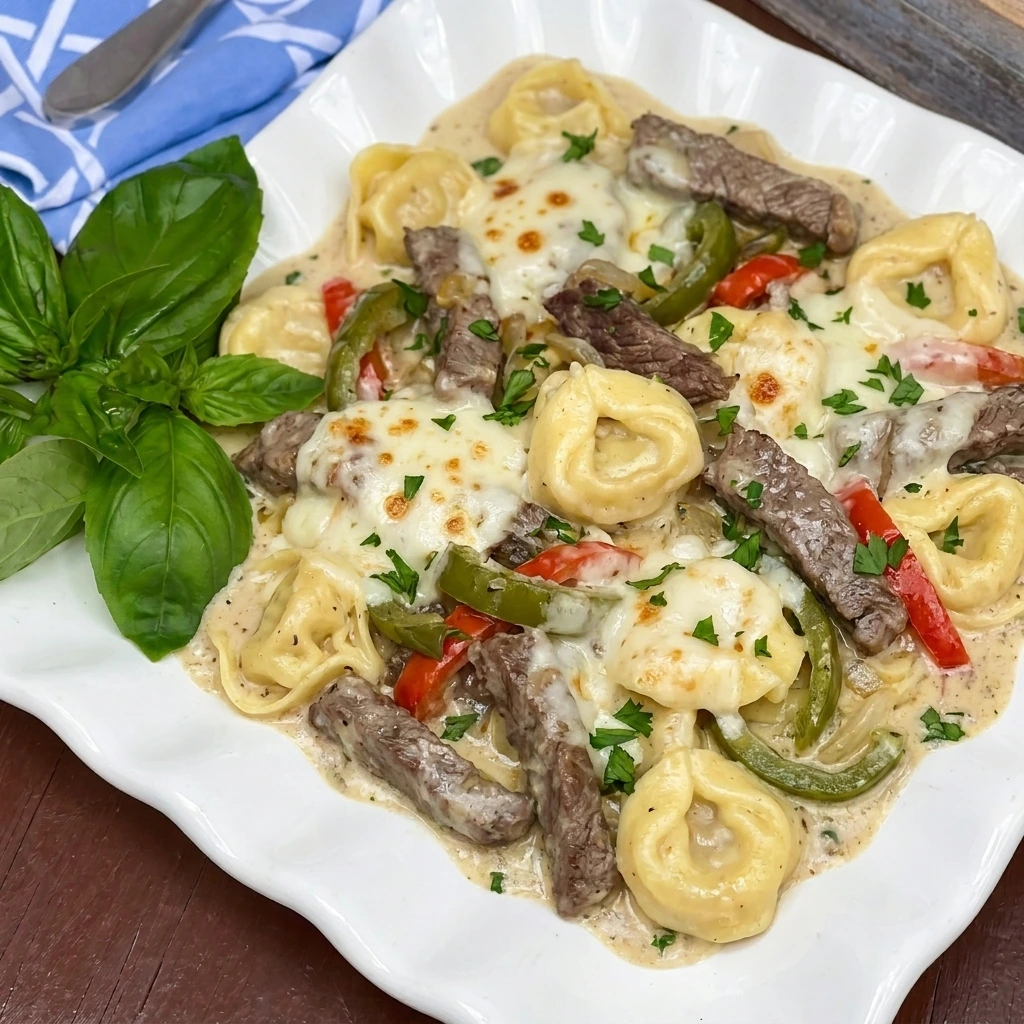
That was one of my best weeks of the year and this easy slow cooker dinner quickly became one of my favorite cheesesteak recipes. We sometimes served Cheesy Garlic Bread Dippers beside it because the crisp edges were perfect for catching the creamy sauce.
I will never forget the first time I made this and the look on the kids’ faces when they tasted it. Read on as I show you how to make this unforgettable family dinner.
Ingredients

Here is what I use for this recipe and you can adjust nuts or spices based on preference:
- Shaved beef steak: Provides tender savory strips that create the classic cheesesteak flavor.
- Refrigerated cheese tortellini: Adds tender pasta pockets filled with rich cheese and gives the dish its hearty structure.
- Green bell pepper: Adds fresh pepper flavor and a soft green contrast after slow cooking.
- Red bell pepper: Brings mild sweetness and warm color to the finished sauce.
- Yellow onion: Adds natural sweetness and deep savory flavor as it softens.
- Garlic: Builds aromatic depth throughout the creamy beef sauce.
- Olive oil: Helps the beef and vegetables brown without sticking during the first cooking stage.
- Beef broth: Creates the savory liquid base that tenderizes the beef and loosens the sauce.
- Worcestershire sauce: Adds concentrated savory flavor and reinforces the cheesesteak character.
- Italian seasoning: Adds balanced dried herbs that complement the beef and cheese.
- Salt: Enhances the flavors of the beef and vegetables and creamy sauce.
- Black pepper: Adds gentle warmth and a classic peppery finish.
- Cream cheese: Melts into the broth to create a smooth and rich sauce.
- Shredded provolone cheese: Forms the stretchy melted topping associated with a classic cheesesteak.
- Fresh parsley: Adds fresh color and a light herbal finish to the plated dish.
Tools You’ll Need
- Slow cooker: Tenderizes the beef and vegetables while developing the creamy sauce with minimal hands on cooking.
- Cast iron skillet: Browns the beef and vegetables to create deeper flavor before slow cooking.
- Wooden cutting board: Provides a stable surface for slicing the beef and peppers and onion.
- Sharp chef knife: Cuts the beef and vegetables into evenly sized yet naturally irregular pieces.
- Measuring cups and spoons: Measures the broth and seasonings and sauces accurately for a balanced result.
- White serving plates: Holds individual portions and displays the creamy pasta and beef clearly.
Instructions
Step 1: Slice the beef and vegetables

Cut the 1 1/2 pounds of shaved beef into irregular bite sized strips so the pieces cook evenly while keeping a natural homemade shape. Slice the green bell pepper and red bell pepper into uneven strips and slice the yellow onion into thin curved pieces. Mince the three garlic cloves so they can blend into the sauce during cooking.
Tip: Keep the beef and pepper strips similar in thickness so they soften evenly while still looking naturally irregular.
Step 2: Brown the beef with peppers and onions

Combine the beef strips and both sliced peppers and the onion with the olive oil. Cook until the beef changes from red to browned while a few edges develop deeper color. Let the vegetables soften slightly while keeping some visible shape. The onions should become glossy and the ingredients should shift and overlap as they cook together.
Tip: Brown the beef in a loose layer so the edges caramelize instead of releasing too much liquid and steaming.
Step 3: Slow cook the creamy beef mixture

Transfer the browned beef and vegetables into the slow cooker insert. Pour in the beef broth and Worcestershire sauce before adding the minced garlic and Italian seasoning and salt and black pepper. Scatter the cream cheese cubes across the mixture and cook until the beef is tender and the vegetables are fully softened. Fold the melted cream cheese into the broth until the sauce becomes pale and creamy with visible beef and peppers throughout.
Tip: Cut the cream cheese into small cubes so it melts evenly and blends into the broth without leaving large white pockets.
Step 4: Fold in the cheese tortellini

Add all 20 ounces of refrigerated cheese tortellini to the creamy beef mixture. Fold the pasta through the sauce so some tortellini remain visible while others settle beneath the beef and vegetables. Continue cooking until the tortellini become plump and tender. The sauce should thicken slightly as it clings to the curved pasta and fills the spaces between the irregular beef strips.
Tip: Add refrigerated tortellini near the end so the pasta becomes tender without turning overly soft or splitting apart.
Step 5: Melt the provolone over the tortellini
Scatter the full cup of shredded provolone unevenly over the hot tortellini and beef. Leave small gaps where the creamy sauce and colorful peppers can remain visible. Cover briefly until the provolone melts into stretchy uneven patches. A few areas should appear lightly golden while other areas remain pale and soft for a natural homemade finish.
Tip: Scatter the provolone loosely instead of packing it down so the melted topping keeps visible pockets of beef and pasta.
Step 6: Plate and garnish one portion

Scoop one generous portion onto a white plate so the plump tortellini and tender beef strips remain visible beneath the melted provolone. Let the sauce settle naturally around the pasta. Finish with the chopped parsley and leave the serving casually arranged. Show varied tortellini angles and uneven cheese stretches and nonuniform pepper pieces for a realistic homemade result.
Tip: Let the finished dish rest briefly before serving so the creamy sauce thickens enough to cling to every tortellini.
Pro Tips
- Use thin shaved beef because it becomes tender quickly and blends naturally with the curved cheese filled tortellini.
- Brown the beef and vegetables before slow cooking because this adds deeper flavor and prevents a pale watery filling.
- Wait until the final cooking stage to add refrigerated tortellini so the pasta stays plump and does not become mushy.
- Rest the finished dish for five minutes before serving so the creamy sauce thickens and coats the pasta more evenly.
Storage Instructions
Cool leftover CrockPot Cheesesteak Tortellini before transferring it into a sealed food storage container. Refrigerate it within two hours and keep it chilled for up to three days. Reheat individual portions gently until the beef and tortellini are hot throughout. Add a small splash of beef broth if the sauce has thickened too much during refrigeration. Freezing is possible although the tortellini may soften after thawing.
Store cooled portions in freezer safe containers for up to two months and thaw them overnight in the refrigerator. Keep fresh parsley separate when possible and add it after reheating. This preserves its brighter color and cleaner herbal flavor.
Frequently Asked Questions
Yes. Brown one and a half pounds of ground beef first and drain excess fat before slow cooking.
Yes. Add frozen tortellini earlier and allow extra cooking time until every pasta pocket is tender.
Brown the beef first and use full fat cream cheese before resting the finished dish for five minutes.
Provolone gives the most classic flavor although mozzarella or white American cheese also melts well.
See You in the Kitchen
I hope you try this CrockPot Cheesesteak Tortellini soon!
It’s a simple recipe that looks beautiful and tastes incredible and makes every weeknight dinner a little more special.
Don’t forget to share your results or save this recipe for later and serve it with Mini Mozzarella Stuffed Pretzel Bites or Chicken Bacon Ranch Pinwheels because it is one worth keeping.
Print
CrockPot Cheesesteak Tortellini
- Total Time: 3 hours 35 minutes
- Yield: 4 servings
Description
CrockPot Cheesesteak Tortellini is an easy dinner packed with tender beef and peppers and onions plus cheese filled pasta in a creamy sauce. This quick and simple comfort food is one of the best ideas for a busy weeknight dinner and it also works for meal prep or a casual party. Serve it with a healthy green salad for balance and enjoy a rich homemade meal with little hands on work. It is cozy enough for a holiday potluck yet practical enough for an ordinary family evening.
Ingredients
- 1 1/2 pounds Shaved beef steak
- 20 ounces Refrigerated cheese tortellini
- 1 large Green bell pepper
- 1 large Red bell pepper
- 1 medium Yellow onion
- 3 cloves Garlic
- 1 tablespoon Olive oil
- 2 cups Beef broth
- 1 tablespoon Worcestershire sauce
- 1 teaspoon Italian seasoning
- 1/2 teaspoon Salt
- 1/2 teaspoon Black pepper
- 8 ounces cubed Cream cheese
- 1 cup Shredded provolone cheese
- 2 tablespoons chopped Fresh parsley
Instructions
- Cut the 1 1/2 pounds of shaved beef into irregular bite sized strips so the pieces cook evenly while keeping a natural homemade shape. Slice the green bell pepper and red bell pepper into uneven strips and slice the yellow onion into thin curved pieces. Mince the three garlic cloves so they can blend into the sauce during cooking.
- Combine the beef strips and both sliced peppers and the onion with the olive oil. Cook until the beef changes from red to browned while a few edges develop deeper color. Let the vegetables soften slightly while keeping some visible shape. The onions should become glossy and the ingredients should shift and overlap as they cook together.
- Transfer the browned beef and vegetables into the slow cooker insert. Pour in the beef broth and Worcestershire sauce before adding the minced garlic and Italian seasoning and salt and black pepper. Scatter the cream cheese cubes across the mixture and cook until the beef is tender and the vegetables are fully softened. Fold the melted cream cheese into the broth until the sauce becomes pale and creamy with visible beef and peppers throughout.
- Add all 20 ounces of refrigerated cheese tortellini to the creamy beef mixture. Fold the pasta through the sauce so some tortellini remain visible while others settle beneath the beef and vegetables. Continue cooking until the tortellini become plump and tender. The sauce should thicken slightly as it clings to the curved pasta and fills the spaces between the irregular beef strips.
- Scatter the full cup of shredded provolone unevenly over the hot tortellini and beef. Leave small gaps where the creamy sauce and colorful peppers can remain visible. Cover briefly until the provolone melts into stretchy uneven patches. A few areas should appear lightly golden while other areas remain pale and soft for a natural homemade finish.
- Scoop one generous portion onto a white plate so the plump tortellini and tender beef strips remain visible beneath the melted provolone. Let the sauce settle naturally around the pasta. Finish with the chopped parsley and leave the serving casually arranged. Show varied tortellini angles and uneven cheese stretches and nonuniform pepper pieces for a realistic homemade result.
Notes
Pro Tips:
- Use thin shaved beef because it becomes tender quickly and blends naturally with the curved cheese filled tortellini.
- Brown the beef and vegetables before slow cooking because this adds deeper flavor and prevents a pale watery filling.
- Wait until the final cooking stage to add refrigerated tortellini so the pasta stays plump and does not become mushy.
- Rest the finished dish for five minutes before serving so the creamy sauce thickens and coats the pasta more evenly.
Storage: Cool leftover CrockPot Cheesesteak Tortellini before transferring it into a sealed food storage container. Refrigerate it within two hours and keep it chilled for up to three days. Reheat individual portions gently until the beef and tortellini are hot throughout. Add a small splash of beef broth if the sauce has thickened too much during refrigeration. Freezing is possible although the tortellini may soften after thawing. Store cooled portions in freezer safe containers for up to two months and thaw them overnight in the refrigerator. Keep fresh parsley separate when possible and add it after reheating. This preserves its brighter color and cleaner herbal flavor.
- Prep Time: 20 minutes
- Cook Time: 3 hours 15 minutes
- Category: Dinner
- Cuisine: American


